双目标定
参数介绍
相机标定主要是为了获取左右相机的内参矩阵、畸变系数、旋转矩阵和平移向量,方便后续对获得的图像进行畸变矫正和图像对齐。
内参矩阵是描述相机内在参数的3x3矩阵,包含了相机的焦距和光学中心的位置。这些参数定义了相机的成像过程中的投影关系,内参矩阵一般表示为:
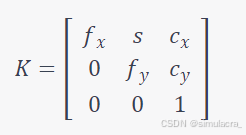
其中:
- fx 和 fy 是焦距(以像素为单位),分别对应x和y方向。
- cx 和 cy 是光学中心(主点),即图像的中心点。
- s称为视向畸变系数,它用于校正图像中的非正交性,通常表示相机的非正交性,即像素在图像平面上的非直角投影。
畸变系数用于描述镜头的畸变情况,通常包括径向畸变和切向畸变,通常表示为[k1 k2 p1 p2 k3],
其中:
- k1,k2,k3 是径向畸变系数。
- p1,p2 是切向畸变系数。
旋转矩阵用于描述两个相机之间的旋转关系,是一个3x3矩阵,表示从右相机坐标系到左相机坐标系的旋转。
平移向量用于描述两个相机之间的平移关系,是一个3x1向量,表示从右相机到左相机的平移量。
镜头畸变主要分为径向畸变和切向畸变。径向畸变使得图像的直线变成弯曲的曲线,特别是在图像的边缘区域,常见于鱼眼镜头等广角镜头;切向畸变使得图像中的点在两个方向上都发生位移,通常是由于相机镜头和图像传感器不完全平行导致的。通过内参矩阵和畸变系数,可以消除图像中的径向和切向畸变,使图像中的直线恢复为直线。
图像对齐是为了确保双目相机拍摄的图像对齐,即每一对图像中的相同点在两幅图像中的垂直位置是相同的,使得每个像素行在两个图像中的位置相同,从而方便后续的立体匹配和深度计算。
标定步骤
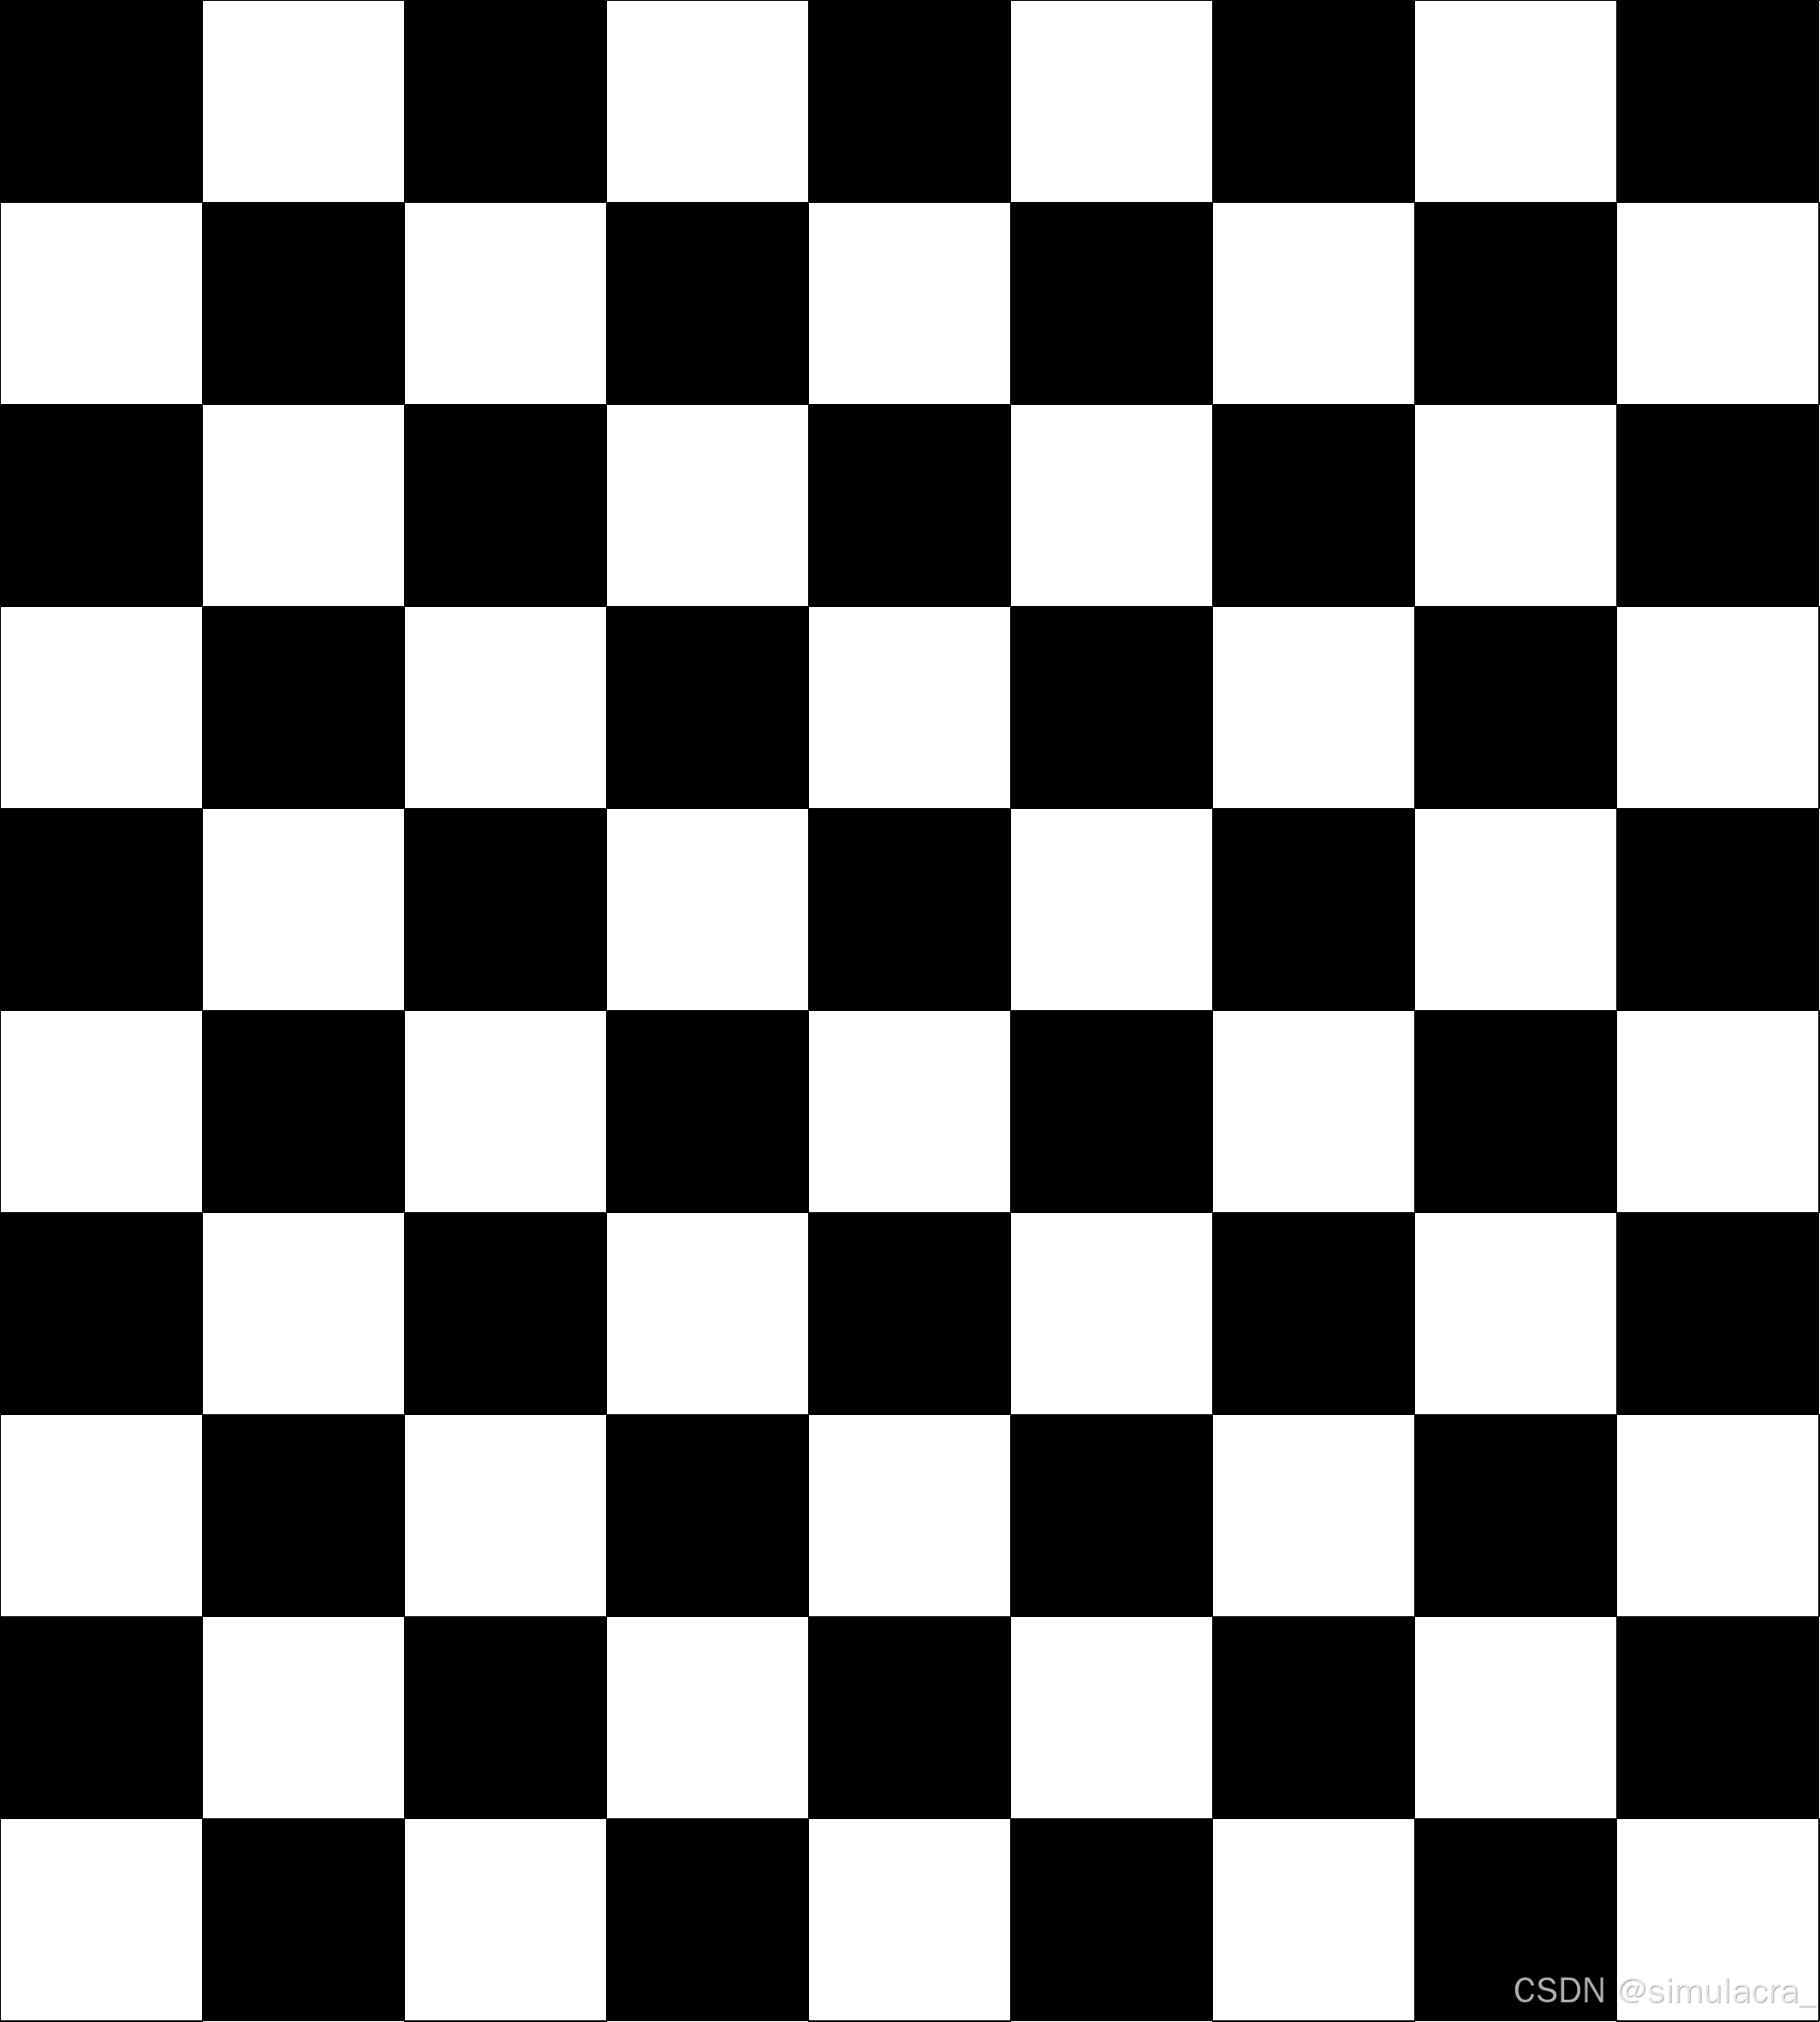
- 标定采用的黑白棋盘格单元格长度最好为2cm,且棋盘格格数最好为奇数*偶数,我采用的标定板为如图所示的a4纸打印的9*10的黑白棋盘格,标定棋盘格如果太大(如a3)会导致无法保证棋盘格在视野的各个位置(上下左右中)都出现在视野范围内。
- 标定使用的照片20张左右为宜,不是越多越好。
- 图片拍摄中要尽可能在相机视野范围的各个位置都出现(可以将视野划分为九宫格,每个格子都要保证有出现过标定板)拍摄的背景尽可能整洁不要有太多干扰物,同时也要有角度的变化(标定板跟相机的夹角最大不超过30度)。
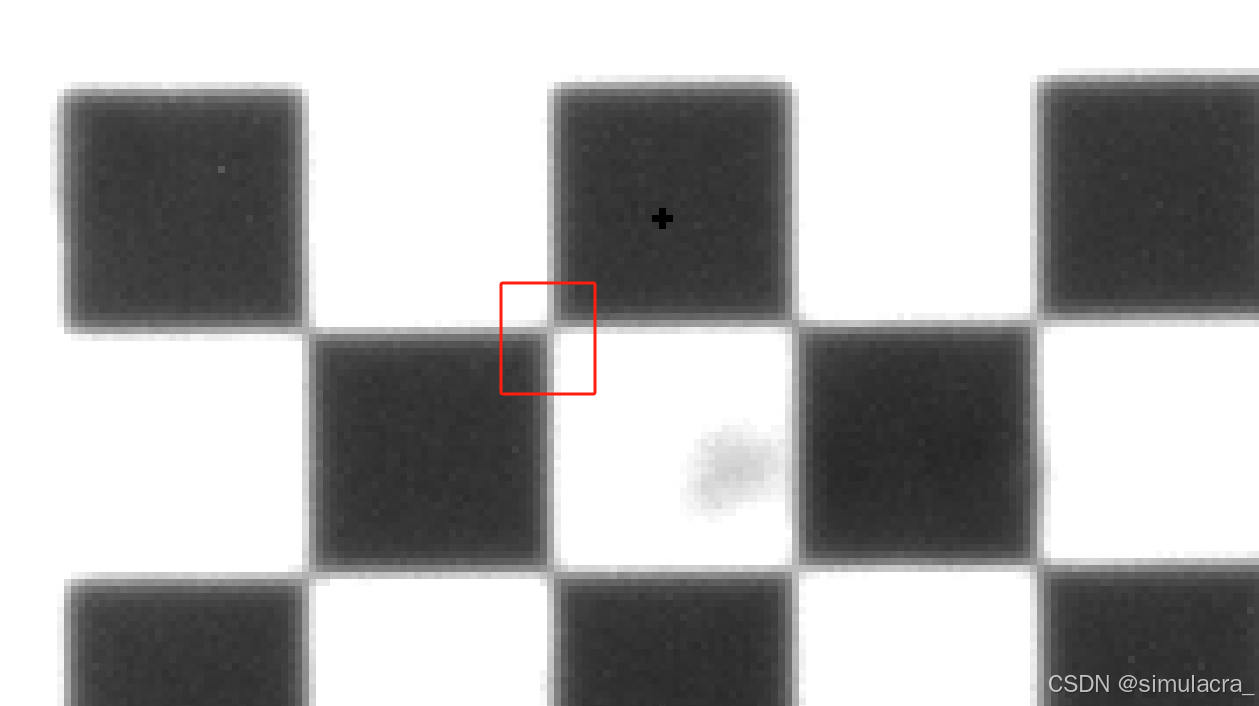
- 拍摄时固定相机位置旋转标定板,光线对标定效果影响很大,如果标定效果不理想可以多打光,可以使角点更容易识别,角点的梯度边缘占的像素3-4还可以,1-2算不错,双目相机如果没有自带的拍照软件可以拍照后在电脑的画图中将图片放大800%以上,也可以看到角点的像素。下图为示例,其中一个块就是一个像素点。
- 得到标定图片后,打开matlab 上方的工具栏app,找到图像处理和计算机视觉下的stereo camera calibration工具,打开并将左右相机的图片导入,一般要求平均像素误差在0.1左右
如果双目相机没有自带的拍照软件,可以采用如下python代码实现拍照和保存照片: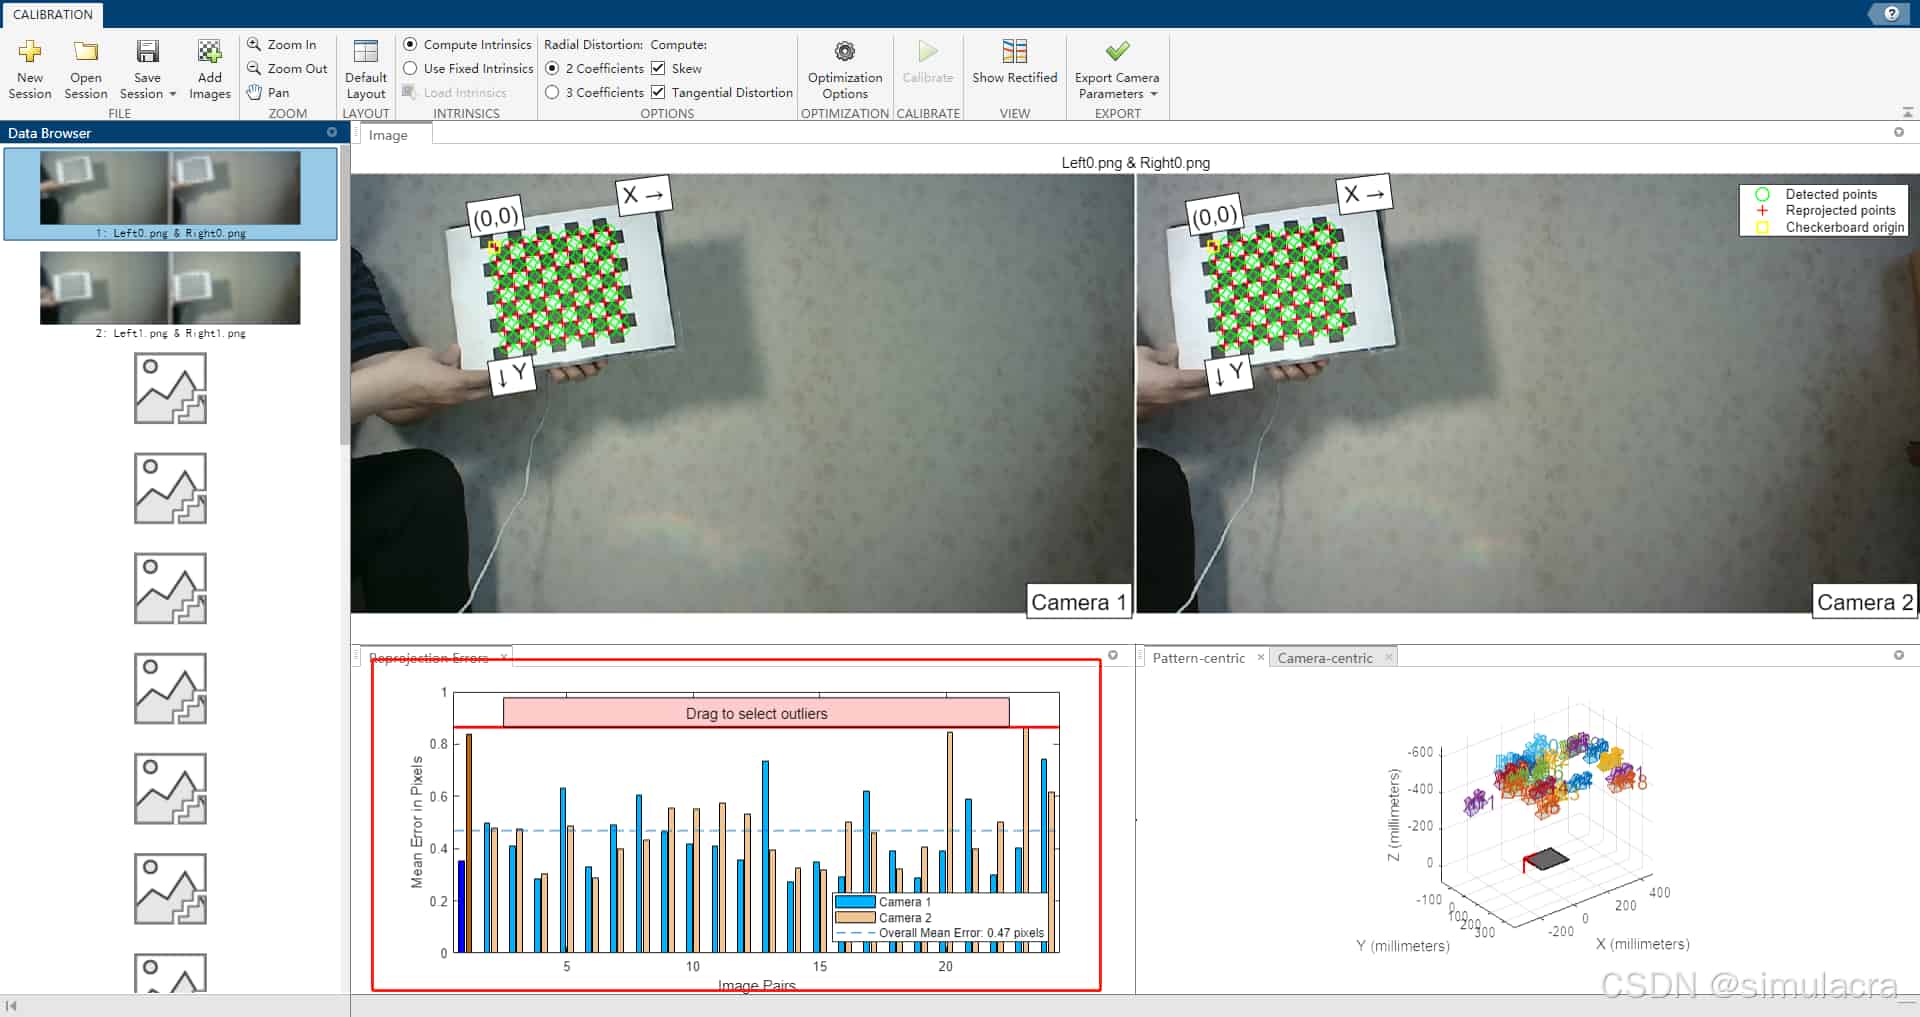
import cv2
imagewidth = 1280
imageheight = 720

cap = cv2.videocapture(1)

# 检查和设置摄像头分辨率
print("setting camera resolution to:", imagewidth * 2, "x", imageheight)
cap.set(cv2.cap_prop_frame_width, imagewidth * 2)
cap.set(cv2.cap_prop_frame_height, imageheight)

# 读取设置后实际的分辨率
actual_width = cap.get(cv2.cap_prop_frame_width)
actual_height = cap.get(cv2.cap_prop_frame_height)
print("actual resolution set:", actual_width, "x", actual_height)

i = 0

if not cap.isopened():
    print("error: could not open video capture.")
    exit()

while true:
    success, img = cap.read()
    if success:
        print(f"captured image shape: {img.shape}")

        # 检查图像分辨率
        if img.shape[1] >= imagewidth * 2 and img.shape[0] >= imageheight:
            rgbimagel = img[:, 0:imagewidth, :]
            rgbimager = img[:, imagewidth:imagewidth * 2, :]
            cv2.imshow('left', rgbimagel)
            cv2.imshow('right', rgbimager)

            c = cv2.waitkey(1) & 0xff
            if c == 13:  # enter键
                cv2.imwrite('left%d.png' % i, rgbimagel)
                cv2.imwrite('right%d.png' % i, rgbimager)
                print("save %d image" % i)
                i += 1
            elif c == 27:  # esc键
                break
        else:
            print("captured image width is less than expected.")

cap.release()
cv2.destroyallwindows()
双目测距
代码
获取标定的参数后,导入需要的库,并保存左右相机的内参矩阵、畸变系数等:
import cv2
import numpy as np
import time
import random
import math

# 左镜头的内参,如焦距
left_camera_matrix = np.array([[676.6671663839634,-1.444673028,596.1585382374480],[0,682.0928218925224,335.1990227822088],[0.,0.,1.]])
right_camera_matrix = np.array([[691.0595574749669,-1.872845542285230,562.1201347823666],[0,693.9359720639367,331.4063679099969],[0.,0.,1.]])

# 畸变系数,k1、k2、k3为径向畸变,p1、p2为切向畸变
left_distortion = np.array([[0.0979,-0.1404, -2.3303e-04,5.1338e-04,0]])
right_distortion = np.array([[0.1060,-0.1630,1.9053e-04,-0.0029,0]])

# 旋转矩阵
r = np.array([[1.0000,1.7793e-04,-0.0041],
              [-1.6645e-04,1.0000,0.0028],
              [0.0041,-0.0028,1.0000]])
# 平移矩阵
t = np.array([-57.4647,0.5090,8.6217])

size = (1280, 720)
进行双目校正,生成校正后的投影矩阵和重投影矩阵,通过 cv2.stereorectify 计算得到的校正旋转矩阵(r1、r2)和投影矩阵(p1、p2),重新映射图像,使左右图像对齐。使用 cv2.initundistortrectifymap 生成的映射表对原始图像进行重新映射,生成查找映射表,用于将原始图像上的点映射到校正后的图像上。并定义鼠标回调函数,当鼠标左键点击时,输出点击处的像素坐标及其对应的世界坐标:
r1, r2, p1, p2, q, validpixroi1, validpixroi2 = cv2.stereorectify(left_camera_matrix, left_distortion,
                                                                  right_camera_matrix, right_distortion, size, r,
                                                                  t)

# 校正查找映射表,将原始图像和校正后的图像上的点一一对应起来
left_map1, left_map2 = cv2.initundistortrectifymap(left_camera_matrix, left_distortion, r1, p1, size, cv2.cv_16sc2)
right_map1, right_map2 = cv2.initundistortrectifymap(right_camera_matrix, right_distortion, r2, p2, size, cv2.cv_16sc2)
print(q)

# --------------------------鼠标回调函数----------------------------------------------------
#   event               鼠标事件
#   param               输入参数
# -----------------------------------------------------------------------------------------
def onmouse_pick_points(event, x, y, flags, param):
    if event == cv2.event_lbuttondown:
        threed = param
        print('\n像素坐标 x = %d, y = %d' % (x, y))
        # print("世界坐标是:", threed[y][x][0], threed[y][x][1], threed[y][x][2], "mm")
        print("世界坐标xyz 是:", threed[y][x][0] / 1000.0, threed[y][x][1] / 1000.0, threed[y][x][2] / 1000.0, "m")

        distance = math.sqrt(threed[y][x][0] ** 2 + threed[y][x][1] ** 2 + threed[y][x][2] ** 2)
        distance = distance / 1000.0  # mm -> m
        print("距离是:", distance, "m")
初始化视频捕获,设置窗口名称和分辨率,并检查摄像头是否成功打开:
capture = cv2.videocapture(1)
win_name = 'deep disp'
cv2.namedwindow(win_name, cv2.window_autosize)
imagewidth = 1280
imageheight = 720
print("setting camera resolution to:", imagewidth * 2, "x", imageheight)
capture.set(cv2.cap_prop_frame_width, imagewidth * 2)
capture.set(cv2.cap_prop_frame_height, imageheight)

actual_width = capture.get(cv2.cap_prop_frame_width)
actual_height = capture.get(cv2.cap_prop_frame_height)
print("actual resolution set:", actual_width, "x", actual_height)

if not capture.isopened():
    print("error: could not open video capture.")
    exit()
开始视频捕获,读取帧并将其分割成左右图像,然后将图像转换为灰度图,进行校正并转换回 bgr 格式:
while true:
    t1 = time.time()
    ret, frame = capture.read()
    if not ret:
        print(f"captured no image")
    frame1 = frame[0:720, 0:1280]
    frame2 = frame[0:720, 1280:2560]
    imgl = cv2.cvtcolor(frame1, cv2.color_bgr2gray)
    imgr = cv2.cvtcolor(frame2, cv2.color_bgr2gray)

    img1_rectified = cv2.remap(imgl, left_map1, left_map2, cv2.inter_linear)
    img2_rectified = cv2.remap(imgr, right_map1, right_map2, cv2.inter_linear)

    imagel = cv2.cvtcolor(img1_rectified, cv2.color_gray2bgr)
    imager = cv2.cvtcolor(img2_rectified, cv2.color_gray2bgr)
创建和配置 sgbm(半全局块匹配)算法对象并计算视差图,对视差图进行归一化处理,生成灰度图和颜色图(之后若有空会更新sgbm算法的详细介绍和该函数各参数含义):
    blocksize = 3
    img_channels = 3
    stereo = cv2.stereosgbm_create(mindisparity=1,
                                   numdisparities=64,
                                   blocksize=blocksize,
                                   p1=8 * img_channels * blocksize * blocksize,
                                   p2=32 * img_channels * blocksize * blocksize,
                                   disp12maxdiff=-1,
                                   prefiltercap=1,
                                   uniquenessratio=10,
                                   specklewindowsize=100,
                                   specklerange=100,
                                   mode=cv2.stereo_sgbm_mode_hh)
    # 计算视差
    disparity = stereo.compute(img1_rectified, img2_rectified)

    # 归一化函数算法,生成深度图(灰度图)
    disp = cv2.normalize(disparity, disparity, alpha=0, beta=255, norm_type=cv2.norm_minmax, dtype=cv2.cv_8u)

    # 生成深度图(颜色图)
    dis_color = disparity
    dis_color = cv2.normalize(dis_color, none, alpha=0, beta=255, norm_type=cv2.norm_minmax, dtype=cv2.cv_8u)
    dis_color = cv2.applycolormap(dis_color, 2)
计算三维坐标数据,将其乘以16以获得实际距离。显示深度图和左图像,并设置鼠标回调函数,当按下 q 键时退出循环:
    threed = cv2.reprojectimageto3d(disparity, q, handlemissingvalues=true)
    threed = threed * 16

    cv2.imshow("depth", dis_color)
    cv2.setmousecallback("depth", onmouse_pick_points, threed)

    cv2.imshow("left", frame1)
    cv2.imshow(win_name, disp)
    if cv2.waitkey(1) & 0xff == ord('q'):
        break
capture.release()
cv2.destroyallwindows()
运行效果
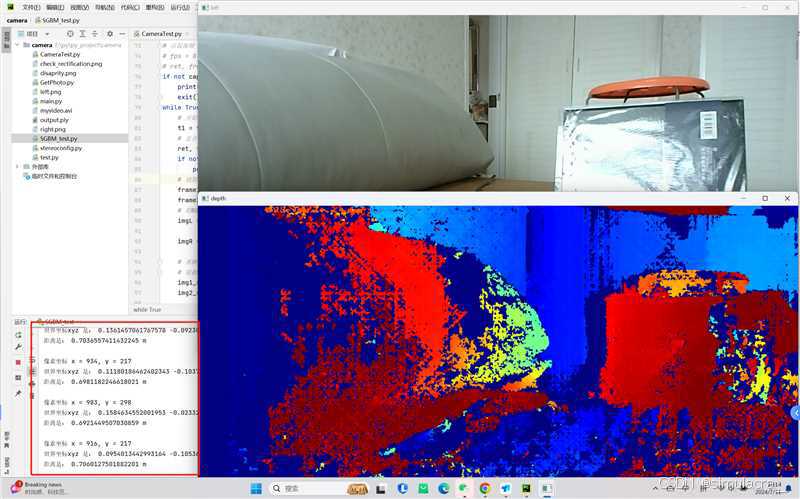
运行后可以得到三个窗口,分别为相机视角,深度图和三维建模图,点击深度图可以显示点击点的三维坐标距离,具体效果如图:
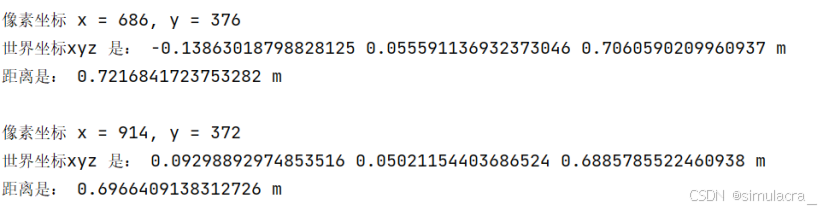
测量距离摄像头73cm左右的长24cm的平板电脑长边的两个顶点运行结果如图所示:
总结
到此这篇关于双目测距python实现方法的文章就介绍到这了,更多相关双目测距python实现内容请搜索代码网以前的文章或继续浏览下面的相关文章希望大家以后多多支持代码网!


发表评论