全文搜索elasticsearch是什么
lucene:java实现的搜索引擎类库
- 易扩展
- 高性能
- 仅限java开发
- 不支持水平扩展
elasticsearch:基于lucene开发的分布式搜索和分析引擎
- 支持分布式、水平扩展
- 提高restfulapi,可被任何语言调用
elastic stack是什么
elk(elastic stack):elasticsearch结合kibana、logstash、beats实现日志数据分析、实时监控
elasticsearch:负责存储、搜索、分析数据kibana:数据可视化logstash、beats:数据抓取(一般用debezium、flink、risingwave…)
elasticsearch能做什么
实时数据分析:支持对实时数据进行索引和分析,可快速处理大量的日志、指标和事件数据
实时监控:对系统指标、业务数据和用户行为进行实时监控
电商搜索:为电商平台提供商品搜索功能,帮助用户快速找到所需的商品
知识库搜索:为企业内部的文档、知识库和业务数据提供搜索功能,提高员工的工作效率
elasticsearch 索引
传统数据库使用正向索引,依据id构建b+树,根据索引id查快,对于非索引文档如商品描述查需要全表扫描
倒排索引:将文档分为词条和id进行存储,先查文档获取id,再根据id查数据库
- 文档(document):每条数据就是一个json文档
- 词条(term):文档按语义分成的词语
索引(index):相同类型文档的集合
映射(mapping):索引中的文档约束信息
字段(fielf):json文档中的字段
dsl:json风格的请求语句,用来实现crud
docker安装elasticsearch、kibana、ik
1、先创建自定义网络
使用默认
bridge只能通过ip通信,这里加入了自定义网络,自定义网络可以自动解析容器名
- docker network ls查看已有网络
- 创建自定义网络docker network create pub-network
- 手动连接网络docker network connect pub-network container_name_or_id
- 删除网络docker network rm network_name_or_idid
2、创建文件夹
mkdir -p /opt/es/data
mkdir -p /opt/es/plugins
mkdir -p /opt/es/logs
3、授权
chmod -r 777 /opt/es/data
chmod -r 777 /opt/es/logs
安装ik分词器
由于es对中文分词无法理解语义,需要ik插件
https://release.infinilabs.com/analysis-ik/stable/
elasticsearch、kibana、ik所有版本保持一致,解压后使用shell工具将整个文件夹上传到/opt/es/plugins
离线部署elasticsearch、kibana
在能访问的地方拉取镜像
docker pull elasticsearch:8.15.2
docker pull kibana:8.15.2
这里使用wsl,wsl进入wsl,然后进入win的d盘
cd /mnt/d
打包镜像,这个文件可以在win d盘找到
docker save elasticsearch:8.15.2 > elasticsearch.tar
docker save kibana:8.15.2 > kibana.tar
使用shell工具如windterm上传文件
加载镜像
docker load -i elasticsearch.tar
docker load -i kibana.tar
查看镜像
docker images
然后命令部署或者docker-compose部署即可
命令部署elasticsearch、kibana
部署elasticsearch
docker run -d \
--name es \
--network pub-network \
--restart always \
-p 9200:9200 \
-p 9300:9300 \
-e "xpack.security.enabled=false" \
-e "discovery.type=single-node" \
-e "http.cors.enabled=true" \
-e "http.cors.allow-origin:*" \
-e "es_java_opts=-xms512m -xmx512m" \
-v /opt/es/data:/usr/share/elasticsearch/data \
-v /opt/es/plugins:/usr/share/elasticsearch/plugins \
-v /opt/es/logs:/usr/share/elasticsearch/logs \
--privileged=true \
elasticsearch:8.15.2
xpack.security.enabled=false禁用密码登录
如果要使用token: -e "xpack.security.enrollment.enabled=true" \
docker部署一般用于开发,不要为难自己,使用token会有很多问题,生产环境再开,使用ssl需要证书
部署kibana
docker run -d \
--name kibana \
--network pub-network \
--restart always \
-p 5601:5601 \
-e csp_strict=false \
-e i18n_locale=zh-cn \
kibana:8.15.2
报错kibana 服务器尚未准备就绪,是因为配置了elasticsearch_hosts
docker-compose部署elasticsearch、kibana
  es:
    image: elasticsearch:8.15.2
    container_name: es
    network_mode: pub-network
    restart: always
    ports:
      # 9200:对外暴露的端口
      - 9200:9200
      # 9300:节点间通信端口
      - 9300:9300
    environment:
      # 禁用密码登录
      xpack.security.enabled: 'false'
      # 单节点运行
      discovery.type: single-node
      # 允许跨域
      http.cors.enabled: 'true'
      # 允许所有访问
      http.cors.allow-origin: '*'
      # 堆内存大小
      es_java_opts: '-xms512m -xmx512m'
    volumes:
      # 数据挂载
      - /opt/es/data:/usr/share/elasticsearch/data
      # 插件挂载
      - /opt/es/plugins:/usr/share/elasticsearch/plugins
      # 日志挂载
      - /opt/es/logs:/usr/share/elasticsearch/logs
    # 允许root用户运行
    privileged: true
  kibana:
    image: kibana:8.15.2
    container_name: kibana
    network_mode: pub-network
    restart: always
    ports:
      - 5601:5601
    environment:
      # 禁用安全检查
      csp_strict: 'false'
      # 设置中文
      i18n_locale: zh-cn
networks:
  pub-network:
    name: pub-network
部署
docker-compose up -d
删除elasticsearch、kibana
docker rm -f es
docker rm -f kibana
开启安全配置(可选,如果要用密码和token)
es8开始需要密码访问,kibana通过token访问
# 生成密码
docker exec -it es /usr/share/elasticsearch/bin/elasticsearch-reset-password -u elastic
# 生成kibana访问token
docker exec -it es /usr/share/elasticsearch/bin/elasticsearch-create-enrollment-token -s kibana
访问elasticsearch、kibana
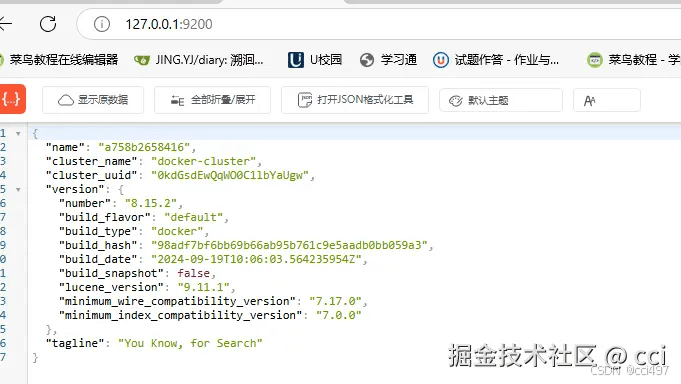
elasticsearch:127.0.0.1:9200,看到以下界面就部署成功了
kibana:127.0.0.1:5601看到以下界面就部署成功了
访问:http://127.0.0.1:9200/.kibana跨域查看有没有发现可视化工具kibana
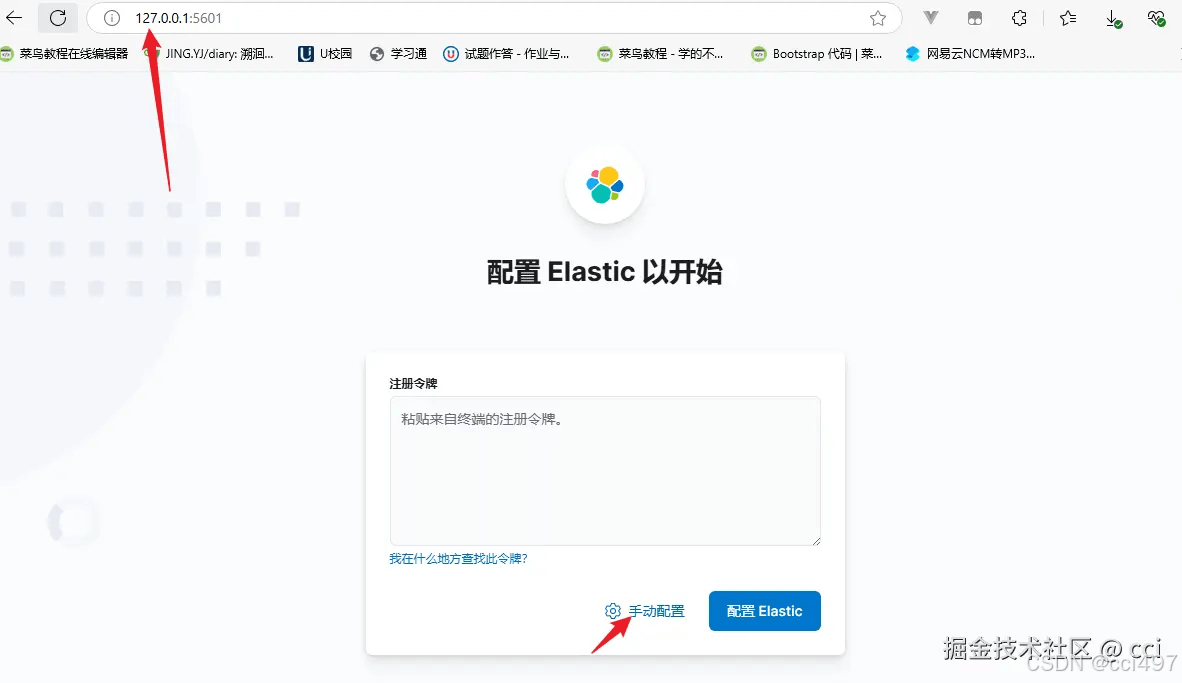
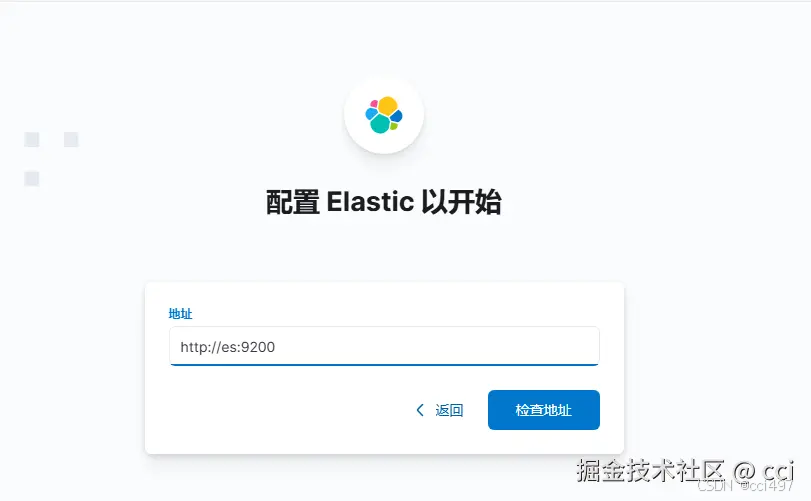
我们选择手动配置,使用http://es:9200,我们没有配置ssl只能用http,容器名为es
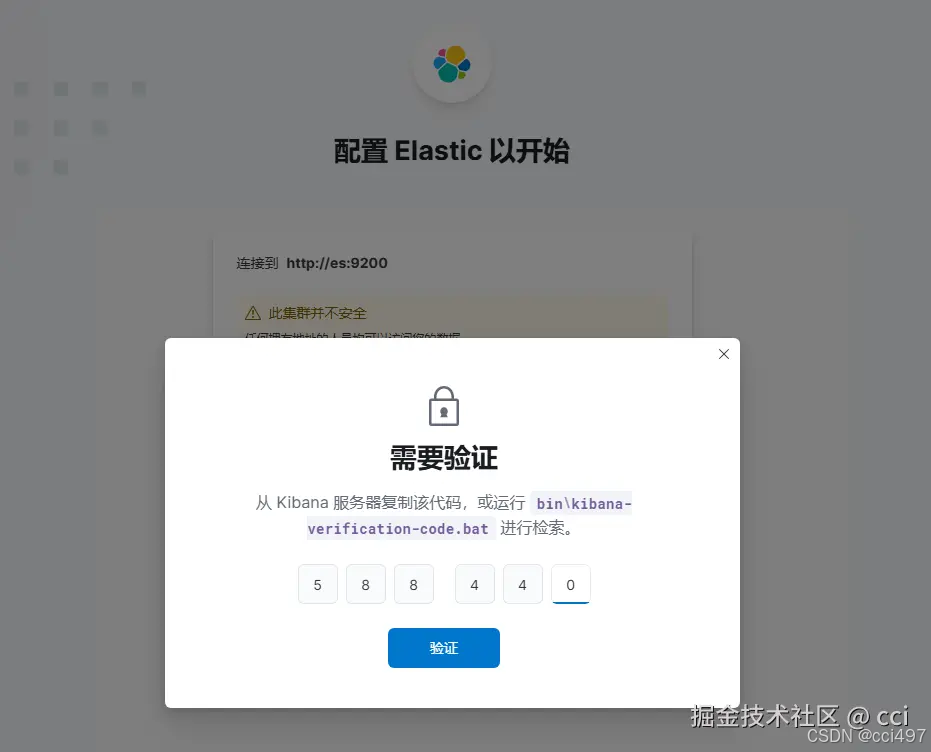
在终端运行命令查看日志中的验证码
docker logs kibana
使用
get /_analyze
{
  "analyzer": "ik_max_word",
  "text": "好好学习天天向上"
}如果一个字为一个词条,就说明分词插件ik没装好,重新安装后重启容器docker restart es
分词原理
依据字典进行分词
对于一些新词语,如铝合金键盘被称为“铝坨坨”,词典中没有这个词语,会将其逐字分词
分词流程
- 1、
character filters:字符过滤器,进行原始处理,如转换编码、去停用词、转小写 - 2、
tokenizer:分词器,将文本流进行分词为词条 - 3、
tokenizer filter:将词条进行进一步处理,如同义词处理、拼音处理
扩展词库
在ik插件config/ikanalyzer.cfg.xml中添加
<?xml version="1.0" encoding="utf-8"?>
<!doctype properties system "http://java.sun.com/dtd/properties.dtd">
<properties>
	<comment>ik analyzer 扩展配置</comment>
	<!--用户可以在这里配置自己的扩展字典 -->
	<entry key="ext_dict">ext.dic</entry>
	 <!--用户可以在这里配置自己的扩展停止词字典-->
	<entry key="ext_stopwords">stopword.dic</entry>
	<!--用户可以在这里配置远程扩展字典 -->
	<!-- <entry key="remote_ext_dict">words_location</entry> -->
	<!--用户可以在这里配置远程扩展停止词字典-->
	<!-- <entry key="remote_ext_stopwords">words_location</entry> -->
</properties>
停用词库
例如敏感词
<?xml version="1.0" encoding="utf-8"?>
<!doctype properties system "http://java.sun.com/dtd/properties.dtd">
<properties>
	<comment>ik analyzer 扩展配置</comment>
	<!--用户可以在这里配置自己的扩展字典 -->
	<entry key="ext_stopwords">stopword.dic</entry>
</properties>
使用
生产使用可以用ai、elp进行分词
修改配置,添加扩展词库和停用词库
vim /opt/es/plugins/elasticsearch-analysis-ik-8.15.2/config/ikanalyzer.cfg.xml
这里新建一个词库
touch /opt/es/plugins/elasticsearch-analysis-ik-8.15.2/config/ext.dic
编辑扩展词库
vim /opt/es/plugins/elasticsearch-analysis-ik-8.15.2/config/ext.dic
添加分词
铝坨坨
编辑停用词库
vim /opt/es/plugins/elasticsearch-analysis-ik-8.15.2/config/stopword.dic
添加
的
重启es
docker restart es
测试分词
get /_analyze{ "analyzer": "ik_max_word", "text": "重重的铝坨坨"}可以看到扩展词库的“铝坨坨”被分词识别出来了,“的”没有被分词
分词作用
- 创建倒排索引时对文档分词
- 用户搜索时对输入的内容分词
ik分词模式
- ik_smart:智能切分,粗粒度
- ik_max_word:最细切分,细粒度
dsl 索引操作
- 仅允许get, put, delete, head
- mapping:对索引库中文档的约束,常见的属性有
- type:字段数据类型
- 字符串:text(可分词的文本)、keyword(不分词的精确值,合在一起有意义的词,如国家、品牌)
- 数值:long、integer、short、byte、double、float
- 布尔:boolean
- 日期:date
- 对象:object
- index:是否创建倒排索引,默认true
- analyzer:使用哪种分词器
- properties:字段的子字段
- type:字段数据类型
添加索引库,每次写入操作版本都会+1,如添加(post)、更新(put)
索引库mgr
put /mgr
{
  "mappings": {
    "properties": {
      "info": {
        "type": "text",
        "analyzer": "ik_smart"
      },
      "email": {
        "type": "keyword",
        "index": false
      },
      "name": {
        "type": "object",
        "properties": {
          "firstname": {
            "type": "keyword"
          },
          "lastname": {
            "type": "keyword"
          }
        }
      }
    }
  }
}
查询索引库
get /mgr
更新索引库(索引库禁止修改,因为索引库建立倒排索引后无法修改,只能添加新字段)
put /mgr/_mapping
{
  "properties":{
    "age":{
      "type":"integer"
    }
  }
}
删除索引库
delete /mgr
dsl文档操作
添加文档
索引库mgr/文档/文档id
post /mgr/_doc/1
{
  "info": "铝坨坨键盘",
  "email": "11111@gmail.com",
  "name": {
    "firstname": "c",
    "lastname": "i"
  }
}
查询文档
get /mgr/_doc/1
更新文档
全量更新,删除旧文档,添加新文档
如果文档id不存在则与添加文档功能相同
put /mgr/_doc/1
{
  "info": "铝坨坨键盘",
  "email": "222@gmail.com",
  "name": {
    "firstname": "c",
    "lastname": "i"
  }
}
增量更新(局部更新)
指定
_update,指定文档doc
post /mgr/_update/1{ "doc": { "email": "333@gmail.com" }}删除文档
delete /mgr/_doc/1
rust客户端操作elasticsearch
添加cargo.toml
elasticsearch = "8.15.0-alpha.1"
# 序列化和反序列化数据
serde = { version = "1.0.127", features = ["derive"] }
# 序列化json
serde_json = "1.0.128"
tokio = { version = "1", features = ["full"] }
# 异步锁
once_cell = "1.20.2"添加环境变量.env
# 指定当前配置文件
run_mode=development
添加配置settings\development.toml
debug = true
# 指定开发环境配置
profile = "development"
[es]
host = "127.0.0.1"
获取配置config\es.rs
use serde::deserialize;
#[derive(debug, deserialize, clone)]
pub struct esconfig {
    host: string,
    port: u16,
}
impl esconfig {
    // 获取redis连接地址
    pub fn get_url(&self) -> string {
        format!("http://{host}:{port}", host = self.host, port = self.port)
    }
}
将配置存放到appconfig
#[derive(debug, deserialize, clone)]
pub struct appconfig {
    pub es:esconfig,
}
impl appconfig {
    pub fn read(env_src: environment) -> result<self, config::configerror> {
        // 获取配置文件目录
        let config_dir = get_settings_dir()?;
        info!("config_dir: {:#?}", config_dir);
        // 获取配置文件环境
        let run_mode = std::env::var("run_mode")
            .map(|env| profile::from_str(&env).map_err(|e| configerror::message(e.to_string())))
            .unwrap_or_else(|_e| ok(profile::dev))?;
        // 当前配置文件名
        let profile_filename = format!("{run_mode}.toml");
        // 获取配置
        let config = config::config::builder()
            // 添加默认配置
            .add_source(config::file::from(config_dir.join("default.toml")))
            // 添加自定义前缀配置
            .add_source(config::file::from(config_dir.join(profile_filename)))
            // 添加环境变量
            .add_source(env_src)
            .build()?;
        info!("successfully read config profile: {run_mode}.");
        // 反序列化
        config.try_deserialize()
    }
}
// 获取配置文件目录
pub fn get_settings_dir() -> result<std::path::pathbuf, configerror> {
    ok(get_project_root()
        .map_err(|e| configerror::message(e.to_string()))?
        .join("settings"))
}
#[cfg(test)]
mod tests {
    use crate::config::profile::profile;
    use self::env::get_env_source;
    pub use super::*;
    #[test]
    pub fn test_profile_to_string() {
        // 设置dev模式
        let profile: profile = profile::try_from("development").unwrap();
        println!("profile: {:#?}", profile);
        assert_eq!(profile, profile::dev)
    }
    #[test]
    pub fn test_read_app_config_prefix() {
        // 读取配置
        let config = appconfig::read(get_env_source("app")).unwrap();
        println!("config: {:#?}", config);
    }
}将配置存放到全局constant\mod.rs
// 环境变量前缀
pub const env_prefix: &str = "app";
// 配置
pub static config: lazy<crate::config::appconfig> = lazy::new(||
    crate::config::appconfig::read(get_env_source(env_prefix)).unwrap()
);加载配置文件client\builder.rs
use crate::config::appconfig;
// 传输配置文件到客户端
pub trait clientbuilder: sized {
    fn build_from_config(config: &appconfig) -> result<self,infraerror>;
}es客户端client\es.rs
infraerror为自定义错误,请修改为你想要的错误,如标准库错误
// 类型别名
pub type esclient = arc<elasticsearch>;
// 加载配置文件
pub trait esclientext: sized {
    fn build_from_config(config: &appconfig) -> impl future<output = result<self, infraerror>>;
}
impl esclientext for esclient {
    async fn build_from_config(config: &appconfig) -> result<self, infraerror> {
        // 1、使用single_node方式创建client
        // let transport = transport::single_node(&config.es.get_url()).unwrap();
        // let client = elasticsearch::new(transport);
        // ok(arc::new(client))
        // 2、使用builder方式创建client,可以添加多个url
        let url = config.es.get_url();
        let url_parsed = url
            .parse::<elasticsearch::http::url>()
            .map_err(|_| infraerror::othererror("url err".to_string()))?;
        let conn_pool = singlenodeconnectionpool::new(url_parsed);
        let transport = transportbuilder::new(conn_pool)
            .disable_proxy()
            .build()
            .map_err(|_| infraerror::othererror("transport err".to_string()))?;
        let client = elasticsearch::new(transport);
        ok(arc::new(client))
    }
}测试client\es.rs,所有请求在body()中定义dsl语句,通过send()发送
#[cfg(test)]
mod tests {
    use elasticsearch::{ cat::catindicesparts, deleteparts, indexparts, updateparts };
    use serde_json::json;
    use super::*;
    use crate::constant::config;
    #[tokio::test]
    async fn test_add_document() {
        let client_result = esclient::build_from_config(&config).await;
        assert!(client_result.is_ok());
        let client = client_result.unwrap();
        let response = client
            .index(indexparts::indexid("mgr", "1"))
            .body(
                json!({
                "id": 1,
                "user": "cci",
                "post_date": "2024-01-15t00:00:00z",
                "message": "trying out elasticsearch, so far so good?"
            })
            )
            .send().await;
        assert!(response.is_ok());
        let response = response.unwrap();
        assert!(response.status_code().is_success());
    }
    #[tokio::test]
    async fn test_get_indices() {
        let client_result = esclient::build_from_config(&config).await;
        assert!(client_result.is_ok());
        let client = client_result.unwrap();
        let get_index_response = client
            .cat()
            .indices(catindicesparts::index(&["*"]))
            .send().await;
        assert!(get_index_response.is_ok());
    }
    #[tokio::test]
    async fn test_update_document() {
        let client_result = esclient::build_from_config(&config).await;
        assert!(client_result.is_ok());
        let client = client_result.unwrap();
        let update_response = client
            .update(updateparts::indexid("mgr", "1"))
            .body(
                json!({
                "doc": {
                    "message": "updated message"
                }
            })
            )
            .send().await;
        assert!(update_response.is_ok());
        let update_response = update_response.unwrap();
        assert!(update_response.status_code().is_success());
    }
    #[tokio::test]
    async fn test_delete_document() {
        let client_result = esclient::build_from_config(&config).await;
        assert!(client_result.is_ok());
        let client = client_result.unwrap();
        let delete_response = client.delete(deleteparts::indexid("mgr", "1")).send().await;
        assert!(delete_response.is_ok());
        let delete_response = delete_response.unwrap();
        assert!(delete_response.status_code().is_success());
    }
}
使用流程
        // 1、创建client
        let client_result = esclient::build_from_config(&config).await;
        assert!(client_result.is_ok());
        let client = client_result.unwrap();
        // 2、定义dsl语句
        let mut body: vec<jsonbody<_>> = vec::with_capacity(4);
        // 添加文档
        body.push(json!({"index": {"_id": "1"}}).into());
        body.push(
            json!({
    "id": 1,
    "user": "kimchy",
    "post_date": "2009-11-15t00:00:00z",
    "message": "trying out elasticsearch, so far so good?"
}).into()
        );
        // 添加文档
        body.push(json!({"index": {"_id": "2"}}).into());
        body.push(
            json!({
    "id": 2,
    "user": "forloop",
    "post_date": "2020-01-08t00:00:00z",
    "message": "bulk indexing with the rust client, yeah!"
}).into()
        );
        // 3、发送请求
let response = client.bulk(bulkparts::index("mgr")).body(body).send().await.unwrap();项目地址:https://github.com/vcciccv/mgr
分析数据结构
mapping要考虑的问题:字段名、数据类型、是否参与搜索(建立倒排索引"index":false,默认true)、是否分词(参与搜索的字段,text分词,keyword、数据类型不分词)、分词器
- 地理坐标:
- geo_point:由经度(longitude)和纬度(latitude)确定的一个点,如
[ 13.400544, 52.530286 ] - geo_shape:由多个
geo_point组成的几何图形,如一条线[[13.0, 53.0], [14.0, 52.0]]
- geo_point:由经度(longitude)和纬度(latitude)确定的一个点,如
copy_to:将多个字段组合为一个字段进行索引 rust客户端操作索引库
生产环境不要使用
unwrap()
这里演示在请求正文中操作,使用send()
transport支持的方法method:
get:获取资源put:创建或更新资源(全量更新)post:创建或更新资源(部分更新)delete:删除资源head:获取头信息
send()请求正文需要包含的参数:
method:必须path:必须headers:必须query_string:可选body:可选timeout:可选
添加索引库
    #[tokio::test]
    async fn test_create_index() {
        // 1、创建client
        let client_result = esclient::build_from_config(&config).await;
        assert!(client_result.is_ok());
        let client = client_result.unwrap();
        // 2、定义dsl语句
        let index_name = "mgr";
        let index_definition =
            json!({
            "mappings":{
                "properties":{
                    "age":{
                        "type":"integer"
                    }
                }
            }
        });
        let body = some(serde_json::to_vec(&index_definition).unwrap());
        let path = format!("/{}", index_name);
        let headers = headermap::new();
        let query_string = none;
        let timeout = none;
        let method = method::put;
        // 3、发送请求
        let response = client.send::<vec<u8>, ()>(
            method,
            &path,
            headers,
            query_string,
            body,
            timeout
        ).await;
        assert!(response.is_ok());
        let response = response.unwrap();
        assert_eq!(response.status_code().is_success(), true);
    }
你也可以将其简化
    #[tokio::test]
    async fn test_create_index() {
        // 1、创建client
        let client = esclient::build_from_config(&config).await.unwrap();
        // 2、定义dsl
        let index_definition =
            json!({
            "mappings":{
                "properties":{
                    "age":{
                        "type":"integer"
                    }
                }
            }
        });
        // 3、发送请求
        let response = client.send::<vec<u8>, ()>(
            method::put,
            format!("/mgr").as_str(),
            headermap::new(),
            none,
            some(index_definition.to_string().as_bytes().to_vec()),
            none
        ).await;
        assert!(response.is_ok());
        let response = response.unwrap();
        assert_eq!(response.status_code().is_success(), true);
    }
查询索引库是否存在
    #[tokio::test]
    async fn test_query_index() {
        // 1、创建 client
        let client = esclient::build_from_config(&config).await.unwrap();
        // 2、定义查询 dsl 语句
        let query = json!({
        "query": {
            "match_all": {}
        }
    });
        // 3、发送请求
        let response = client.send::<vec<u8>, ()>(
            method::get,
            format!("/mgr/_search").as_str(),
            headermap::new(),
            none,
            some(query.to_string().as_bytes().to_vec()),
            none
        ).await;
        assert!(response.is_ok());
        let response = response.unwrap();
        println!("{:?}", response);
        assert_eq!(response.status_code().is_success(), true);
    }
也可以不定义dsl查询
    #[tokio::test]
    async fn test_query_index2() {
        // 1、创建 client
        let client = esclient::build_from_config(&config).await.unwrap();
        // 2、发送请求
        let response = client.send::<vec<u8>, ()>(
            method::get,
            format!("/mgr").as_str(),
            headermap::new(),
            none,
            none,
            none
        ).await;
        assert!(response.is_ok());
        let response = response.unwrap();
        println!("{:?}", response);
        assert_eq!(response.status_code().is_success(), true);
    }
更新索引库
    #[tokio::test]
    async fn test_update_index() {
        // 1、创建 client
        let client = esclient::build_from_config(&config).await.unwrap();
        // 2、定义查询 dsl 语句
        let update_content = json!({
            "properties":{
                "age":{
                "type":"integer"
                }
            }
    });
        // 3、发送请求
        let response = client.send::<vec<u8>, ()>(
            method::put,
            format!("/mgr/_mapping").as_str(),
            headermap::new(),
            none,
            some(update_content.to_string().as_bytes().to_vec()),
            none
        ).await;
        assert!(response.is_ok());
        let response = response.unwrap();
        println!("{:?}", response);
        assert_eq!(response.status_code().is_success(), true);
    }
删除索引库
    #[tokio::test]
    async fn test_delete_index() {
        // 1、创建 client
        let client = esclient::build_from_config(&config).await.unwrap();
        // 2、发送请求
        let response = client.send::<(), ()>(
            method::delete,
            format!("/mgr").as_str(),
            headermap::new(),
            none,
            none,
            none
        ).await;
        assert!(response.is_ok());
        let response = response.unwrap();
        assert_eq!(response.status_code().is_success(), true);
    }
rust客户端操作文档
添加文档
    #[tokio::test]
    async fn test_create_doc() {
        // 1、创建 client
        let client = esclient::build_from_config(&config).await.unwrap();
        // 2、定义查询 dsl 语句
        let doc_content =
            json!({
            "id": "1",
            "user": "kimchy",
            "post_date": "2009-11-15t00:00:00z",
            "message": "trying out elasticsearch, so far so good?"
        });
        // 3、发送请求
        let response = client.send::<vec<u8>, ()>(
            method::post,
            format!("/mgr/_doc/1").as_str(),
            headermap::new(),
            none,
            some(doc_content.to_string().as_bytes().to_vec()),
            none
        ).await;
        assert!(response.is_ok());
        let response = response.unwrap();
        println!("{:?}", response);
        assert_eq!(response.status_code().is_success(), true);
    }
查询文档是否存在
    #[tokio::test]
    async fn test_get_doc() {
        // 1、创建 client
        let client = esclient::build_from_config(&config).await.unwrap();
        // 2、发送请求
        let response = client.send::<vec<u8>, ()>(
            method::get,
            format!("/mgr/_doc/1").as_str(),
            headermap::new(),
            none,
            none,
            none
        ).await;
        assert!(response.is_ok());
        let response = response.unwrap();
        println!("{:?}", response);
        assert_eq!(response.status_code().is_success(), true);
    }
更新文档
    #[tokio::test]
    async fn test_update_doc() {
        // 1、创建 client
        let client = esclient::build_from_config(&config).await.unwrap();
        // 2、定义查询 dsl 语句
        let doc_content =
            json!({
            "doc": {
                "message": "updated message"
            }
        });
        // 3、发送请求
        let response = client.send::<vec<u8>, ()>(
            method::post,
            format!("/mgr/_update/1").as_str(),
            headermap::new(),
            none,
            some(doc_content.to_string().as_bytes().to_vec()),
            none
        ).await;
        assert!(response.is_ok());
        let response = response.unwrap();
        println!("{:?}", response);
        assert_eq!(response.status_code().is_success(), true);
    }
删除文档
    #[tokio::test]
    async fn test_delete_doc() {
        // 1、创建 client
        let client = esclient::build_from_config(&config).await.unwrap();
        // 2、发送请求
        let response = client.send::<vec<u8>, ()>(
            method::delete,
            format!("/mgr/_doc/1").as_str(),
            headermap::new(),
            none,
            none,
            none
        ).await;
        assert!(response.is_ok());
        let response = response.unwrap();
        println!("{:?}", response);
        assert_eq!(response.status_code().is_success(), true);
    }
批量添加文档
    #[tokio::test]
    async fn test_bulk_add_to_mgr() {
        // 1、创建client
        let client_result = esclient::build_from_config(&config).await;
        assert!(client_result.is_ok());
        let client = client_result.unwrap();
        // 2、定义dsl语句
        let mut body: vec<jsonbody<_>> = vec::with_capacity(4);
        // 添加第一个操作和文档
        body.push(json!({"index": {"_id": "1"}}).into());
        body.push(
            json!({
    "id": 1,
    "user": "kimchy",
    "post_date": "2009-11-15t00:00:00z",
    "message": "trying out elasticsearch, so far so good?"
}).into()
        );
        // 添加第二个操作和文档
        body.push(json!({"index": {"_id": "2"}}).into());
        body.push(
            json!({
    "id": 2,
    "user": "forloop",
    "post_date": "2020-01-08t00:00:00z",
    "message": "bulk indexing with the rust client, yeah!"
}).into()
        );
        // 3、发送请求
        let response = client.bulk(bulkparts::index("mgr")).body(body).send().await.unwrap();
        assert!(response.status_code().is_success());
    }
rust客户端操作搜索
这里演示在请求体body中进行api调用
- 查询所有:查出所有数据
- 全文检索查询(full text):利用分词器对内容分词,从倒排索引库中查询
- match_query
- multi_match_query
- 精确查询:根据精确值查询,如integer、keyword、日期
- id
- range:根据值的范围查询
- term:根据词条精确值查询
- 地理坐标查询(geo):根据经纬度查询
- geo_distance:查询geo_point指定距离范围内的所有文档
- geo_bounding_box:查询geo_point值落在某个矩形范围内的所有文档
- 复合查询(compound):将上述条件组合起来
查询所有
默认10条
    #[tokio::test]
    async fn test_search_match_all() {
        // 1、创建 client
        let client = esclient::build_from_config(&config).await.unwrap();
        // 2. 执行搜索
        let response = client
            .search(searchparts::index(&["mgr"]))
            .from(0)
            .size(5)
            .body(
                json!({
            "query": {
                "match_all": {
                }
            }
        })
            )
            .send().await
            .unwrap();
        // 3. 解析响应
        let response_body = response.json::<value>().await.unwrap();
        // 搜索耗时
        let took = response_body["took"].as_i64().unwrap();
        println!("took: {}ms", took);
        // 搜索结果
        for hit in response_body["hits"]["hits"].as_array().unwrap() {
            println!("{:?}", hit["_source"]);
        }
    }
等价于
get /mgr/_search
{
  "query": {
    "match_all": {}
  }
}
全文搜索
message为文档中的字段
    #[tokio::test]
    async fn test_search_match() {
        // 1、创建 client
        let client = esclient::build_from_config(&config).await.unwrap();
        // 2. 执行搜索
        let response = client
            .search(searchparts::index(&["mgr"]))
            .from(0)
            .size(5)
            .body(
                json!({
            "query": {
                "match": {
                    "message": "good"
                }
            }
        })
            )
            .send().await
            .unwrap();
        // 3. 解析响应
        let response_body = response.json::<value>().await.unwrap();
        // 搜索耗时
        let took = response_body["took"].as_i64().unwrap();
        println!("took: {}ms", took);
        // 搜索结果
        for hit in response_body["hits"]["hits"].as_array().unwrap() {
            println!("{:?}", hit["_source"]);
        }
    }
相当于
get /mgr/_search
{
  "query": {
    "match": {
      "message": "good"
    }
  }
}
多字段查询
多字段查询效率低,一般在创建时使用copy_to到一个字段中
    #[tokio::test]
    async fn test_search_multi_match() {
        // 1、创建 client
        let client = esclient::build_from_config(&config).await.unwrap();
        // 2. 执行搜索
        let response = client
            .search(searchparts::index(&["mgr"]))
            .from(0)
            .size(5)
            .body(
                json!({
            "query": {
                "multi_match": {
                    "query": "good",
                    "fields": [
                        "message",
                        "user"
                        ]
                    }
                }
            })
            )
            .send().await
            .unwrap();
        // 3. 解析响应
        let response_body = response.json::<value>().await.unwrap();
        // 搜索耗时
        let took = response_body["took"].as_i64().unwrap();
        println!("took: {}ms", took);
        // 搜索结果
        for hit in response_body["hits"]["hits"].as_array().unwrap() {
            println!("{:?}", hit["_source"]);
        }
    }
相当于
get /mgr/_search
{
  "query": {
    "multi_match": {
      "query": "good",
      "fields": [
        "message",
        "user"
      ]
    }
  }
}
根据范围查询(range)
gte大于等于,lte小于等于;gt大于lt小于
    #[tokio::test]
    async fn test_search_range() {
        // 1、创建 client
        let client = esclient::build_from_config(&config).await.unwrap();
        // 2. 执行搜索
        let response = client
            .search(searchparts::index(&["mgr"]))
            .from(0)
            .size(5)
            .body(
                json!({
            "query": {
                "range": {
                    "id": {
                        "gte": 1,
                        "lte": 1
                        }
                    }
                }
            })
            )
            .send().await
            .unwrap();
        // 3. 解析响应
        let response_body = response.json::<value>().await.unwrap();
        // 搜索耗时
        let took = response_body["took"].as_i64().unwrap();
        println!("took: {}ms", took);
        // 搜索结果
        for hit in response_body["hits"]["hits"].as_array().unwrap() {
            println!("{:?}", hit["_source"]);
        }
    }
相当于
get /mgr/_search
{
  "query": {
    "range": {
      "id": {
        "gte": 1,
        "lte": 1
      }
    }
  }
}
根据词条精确查询(term)
    #[tokio::test]
    async fn test_search_term() {
        // 1、创建 client
        let client = esclient::build_from_config(&config).await.unwrap();
        // 2. 执行搜索
        let response = client
            .search(searchparts::index(&["mgr"]))
            .from(0)
            .size(5)
            .body(
                json!({
            "query": {
                "term": {
                    "user": "kimchy"
                    }
                }
            })
            )
            .send().await
            .unwrap();
        // 3. 解析响应
        let response_body = response.json::<value>().await.unwrap();
        // 搜索耗时
        let took = response_body["took"].as_i64().unwrap();
        println!("took: {}ms", took);
        // 搜索结果
        for hit in response_body["hits"]["hits"].as_array().unwrap() {
            println!("{:?}", hit["_source"]);
        }
    }
相当于
get /mgr/_search
{
  "query": {
    "term": {
      "user": "kimchy"
    }
  }
}
根据地理距离查询
get /mgr/_search
{
  "query": {
    "geo_distance": {
      "distance": "100km",
      "location": "31.04, 45.12"
    }
  }
}
根据指定矩形范围查询
左上经纬度与右下经纬度
geo为文档中的字段
get /mgr/_search
{
  "query": {
    "geo_bounding_box": {
      "geo": {
        "top_left": {
          "lon": 124.45,
          "lat": 32.11
        },
        "bottom_right": {
          "lon": 125.12,
          "lat": 30.21
        }
      }
    }
  }
}
复合查询
查询时文档会对搜索词条的关联度打分_score,返回结果时按照降序排列
关联度计算方法
- tf-idf算法(es5.0之前)
tf(词条频率)= 词条出现次数/文档中词条总数
idf(逆文档频率)=log(文档总数/包含词条的文档总数)
score = ∑(𝑖=1,𝑛)(tf*idf):将词条频率与逆文档频率相乘再求和
- bm25算法(es5.0之后)
默认采用bm25算法:考虑了tf、idf、文档长度等因素,能够平衡长短文的关联度

function_score修改关联度
指定文档和算分函数
get /mgr/_search
{
  "query": {
    "function_score": {
      "query": {
        "match": {// 查询方法
        "message": "good"
        }
      },
      "functions": [ // 算分函数
        {
          "filter": {// 只有符合过滤条件的才被计算
          "term": {// 根据词条精确查询
          "id": 1
          }
          },
          "weight": 3 // 指定加权函数
        }
        ],
        // 加权模式:相乘
        "boost_mode": "multiply"
    }
  }
}weight:给定常量值,还可以指定以下值field_value_factor:用文档中的指定字段值作为函数结果random_score:随机生成一个值script_score:自定义计算公式boost_mode:加权模式,multiply与原来的_score相乘,还可以配置:replace:替换原来的_scoresum:求和avg:取平均值min:取最小值max:取最大值
相当于
    #[tokio::test]
    async fn test_function_score_query() {
        // 1、创建 client
        let client = esclient::build_from_config(&config).await.unwrap();
        // 2. 执行搜索
        let response = client
            .search(searchparts::index(&["mgr"]))
            .from(0)
            .size(5)
            .body(
                json!({
            "query": {
                "function_score": {
                    "query": {
                        "match": {// 查询方法
                        "message": "good"
                        }
                    },
                    "functions": [ // 算分函数
                    {
                        "filter": {// 只有符合过滤条件的才被计算
                        "term": {// 根据词条精确查询
                        "id": 1
                        }
                        },
                        "weight": 3 // 指定加权函数
                    }
                ],
                    // 加权模式:相乘
                    "boost_mode": "multiply"
                    }
                }
            })
            )
            .send().await
            .unwrap();
        // 3. 解析响应
        let response_body = response.json::<value>().await.unwrap();
        // 搜索耗时
        let took = response_body["took"].as_i64().unwrap();
        println!("took: {}ms", took);
        // 搜索结果
        for hit in response_body["hits"]["hits"].as_array().unwrap() {
            println!("{:?}", hit["_source"]);
        }
    }
boolean query 布尔查询
布尔查询是一个或多个子句查询的组合,组合方式有
must:必须匹配每个子查询,类似于“与”should:选择性匹配子查询,类似于“或”must_not:必须不匹配,不参与算分,类似于“非”filter:必须匹配,
查询message中包含rust,post_date不小于2020年1月1日的文档
get /mgr/_search
{
  "query": {
    "bool": {
      "must": [
        {
          "match_phrase": {
            "message": "rust"
          }
        }
      ],
      "must_not": [
        {
          "range": {
            "post_date": {
              "lt": "2020-01-01t00:00:00z"
            }
          }
        }
      ]
    }
  }
}
搜索结果处理
排序
get /mgr/_search
{
  "query": {
    "match_all": {}
  },
  "sort": [
    {
      "id": "desc"// asc升序,desc降序
    }
  ]
}
地理位置排序
get /mgr/_search
{
  "query": {
    "match_all": {}
  },
  "sort": [
    {
      "_geo_distance":{
        "field": {
          "lat": 40,// 纬度
          "lon": -70// 经度
        },
        "order":"asc",// 排序方式
        "unit":"km" // 单位
      }
    }
  ]
}
分页
1、from+size分页查询(默认10条数据)
get /mgr/_search
{
  "query": {
    "match_all": {}
  },
  "from":1,// 分页开始位置
  "size":10,// 期望获取的文档总数
  "sort": [
    {
      "id": "desc"// asc升序,desc降序
    }
    ]
}深度分页问题:一般将es作为分布式部署,当需要"from"=990,"size"=10查数据时:
1、先从每个数据分片上查询前1000条数据
2、将所有节点的结果聚合,在内存中重新排序选出前1000条文档
3、在这1000条文档中选取"from"=990,"size"=10的数据
如果搜索页数过深,或者结果集(from+size)越大,对内存和cpu的消耗越高,因此es设定的查询上限是
10000
深度分页解决方案:
2、search after分页查询:分页时排序,从上一次的排序值开始查询下一页文档(只能向后查询)
3、scroll分页查询:将排序数据形成快照,保存在内存中(内存消耗大,官方不推荐)
高亮处理
搜索键盘时关键字高亮

highlight指定高亮字段
默认搜索字段和高亮字段匹配才高亮
get /mgr/_search
{
  "query": {
    "match": {
      "message":"rust"// 搜索message中包含rust的文档
    }
  },
  "highlight":{
    "fields":{
      "message":{// 指定高亮字段
      "require_field_match":"false"// 搜索字段和高亮字段可以不匹配
      }
    }
  }
}
数据聚合
聚合(aggregations)可以实现对文档数据的统计、分析、运算,聚合分类:
- 桶(buket):用来对数据分组
- https://www.elastic.co/guide/en/elasticsearch/reference/current/search-aggregations-bucket.html
- termaggregation:按文档字段或词条值分组
- date histogram:按日期阶梯分组,如一周为一组
- 度量(metric):用于计算一些值,如最大值、最小值、平均值
- https://www.elastic.co/guide/en/elasticsearch/reference/current/search-aggregations-metrics.html
- avg:求平均值
- max:求最大值
- min:求最小值
- sum:求和
- stats:同时求max、min、avg、sum等
- 管道(pipeline):以其他聚合的结果作为聚合的基础
- https://www.elastic.co/guide/en/elasticsearch/reference/current/search-aggregations-pipeline.html
桶(buket)
buket默认统计其中的文档数量_count,并且按照降序排序
get /mgr/_search
{
  "size":0,// 文档大小,结果不包含文档,只包含聚合结果
  "aggs": {//指定聚合
    "idagg": {// 聚合名
      "terms": {// 精确查询
        "field":"id",// 指定字段
        "order":{
          "_count":"asc"// 按升序排序
        }
      }
    }
  }
}
度量(metric)
get /mgr/_search
{
  "size":0,// 文档大小,结果不包含文档,只包含聚合结果
  "aggs": {//指定聚合
    "idagg": {// 聚合名
      "terms": {// 精确查询
        "field":"id",// 指定字段
        "size":20
      },
      "aggs":{// 子聚合
        "score_stats":{// 聚合名
          "max":{//聚合类型,min、max、avg等
            "field":"score"// 聚合字段
          }
        }
      }
    }
  }
}
自动补全
拼音补全
如果你想要通过拼音补全,请下载解压拼音分词器上传到/opt/es/plugins目录然后重启es
https://github.com/infinilabs/analysis-pinyin/releases
- 补全字段必须是
completion类型 - 拼音分词需要自定义分词器
进行拼音分词:创建索引并设置字段类型为completion,同时指定先分词再根据词条过滤(如果不自定义分词器,默认将每个汉字单独分为拼音,所以先分词词条再进行拼音处理),其他设置见github仓库
put /test
{
  "settings": {// 设置
    "analysis": {
      "analyzer": {// 设置分词器
        "my_analyzer": {// 分词器名
          "filters": [
           "lowercase",// 转小写
           "stop"// 去停用词
         ],
          "tokenizer": "ik_max_word", // 分词器
          "filter": "py" // 过滤时进行拼音
        }
      }
    },
    "filter": { // 自定义tokenizer filter
      "py": { // 过滤器名称
        "type": "pinyin", // 过滤器类型,这里是pinyin
        "keep_full_pinyin": false,// 是否保留完整的拼音形式
        "keep_joined_full_pinyin": true,// 是否保留连接起来的完整拼音形式
        "keep_original": true,// 是否保留原始的文本内容
        "limit_first_letter_length": 16,// 限制拼音首字母的长度为 16
        "remove_duplicated_term": true,// 是否移除重复的词条
        "none_chinese_pinyin_tokenize": false// 不对非中文字符进行拼音分词
      }
    }
  },
  "mappings": {
    "properties": {
      "user": {
        "type": "completion"
      }
    }
  }
}不进行拼音分词:创建索引并设置字段类型为completion
put /test
{
  "mappings": {
    "properties": {
      "user": {
        "type": "completion"
      }
    }
  }
}
添加文档
post /test/_doc/1
{
  "id": 1,
  "message": "trying out elasticsearch, so far so good?",
  "post_date": "2009-11-15t00:00:00z",
  "user": "kimchy"
}
根据关键字查询补全
get /test/_search
{
  "suggest": {
    "your_suggestion": {// 指定自动补全查询名字
    "text": "k",// 关键字前缀
    "completion": {// 自动补全类型
      "field": "user",// 补全字段
      "skip_duplicates": true,// 是否跳过重复的建议
      "size": 10 // 获取前10条结果
    }
    }
  }
}所有代码地址:https://github.com/vcciccv/mgr/blob/main/auth/infrastructure/src/client/es.rs
到此这篇关于rust整合elasticsearch的详细过程(收藏)的文章就介绍到这了,更多相关rust整合elasticsearch内容请搜索代码网以前的文章或继续浏览下面的相关文章希望大家以后多多支持代码网!


发表评论