onnx runtime简介
onnx runtime 是一个跨平台的推理和训练机器学习加速器。onnx 运行时推理可以实现更快的客户体验和更低的成本,支持来自深度学习框架(如 pytorch 和 tensorflow/keras)以及经典机器学习库(如 scikit-learn、lightgbm、xgboost 等)的模型。 onnx 运行时与不同的硬件、驱动程序和操作系统兼容,并通过利用硬件加速器(如果适用)以及图形优化和转换来提供最佳性能。
resnet50v2简介
resnet50v2 是一种深度卷积神经网络架构,是 resnet(residual network,残差网络)系列的一部分。resnet 是由何凯明等人在 2015 年提出的,它通过引入残差块(residual block)解决了深度神经网络训练过程中梯度消失和梯度爆炸的问题,使得构建非常深的网络成为可能。resnet50v2 被广泛应用于各种计算机视觉任务,如图像分类、目标检测、图像分割等。由于其深度和强大的特征学习能力,resnet50v2 在众多基准测试中表现出色,是许多研究和应用中的首选模型之一。
示例
这个示例代码在
fork一份,克隆到本地,在本地打开这个项目,项目结构如下所示:

依赖的包除了onnxruntime还有imagesharp。
imagesharp简介
imagesharp 是一个新的、功能齐全、完全托管的跨平台 2d 图形库。imagesharp 旨在简化图像处理,为您带来一个非常强大而又非常简单的 api。
imagesharp 从头开始设计,具有灵活性和可扩展性。该库为常见的图像处理操作提供了 api 端点,并为开发其他操作提供了构建块。
imagesharp 针对 .net 8 构建,可用于设备、云和嵌入式/iot 方案。
下载 resnet50 v2 onnx 模型,下载地址在:
读取路径
首先,源代码中是通过程序参数读取模型的路径和要测试的图像的路径,也可以直接赋值:
// read paths
//string modelfilepath = args[0];
//string imagefilepath = args[1];
string modelfilepath = @"你的路径\microsoft.ml.onnxruntime.resnet50v2sample\resnet50-v2-7.onnx";
string imagefilepath = @"你的路径\microsoft.ml.onnxruntime.resnet50v2sample\狮子.jpg";
读取图像
接下来,我们将使用跨平台图像库 imagesharp 读取图像:
 // read image
 using image<rgb24> image = image.load<rgb24>(imagefilepath);
调整图像大小
接下来,我们将图像大小调整为模型期望的适当大小;224 像素 x 224 像素:
using stream imagestream = new memorystream();
image.mutate(x =>
{
    x.resize(new resizeoptions
    {
        size = new size(224, 224),
        mode = resizemode.crop
    });
});
image.save(imagestream, format);
预处理图像
接下来,我们将根据模型的要求对图像进行预处理,具体要求见:
https://github.com/onnx/models/tree/main/validated/vision/classification/resnet
// we use densetensor for multi-dimensional access to populate the image data
var mean = new[] { 0.485f, 0.456f, 0.406f };
var stddev = new[] { 0.229f, 0.224f, 0.225f };
densetensor<float> processedimage = new(new[] { 1, 3, 224, 224 });
image.processpixelrows(accessor =>
{
    for (int y = 0; y < accessor.height; y++)
    {
        span<rgb24> pixelspan = accessor.getrowspan(y);
        for (int x = 0; x < accessor.width; x++)
        {
            processedimage[0, 0, y, x] = ((pixelspan[x].r / 255f) - mean[0]) / stddev[0];
            processedimage[0, 1, y, x] = ((pixelspan[x].g / 255f) - mean[1]) / stddev[1];
            processedimage[0, 2, y, x] = ((pixelspan[x].b / 255f) - mean[2]) / stddev[2];
        }
    }
});
在这里,我们正在创建一个所需大小 (batch-size, channels, height, width) 的张量,访问像素值,对其进行预处理,最后将它们分配给适当指示的张量。
设置输入
接下来,我们将创建模型的输入:
using var inputortvalue = ortvalue.createtensorvaluefrommemory(ortmemoryinfo.defaultinstance,
    processedimage.buffer, new long[] { 1, 3, 224, 224 });
var inputs = new dictionary<string, ortvalue>
{
    { "data", inputortvalue }
}
要检查 onnx 模型的输入节点名称,您可以使用 netron 可视化模型并查看输入/输出名称。在本例中,此模型具有 data 作为输入节点名称。
运行推理
接下来,我们将创建一个推理会话并通过它运行输入:
using var session = new inferencesession(modelfilepath);
using var runoptions = new runoptions();
using idisposablereadonlycollection<ortvalue> results = session.run(runoptions, inputs, session.outputnames);
后处理输出
接下来,我们需要对输出进行后处理以获得 softmax 向量,因为这不是由模型本身处理的:
var output = results[0].gettensordataasspan<float>().toarray();
float sum = output.sum(x => (float)math.exp(x));
ienumerable<float> softmax = output.select(x => (float)math.exp(x) / sum);
其他型号可能会在输出之前应用 softmax 节点,在这种情况下,您不需要此步骤。同样,您可以使用 netron 查看模型输出。
提取前10个预测结果
ienumerable<prediction> top10 = softmax.select((x, i) => new prediction { label = labelmap.labels[i], confidence = x })
                   .orderbydescending(x => x.confidence)
                   .take(10);
打印结果
console.writeline("top 10 predictions for resnet50 v2...");
console.writeline("--------------------------------------------------------------");
foreach (var t in top10)
{
console.writeline($"label: {t.label}, confidence: {t.confidence}");
}
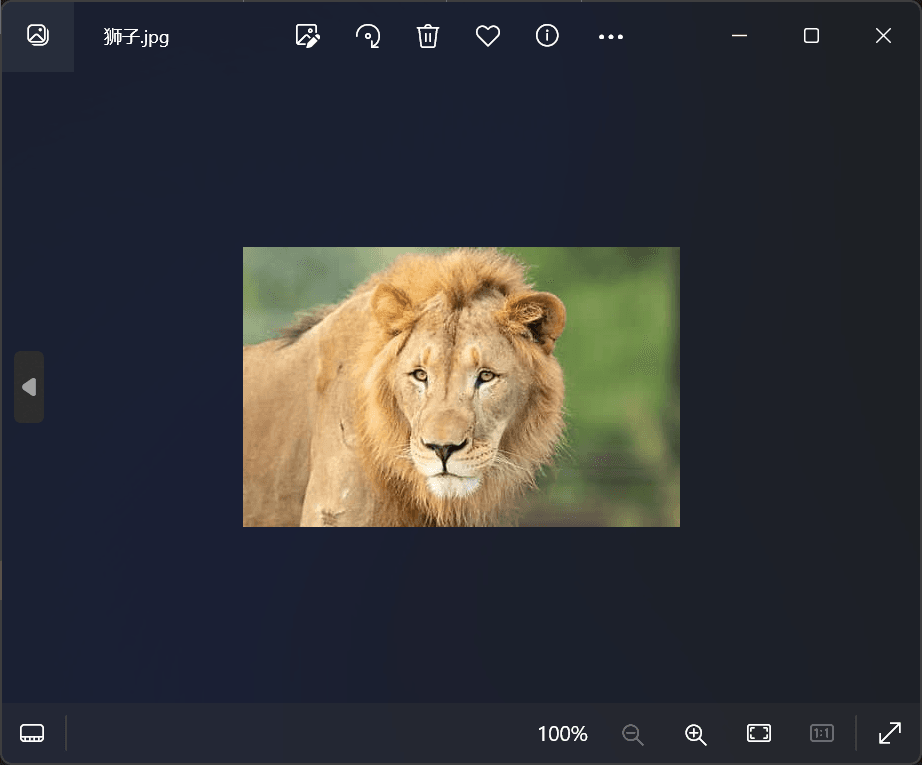
本例的示例图片是一只狮子,如下所示:
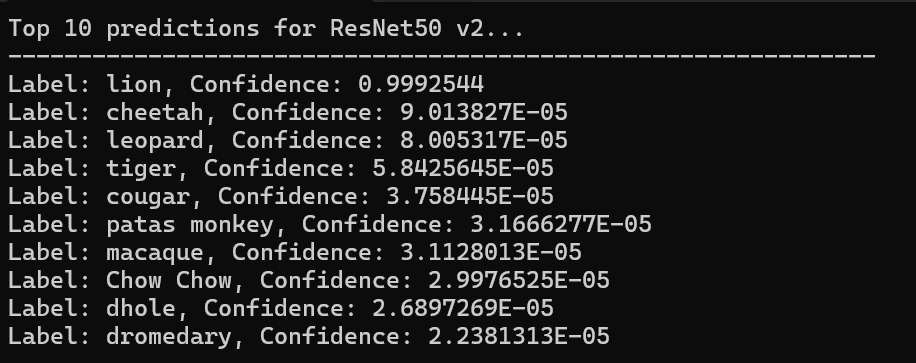
查看预测结果:
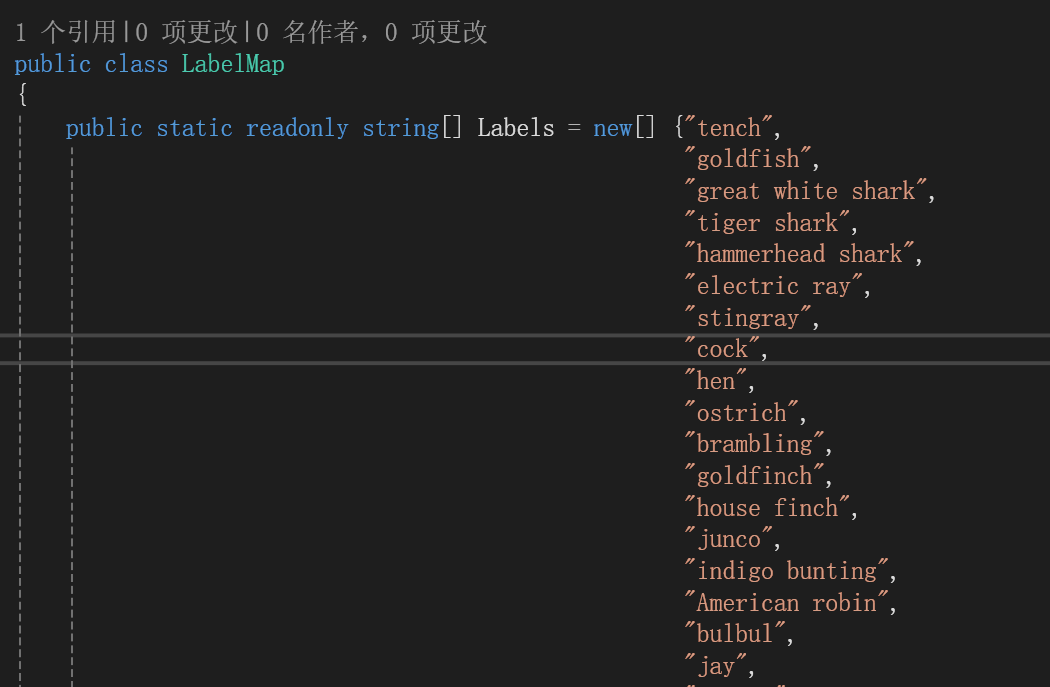
在labelmap类中可以查看该模型可以识别的物体:
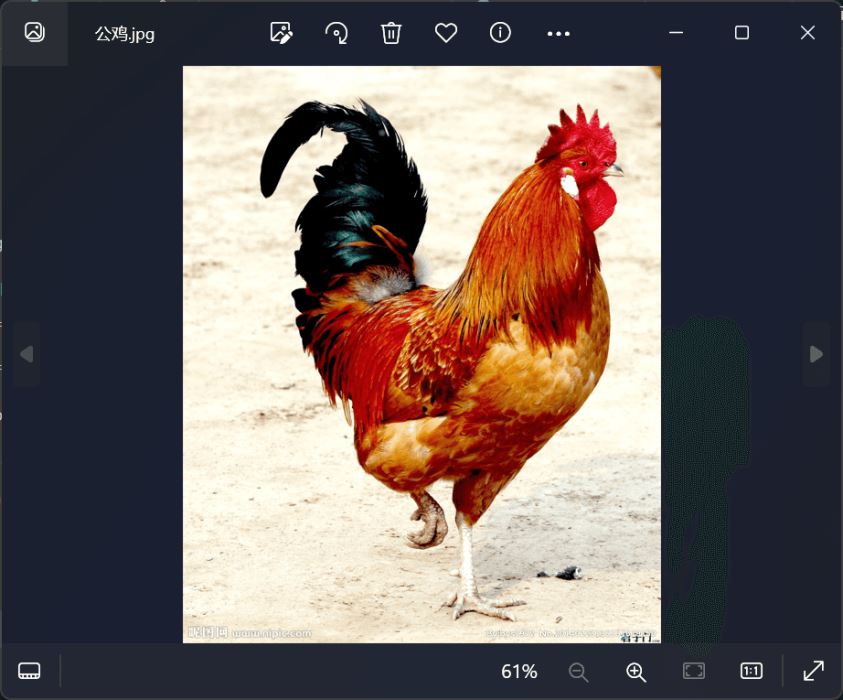
例如cock是公鸡的意思,我们可以现场找一张公鸡的图片,查看效果。
找到的一张公鸡图片如下所示:
修改测试图片为这种图片,再次运行,结果如下所示:
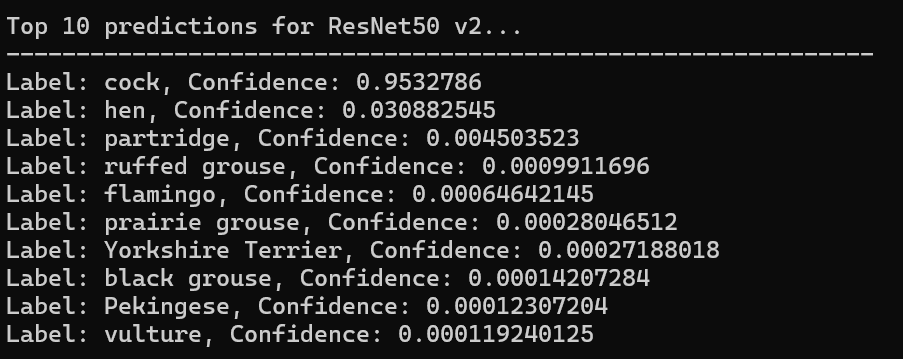
成功识别出了公鸡。
总结
以上就完成了onnx runtime的入门示例,可以根据兴趣与需求尝试使用其他的模型。
参考
1、image recognition with resnet50v2 in c# | onnxruntime
4、sixlabors/imagesharp: 📷 a modern, cross-platform, 2d graphics library for .net (github.com)
到此这篇关于在c#中使用resnet50v2进行图像识别的文章就介绍到这了,更多相关c# resnet50v2图像识别内容请搜索代码网以前的文章或继续浏览下面的相关文章希望大家以后多多支持代码网!
![C#实现Bitmap类型与Byte[]类型相互转化的示例详解](/images/newimg/nimg1.png)


发表评论