【中秋国庆不断更】openharmony组件内状态变量使用:@state装饰器
@state装饰的变量,或称为状态变量,一旦变量拥有了状态属性,就和自定义组件的渲染绑定起来。当状态改变时,ui会发生对应的渲染改变。
在状态变量相关装饰器中,@state是最基础的,使变量拥有状态属性的装饰器,它也是大部分状态变量的数据源。
说明:
从api version 9开始,该装饰器支持在arkts卡片中使用。
概述
@state装饰的变量,与声明式范式中的其他被装饰变量一样,是私有的,只能从组件内部访问,在声明时必须指定其类型和本地初始化。初始化也可选择使用命名参数机制从父组件完成初始化。
@state装饰的变量拥有以下特点:
● @state装饰的变量与子组件中的@prop、@link或@objectlink装饰变量之间建立单向或双向数据同步。
● @state装饰的变量生命周期与其所属自定义组件的生命周期相同。
装饰器使用规则说明
| @state变量装饰器 | 说明 |
|---|---|
| 装饰器参数 | 无 |
| 同步类型 | 不与父组件中任何类型的变量同步。 |
| 允许装饰的变量类型 | object、class、string、number、boolean、enum类型,以及这些类型的数组。支持date类型。支持类型的场景请参考观察变化。类型必须被指定。不支持any,不支持简单类型和复杂类型的联合类型,不允许使用undefined和null。说明:不支持length、resourcestr、resourcecolor类型,length、resourcestr、resourcecolor为简单类型和复杂类型的联合类型。 |
| 被装饰变量的初始值 | 必须本地初始化。 |
变量的传递/访问规则说明
| 传递/访问 | 说明 |
|---|---|
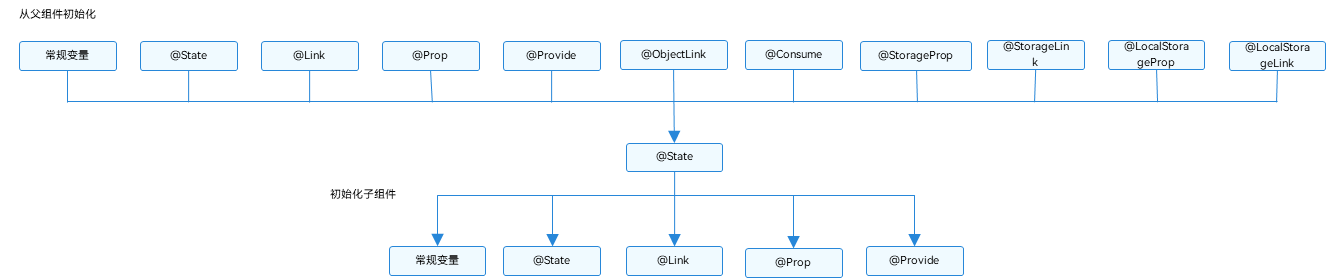
| 从父组件初始化 | 可选,从父组件初始化或者本地初始化。如果从父组件初始化将会覆盖本地初始化。支持父组件中常规变量(常规变量对@prop赋值,只是数值的初始化,常规变量的变化不会触发ui刷新,只有状态变量才能触发ui刷新)、@state、@link、@prop、@provide、@consume、@objectlink、@storagelink、@storageprop、@localstoragelink和@localstorageprop装饰的变量,初始化子组件的@state。 |
| 用于初始化子组件 | @state装饰的变量支持初始化子组件的常规变量、@state、@link、@prop、@provide。 |
| 是否支持组件外访问 | 不支持,只能在组件内访问。 |
图1 初始化规则图示
观察变化和行为表现
并不是状态变量的所有更改都会引起ui的刷新,只有可以被框架观察到的修改才会引起ui刷新。该小节去介绍什么样的修改才能被观察到,以及观察到变化后,框架的是怎么引起ui刷新的,即框架的行为表现是什么。
观察变化
● 当装饰的数据类型为boolean、string、number类型时,可以观察到数值的变化。
// for simple type
@state count: number = 0;
// value changing can be observed
this.count = 1;
● 当装饰的数据类型为class或者object时,可以观察到自身的赋值的变化,和其属性赋值的变化,即object.keys(observedobject)返回的所有属性。例子如下。 声明classa和model类。
  class classa {
    public value: string;

    constructor(value: string) {
      this.value = value;
    }
  }

  class model {
    public value: string;
    public name: classa;
    constructor(value: string, a: classa) {
      this.value = value;
      this.name = a;
    }
  }
@state装饰的类型是model
// class类型
 @state title: model = new model('hello', new classa('world'));
对@state装饰变量的赋值。
// class类型赋值
this.title = new model('hi', new classa('arkui'));
对@state装饰变量的属性赋值。
// class属性的赋值
this.title.value = 'hi'
嵌套属性的赋值观察不到。
// 嵌套的属性赋值观察不到
this.title.name.value = 'arkui'
● 当装饰的对象是array时,可以观察到数组本身的赋值和添加、删除、更新数组的变化。例子如下。 声明classa和model类。
class model {
  public value: number;
  constructor(value: number) {
    this.value = value;
  }
}
@state装饰的对象为model类型数组时。
@state title: model[] = [new model(11), new model(1)]
数组自身的赋值可以观察到。
this.title = [new model(2)]
数组项的赋值可以观察到。
this.title[0] = new model(2)
删除数组项可以观察到。
this.title.pop()
新增数组项可以观察到。
this.title.push(new model(12))
● 当装饰的对象是date时,可以观察到date整体的赋值,同时可通过调用date的接口setfullyear, setmonth, setdate, sethours, setminutes, setseconds, setmilliseconds, settime, setutcfullyear, setutcmonth, setutcdate, setutchours, setutcminutes, setutcseconds, setutcmilliseconds 更新date的属性。
@entry
@component
struct datepickerexample {
  @state selecteddate: date = new date('2021-08-08')

  build() {
    column() {
      button('set selecteddate to 2023-07-08')
        .margin(10)
        .onclick(() => {
          this.selecteddate = new date('2023-07-08')
        })
      button('increase the year by 1')
        .margin(10)
        .onclick(() => {
          this.selecteddate.setfullyear(this.selecteddate.getfullyear() + 1)
        })
      button('increase the month by 1')
        .margin(10)
        .onclick(() => {
          this.selecteddate.setmonth(this.selecteddate.getmonth() + 1)
        })
      button('increase the day by 1')
        .margin(10)
        .onclick(() => {
          this.selecteddate.setdate(this.selecteddate.getdate() + 1)
        })
      datepicker({
        start: new date('1970-1-1'),
        end: new date('2100-1-1'),
        selected: this.selecteddate
      })
    }.width('100%')
  }
}
框架行为
● 当状态变量被改变时,查询依赖该状态变量的组件;
● 执行依赖该状态变量的组件的更新方法,组件更新渲染;
● 和该状态变量不相关的组件或者ui描述不会发生重新渲染,从而实现页面渲染的按需更新。
使用场景
装饰简单类型的变量
以下示例为@state装饰的简单类型,count被@state装饰成为状态变量,count的改变引起button组件的刷新:
● 当状态变量count改变时,查询到只有button组件关联了它;
● 执行button组件的更新方法,实现按需刷新。
@entry
@component
struct mycomponent {
  @state count: number = 0;

  build() {
    button(`click times: ${this.count}`)
      .onclick(() => {
        this.count += 1;
      })
  }
}
装饰class对象类型的变量
● 自定义组件mycomponent定义了被@state装饰的状态变量count和title,其中title的类型为自定义类model。如果count或title的值发生变化,则查询mycomponent中使用该状态变量的ui组件,并进行重新渲染。
● entrycomponent中有多个mycomponent组件实例,第一个mycomponent内部状态的更改不会影响第二个mycomponent。
class model {
  public value: string;

  constructor(value: string) {
    this.value = value;
  }
}

@entry
@component
struct entrycomponent {
  build() {
    column() {
      // 此处指定的参数都将在初始渲染时覆盖本地定义的默认值,并不是所有的参数都需要从父组件初始化
      mycomponent({ count: 1, increaseby: 2 })
      mycomponent({ title: new model('hello, world 2'), count: 7 })
    }
  }
}

@component
struct mycomponent {
  @state title: model = new model('hello world');
  @state count: number = 0;
  private increaseby: number = 1;

  build() {
    column() {
      text(`${this.title.value}`)
      button(`click to change title`).onclick(() => {
        // @state变量的更新将触发上面的text组件内容更新
        this.title.value = this.title.value === 'hello arkui' ? 'hello world' : 'hello arkui';
      })

      button(`click to increase count=${this.count}`).onclick(() => {
        // @state变量的更新将触发该button组件的内容更新
        this.count += this.increaseby;
      })
    }
  }
}
从该示例中,我们可以了解到@state变量首次渲染的初始化流程:
1. 使用默认的本地初始化:
@state title: model = new model('hello world');
@state count: number = 0;
2. 对于@state来说,命名参数机制传递的值并不是必选的,如果没有命名参数传值,则使用本地初始化的默认值:
class c1 {
   public count:number;
   public increaseby:number;
   constructor(count: number, increaseby:number) {
   this.count = count;
   this.increaseby = increaseby;
  }
}
let obj = new c1(1, 2)
mycomponent(obj)


发表评论