selenium ide/我的第一个web自动化程序 2020/4/28 周二 64-66
0 selenium: 驱动浏览器做自动化测试
分三块:
selenium ide,是firefox的扩展插件,支持用户录制和回放测试
selenium webdriver,提供了各种语言环境的api来支持更多控制权和编写符合标准软件开发实践的应用程序。
seleniumgrid,分布式自动化工具,可以在多个测试环境中以并发的方式执行测试脚本,实现测试脚本的并发 执行,缩短大量的测试脚本的执行时间
selenium webdriver
selenium grid
1 selenium ide:(了解)
selenium ide 是一个firefox/chorme插件,用于记录和回放用户与浏览器的交互。
只支持firefox、chrome。其中chrome必须翻墙,所以用firefox来进行学习。
1.1 下载selenium ide for firefox:
selenium 官网:https://www.selenium.dev/downloads/
选selenium ide for firefox: will enter https://addons.mozilla.org/en-us/firefox/addon/selenium-ide/ and click "add to firefox" will download.
浏览器右上角有个se小logo,就说明安装好了。
1.2 点击se的logo,"record a new test in a new project"/"create a new project". enter project name: seleniumidetest;enter base url:https://www.baidu.com;start recording:浏览器会自动打开百度。
1.3 开始操作浏览器。
1 输入腾讯课堂,点击“百度一下”
2 点击第一条记录,会新开一个tab,显示腾讯课堂首页。
回到ide,右上角关闭录制,填test name:baidutest,ok,脚本就录好了。
1.4 脚本回放:
在页面点“current run test”:会自动输“腾讯课堂”,查询,点了官网链接,但是报错:因为firefox阻止了新窗口弹出。
->解决方案:firefox->选项->隐私与安全->权限->拦截弹出式窗口:uncheck.退出火狐浏览器,重新打开,进行脚本回放,ok。
1.5 导出脚本,为java、python、ruby(必须firefox版本比较高)
testname右边有三个点,export->java->export .java file
1.6 selenium ide:
selenium ide 是一个firefox/chorme插件,用于记录和回放用户与浏览器的交互。使用它来创建简单的脚本或者协助进行探索性测试。
缺点:只支持firefox/chorme;脚本不稳定;线性脚本,无法处理复杂的逻辑。
2 selenium webdriver(重点掌握):
用于web应用程序测试的工具,selenium是开源并且免费的,selenium 测试直接在浏览器中运行,就像真实用户所 做的一样 覆盖ie、chrome、firefox、safari等主流浏览器。通过在不同浏览器中运行测试,更容易发现浏览器的不兼容性。 支持java、python、net、perl等编程语言进行自动化测试脚本编写。
2.1 发展历程

2.2 selenium webdriver原理
驱动(翻译器):把客户端发送来的指令,翻译成浏览器能识别的语言。
不同浏览器提供不同driver驱动

3 maven安装配置:
0 maven作用
maven 作用:项目构建工具,是目前大部分企业在做项目时首选的项目构建,管理工具;也有一部分企业在用ant,aspira用的是ivy
编译代码;项目打包;项目模块化管理;在线管理依赖;提供丰富的插件,方便项目持续集成。
在我们课程中最大的作用管理jar包[其他jar包管理工具:ant,gradle。
第三方jar(工具包),如excel、json
maven: 别人写好的jar包;git:管理自己的代码
本地下载maven,本地新建一个本地仓库文件夹repository,空的。远程有一个中心仓库,是由maven团队管理的。本地仓库可以直连中心仓库,来获取jar包。但因为中心仓库在美国,直接连很慢。加了阿里云的镜像,就像代理服务。阿里云会定时去同步,就像私服。配了镜像,就会去阿里云取jar,就会很快。
1 下载maven&环境配置:3.6.1
https://maven.apache.org/download.cgi
maven 3.6.1:d:\developsoftware\apache-maven-3.6.1
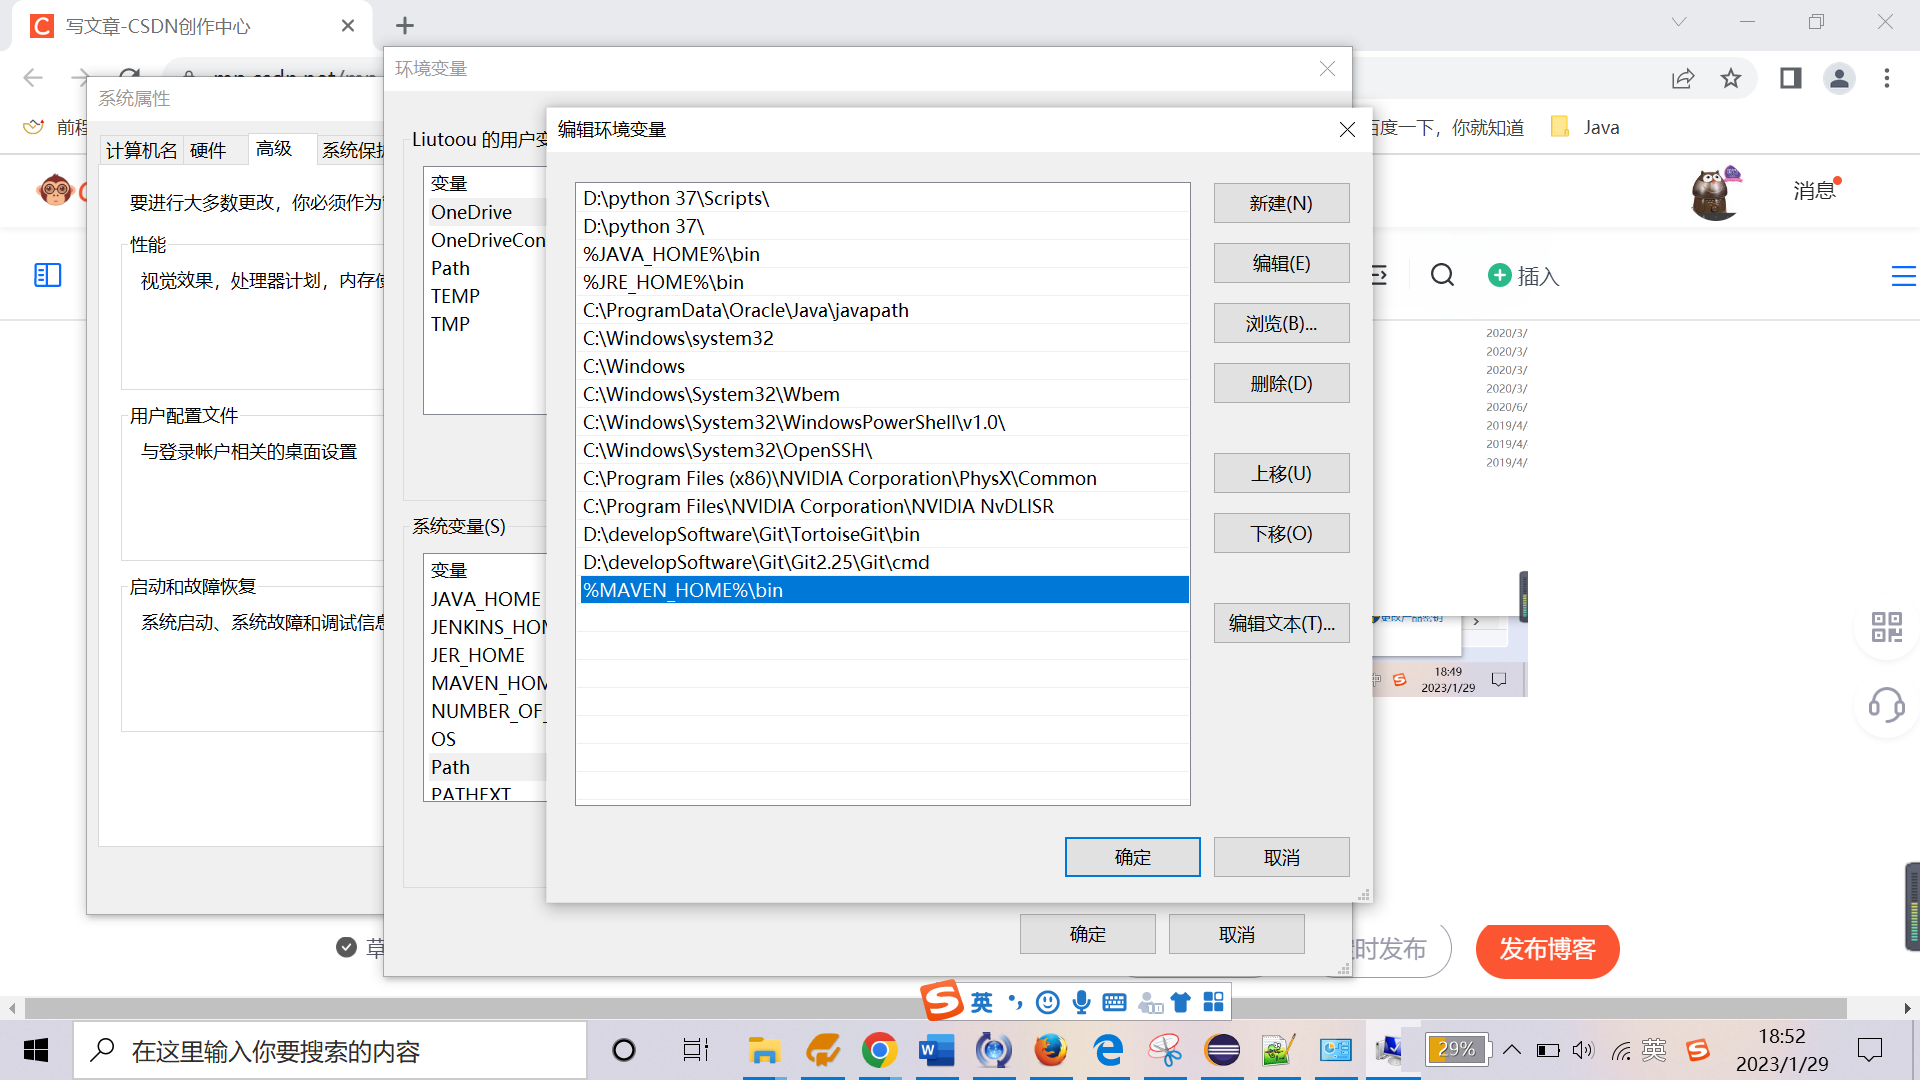
1 新建环境变量:变量名maven_home,变量值为解压后的文件夹:d:\developsoftware\apache-maven-3.6.1

2 修改path变量:
2 修改maven全局配置文件:
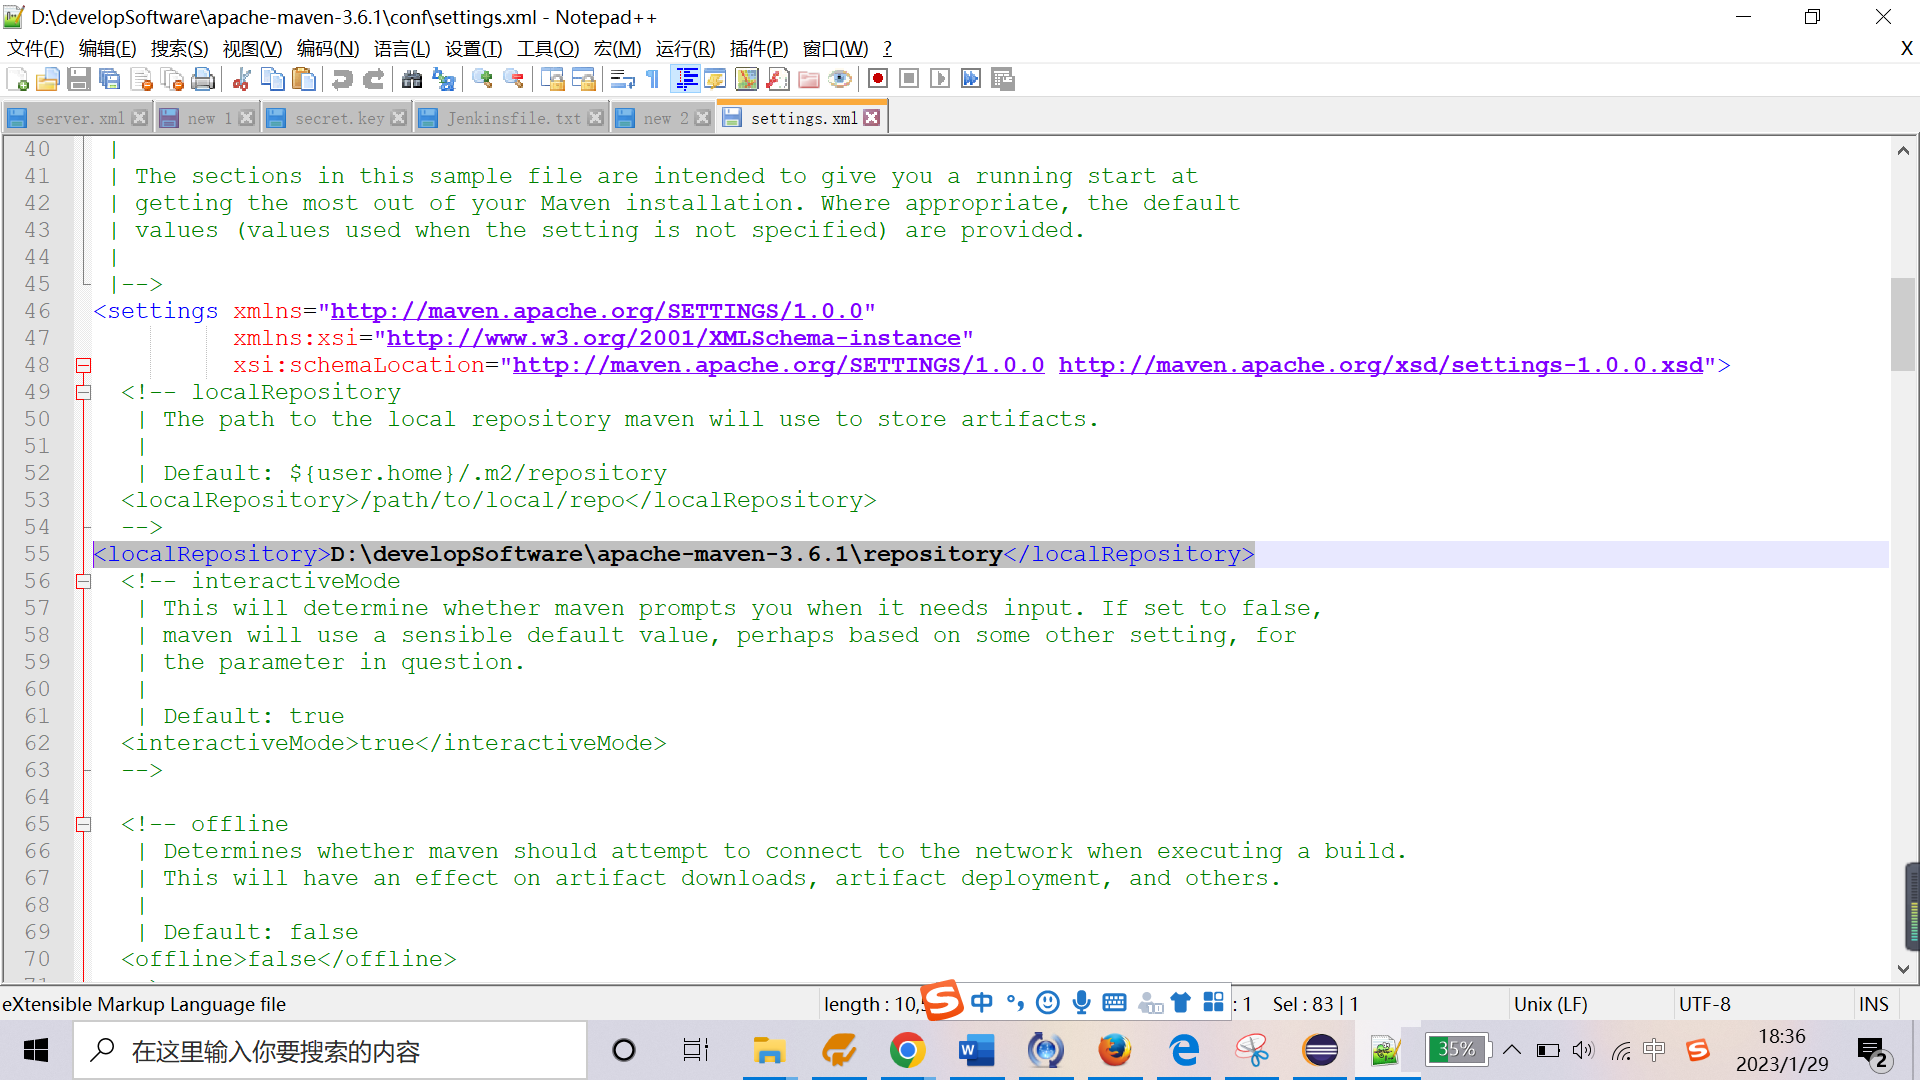
将maven仓库配置为自己创建的文件夹+配置mirror:修改这个文件d:\developsoftware\apache-maven-3.6.1\conf\settings.xml
创建maven仓库:自定义文件夹作为本地maven仓库
如新建文件夹 d:\developsoftware\apache-maven-3.6.1\repository
配置文件路径 d:\developsoftware\apache-maven-3.6.1\conf\settings.xml ,
1 将maven仓库配置为自己创建的文件夹:l55
<localrepository>d:\developsoftware\apache-maven-3.6.1\repository</localrepository>
2 配置阿里云镜像,指定下载jar包的地址,这样访问会比较快:l159-164
<mirror>
<id>nexus-aliyun</id>
<mirrorof>central</mirrorof>
<name>nexus aliyun</name>
<url>http://maven.aliyun.com/nexus/content/groups/public</url>
</mirror>

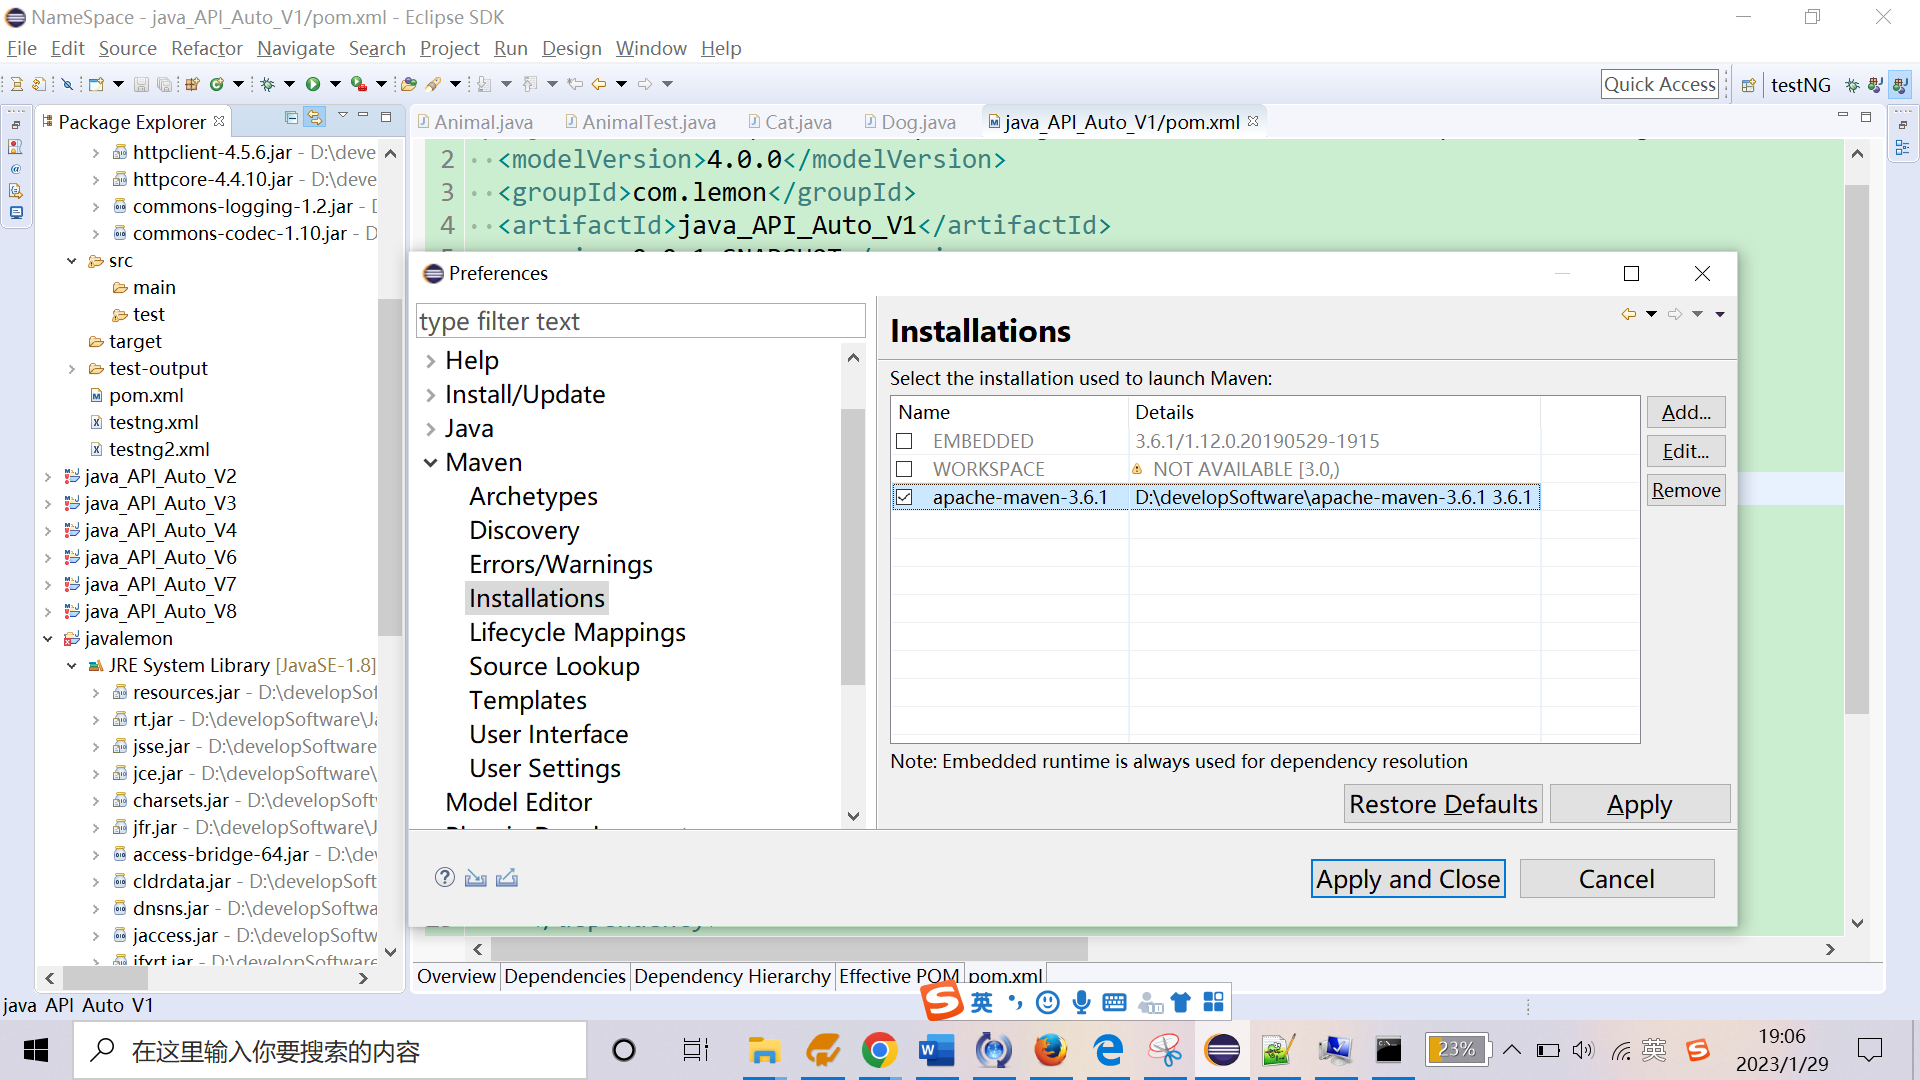
3 eclipes中配置maven
window->preference->maven->installation/user settings, apply.
maven-installation: 配置本地maven根目录:d:\developsoftware\apache-maven-3.6.1
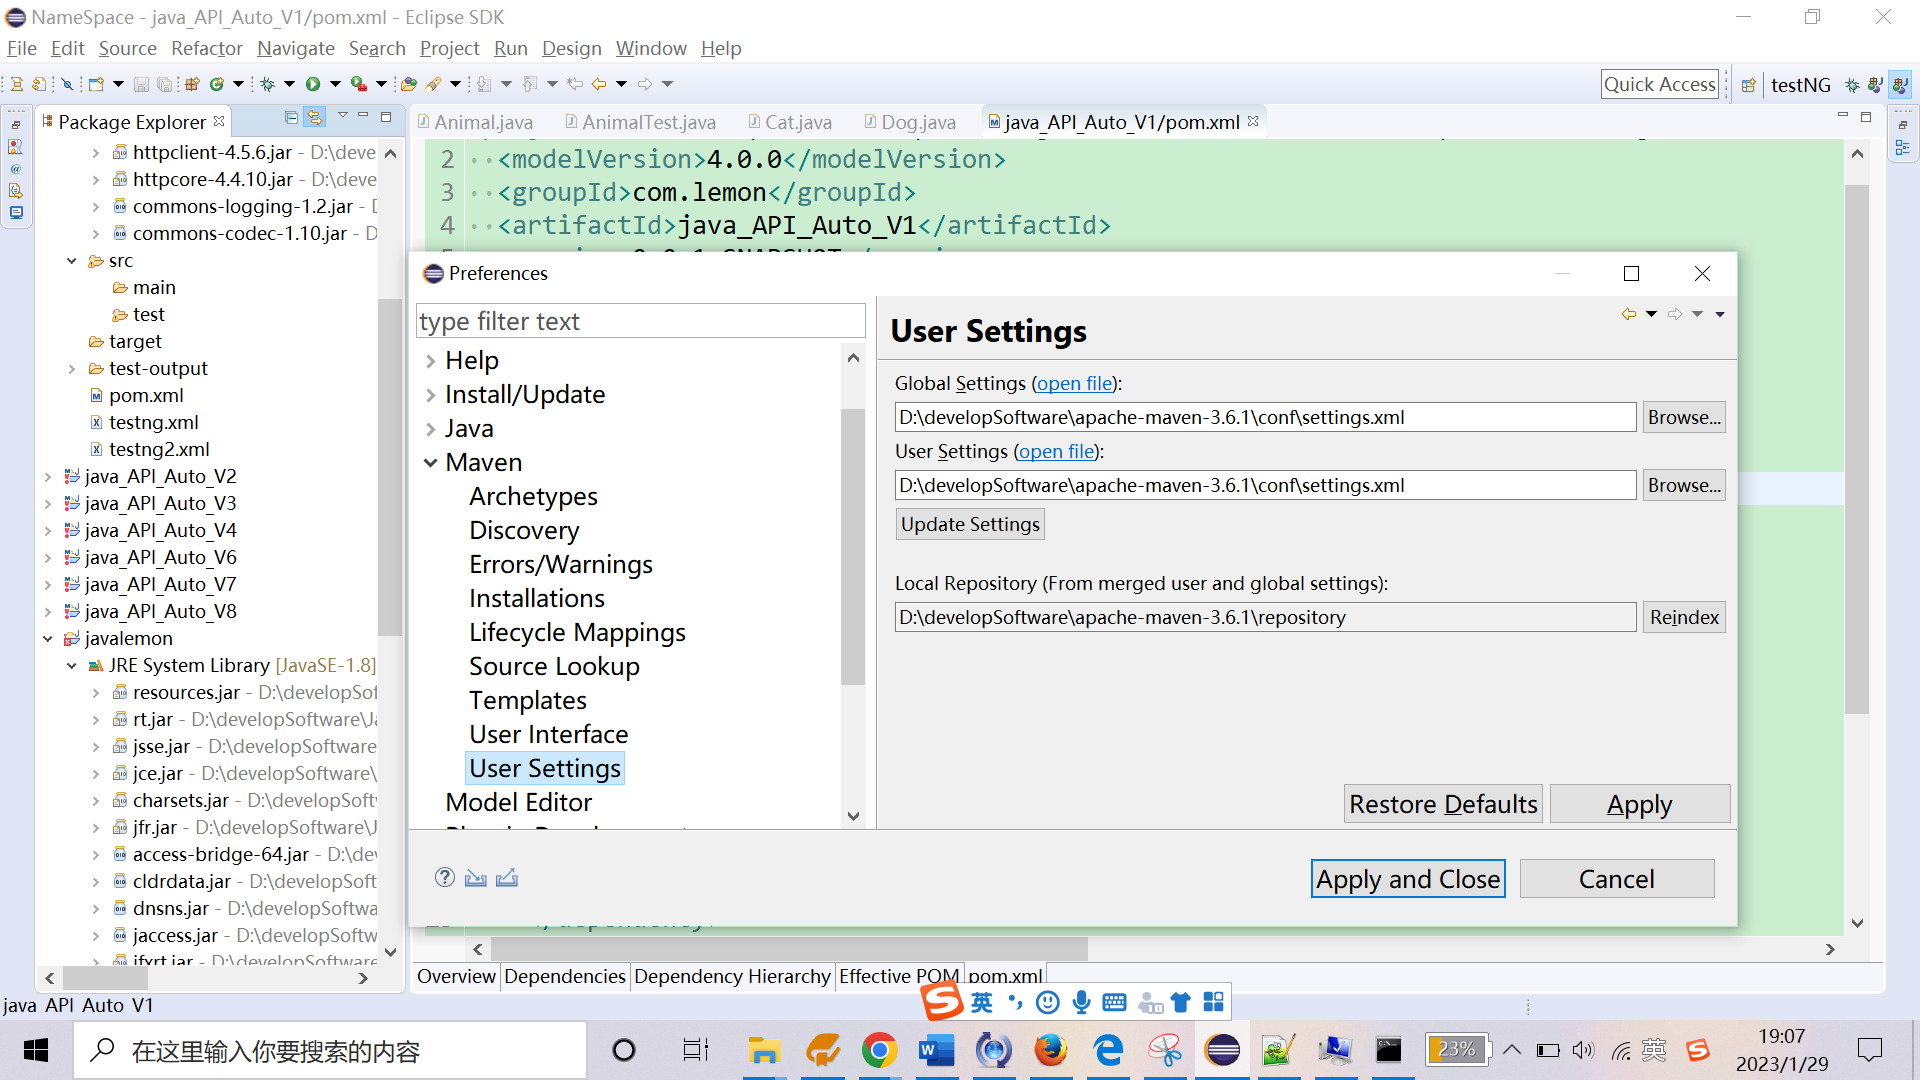
maven-user settings shall as below:
user setting: d:\developsoftware\apache-maven-3.6.1\conf\settings.xml
local repository: d:\developsoftware\apache-maven-3.6.1\repository
遇到的问题:
eclipse->preference:看不到maven [solution: https://blog.csdn.net/u013033112/article/details/80618961]
solution:安装插件
help --> install new software --> add, 输入如下内容:
m2e
http://download.eclipse.org/technology/m2e/releases
一直next到最后,提示重启eclipse即可。
4 搭建自动化测试环境
1 创建maven项目
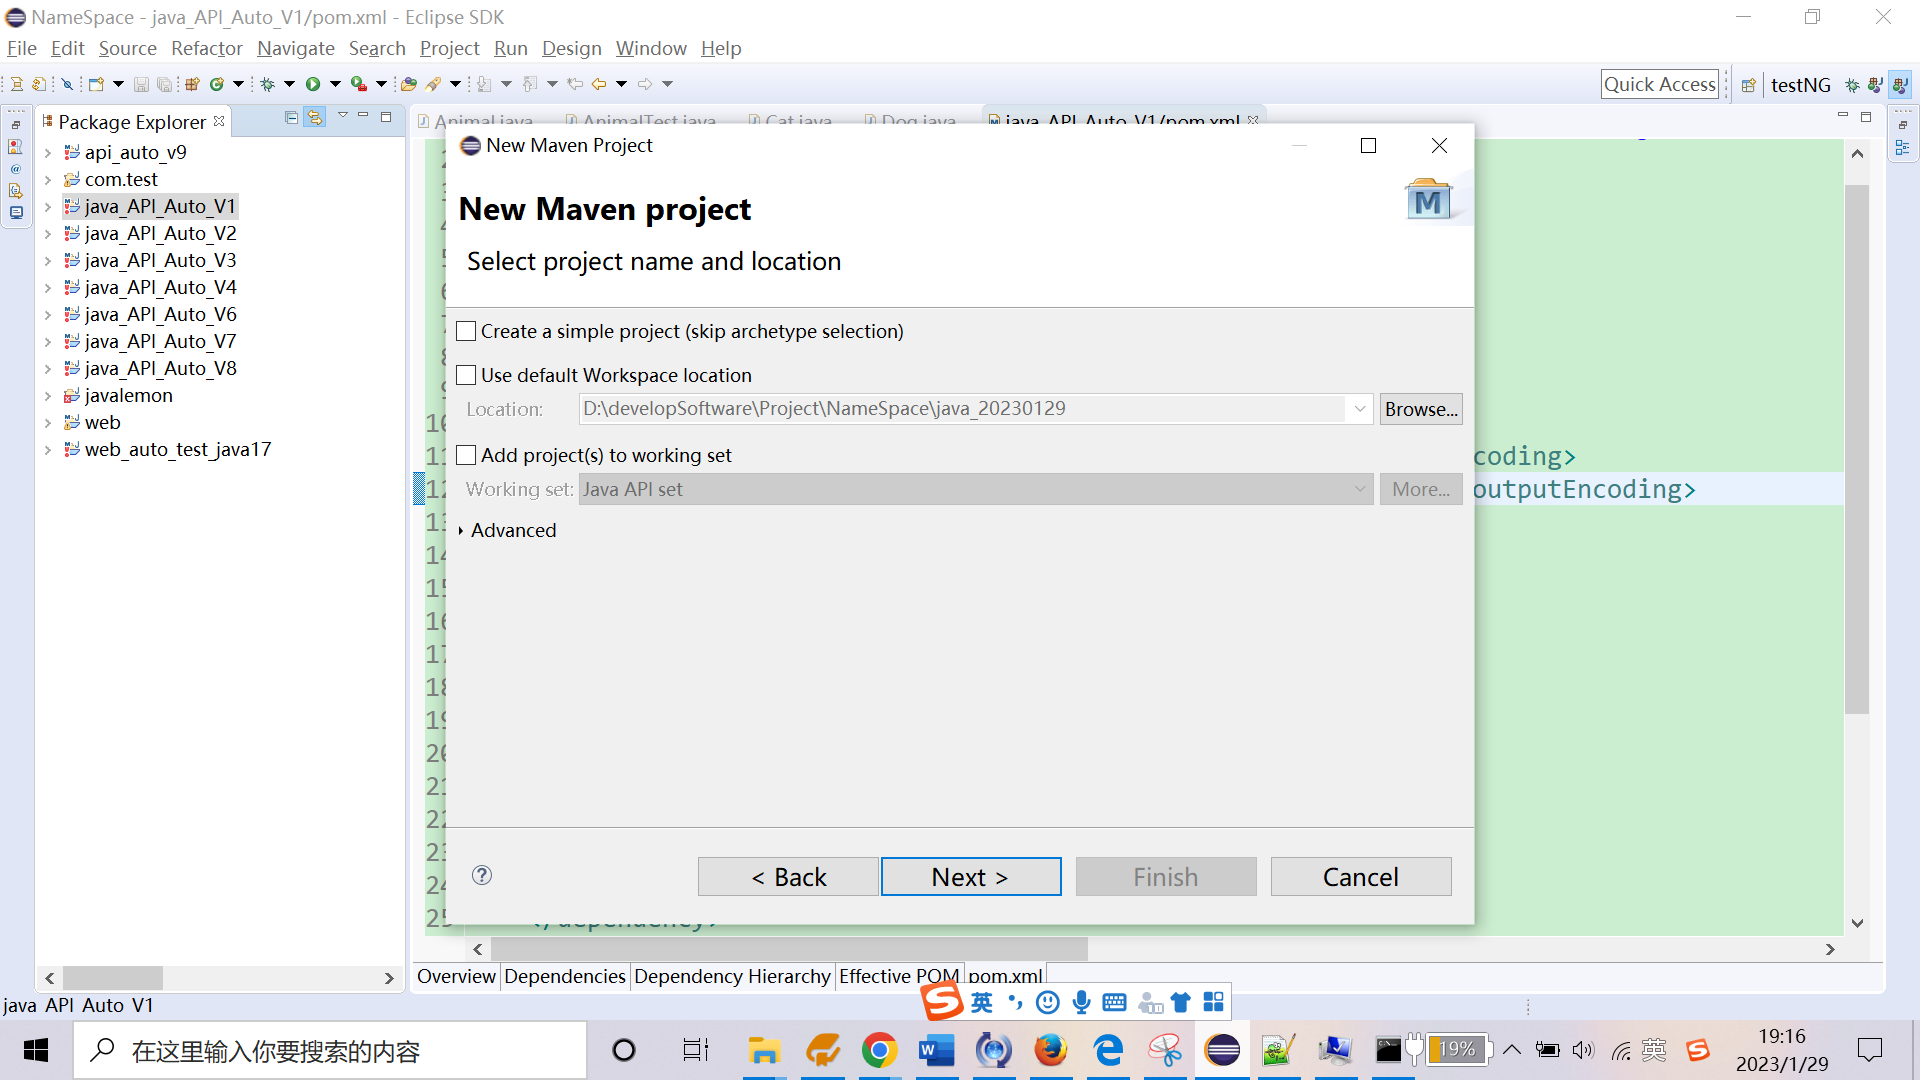
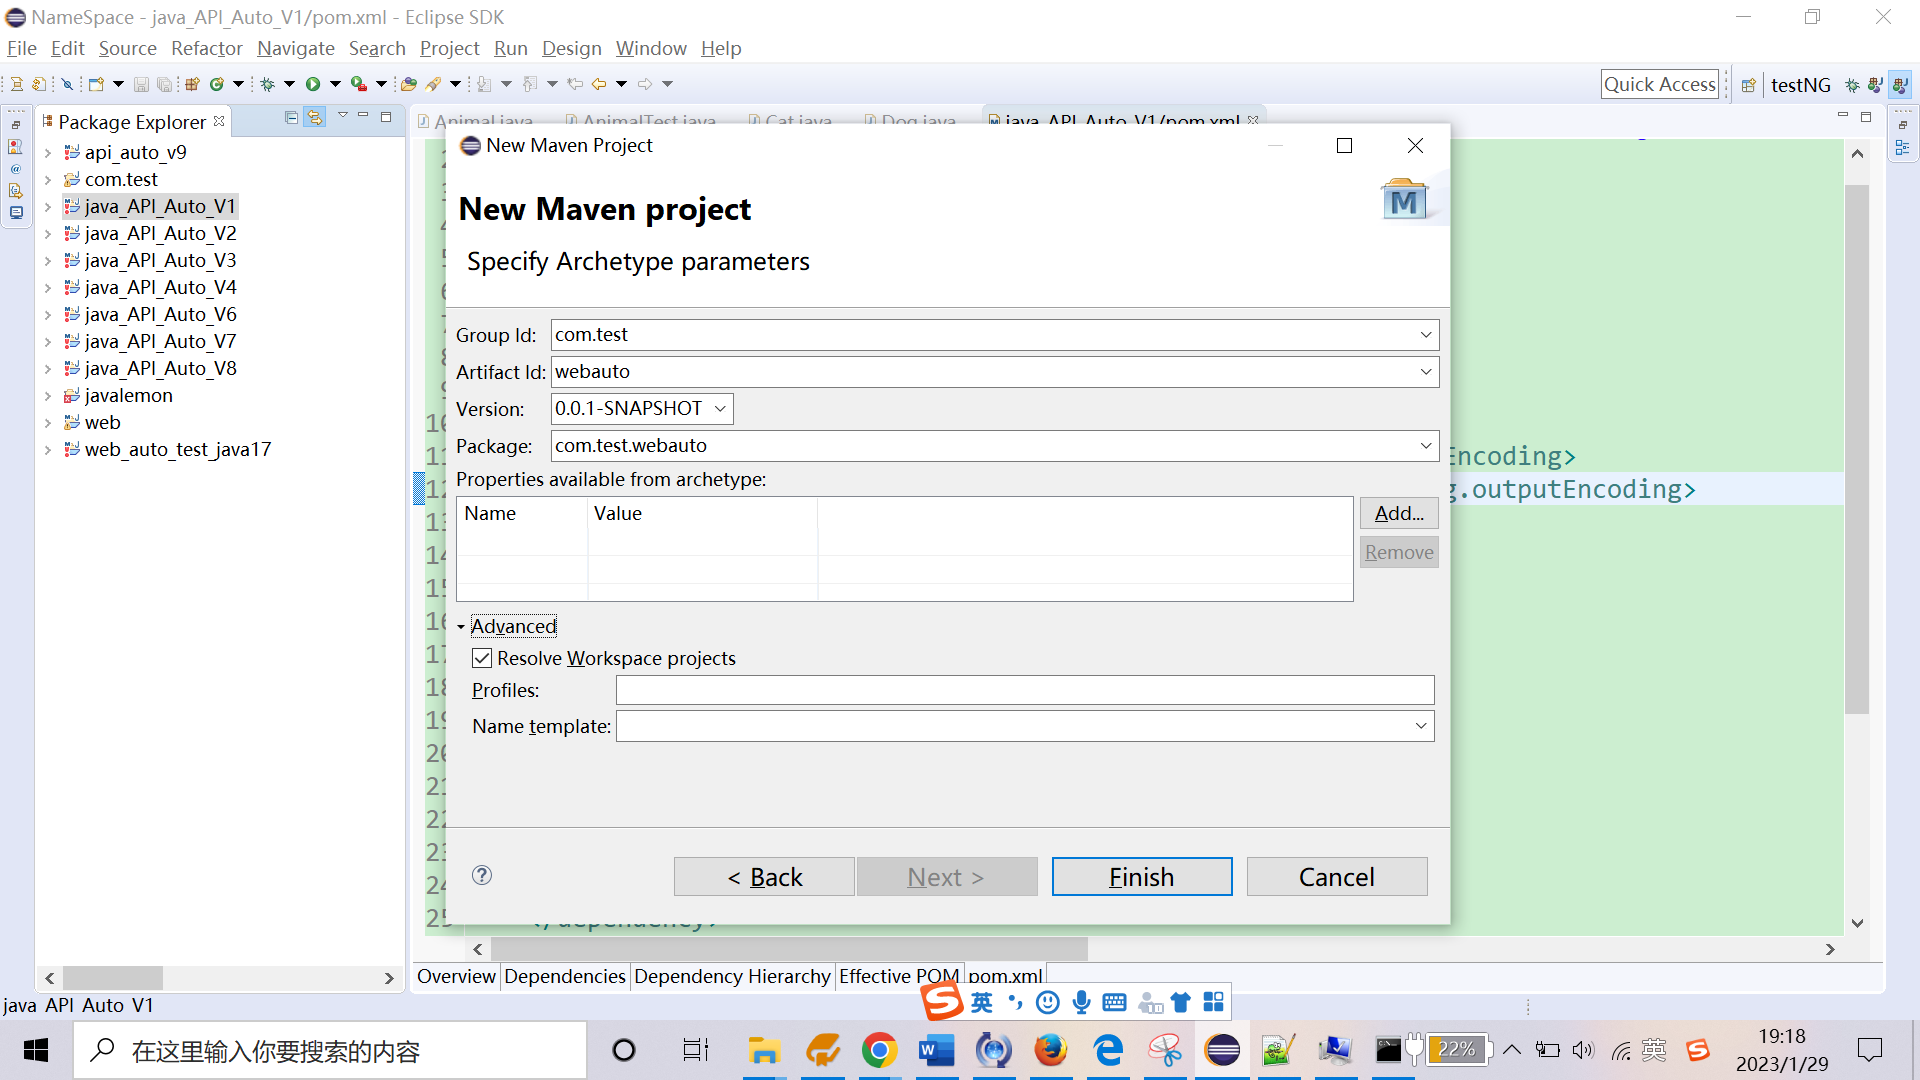
group id:分组,填组织名,如com.lemon
artifact id:项目包名(简单理解为jar包名)
version:版本
packaging:打包方式
pom.xml添加依赖:
<dependencies>
<dependency>
...
</dependency>
...
</dependencies>
1 maven项目结构
src/main/java:一般是开发人员写代码的目录
src/main/resources: 开发人员放项目资源文件的目录
src/test/java:放测试人员代码的目录
src/test/resources:放测试资源文件的目录
maven dependencies:通过maven拿下来的项目依赖包存放目录
target: 存放构建后文件的目录
2 maven的几个常用构建命令
mvn package:打包
mvn install:安装到本地仓库
mvn test:执行单元测试代码
2 引入selenium框架:pom.xml里引入selenium依赖
<dependency>
<groupid>org.seleniumhq.selenium</groupid>
<artifactid>selenium-java</artifactid>
<version>3.141.59</version>
</dependency>
note: version 应该选比较新,并且usage人数比较多的:https://mvnrepository.com/artifact/org.seleniumhq.selenium/selenium-java

进到版本页:然后把maven配置信息复制粘贴到eclipse里pom.xml的文件里。
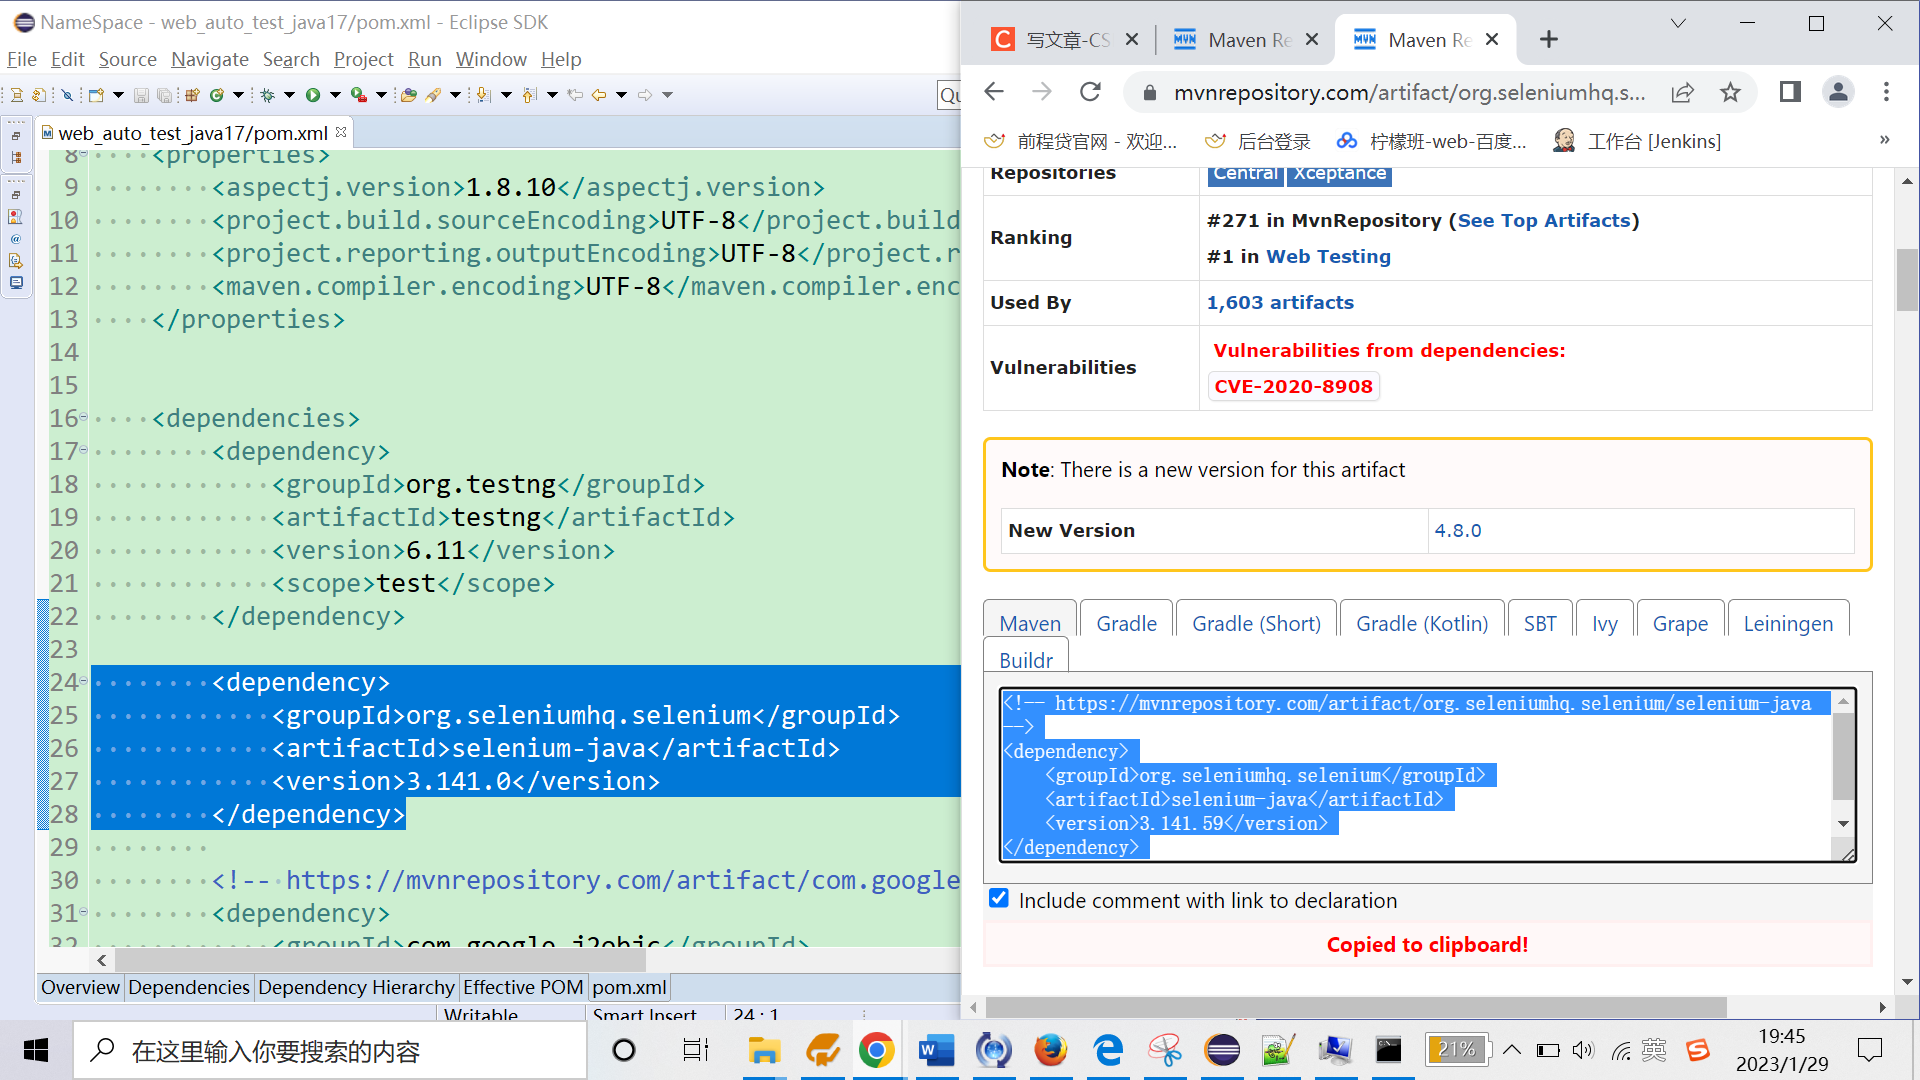
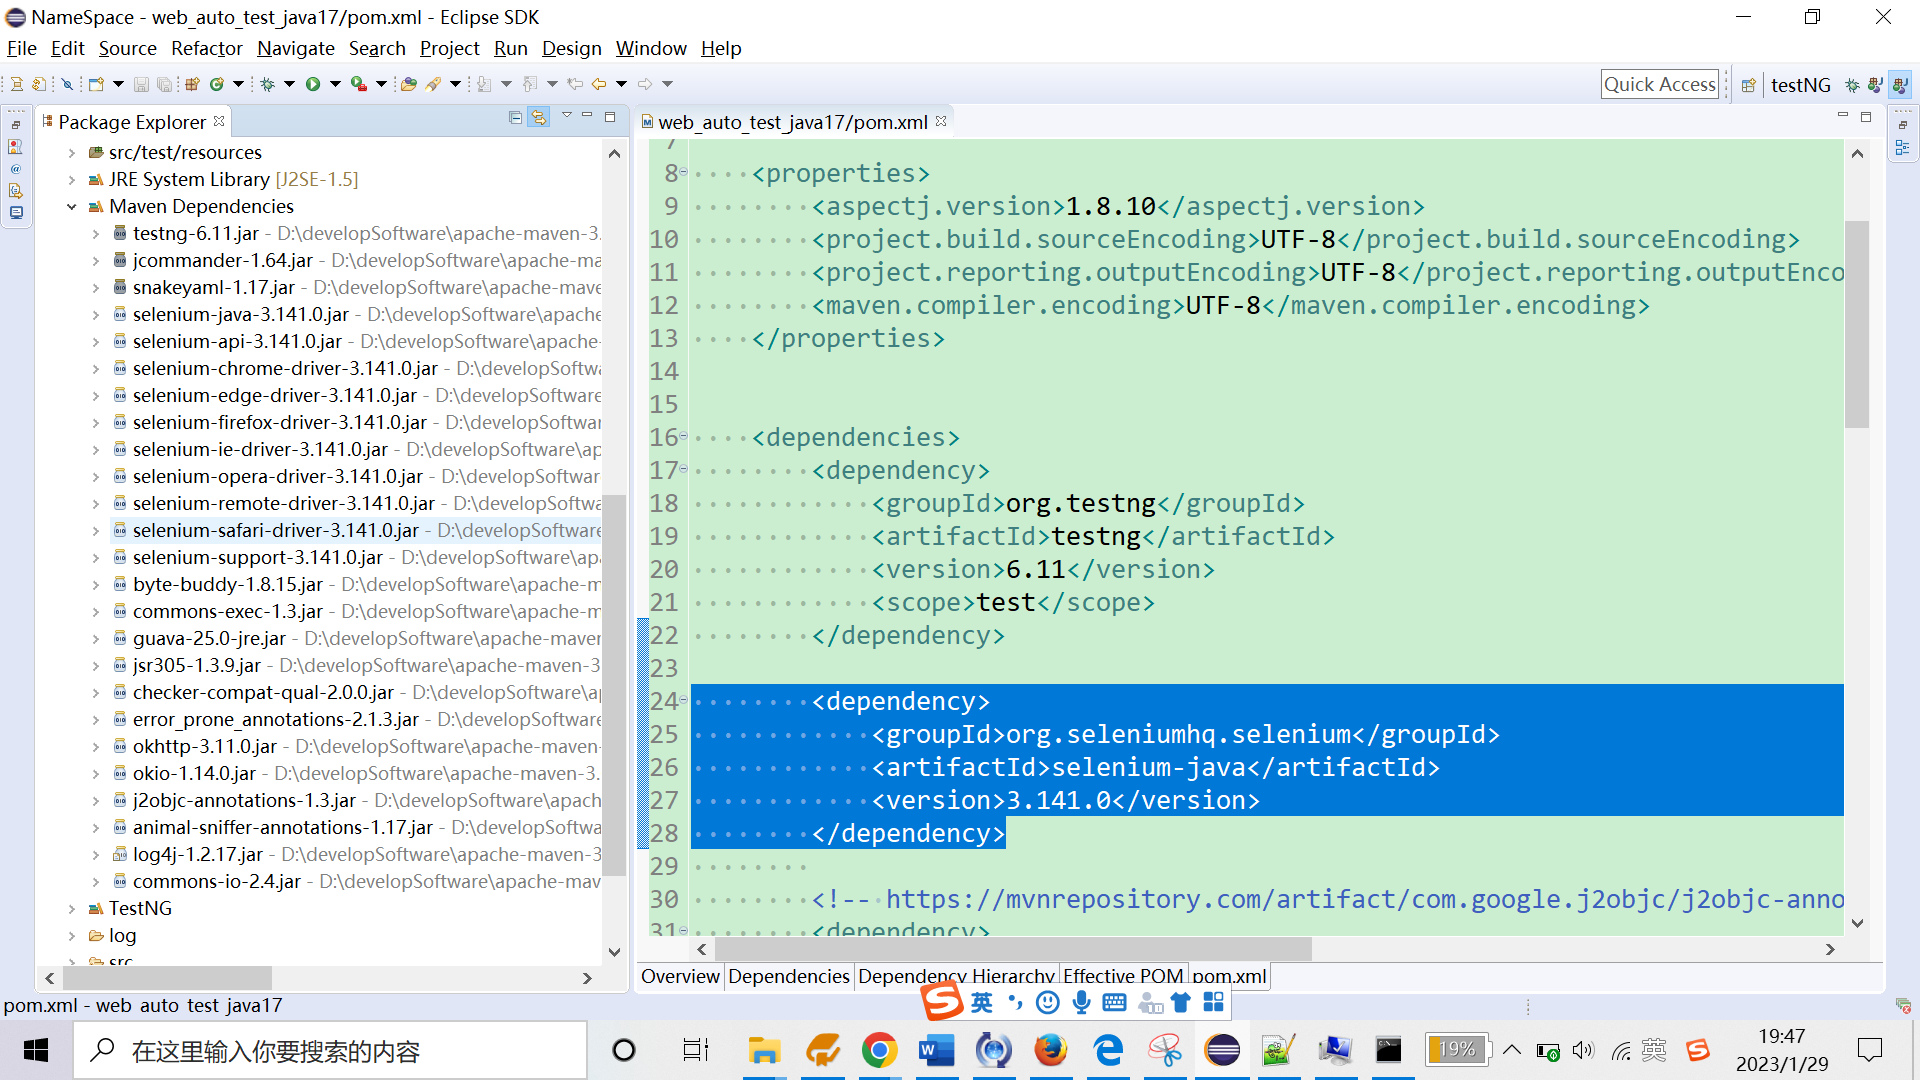
保存pom.xml后会自动下载依赖包,然后在eclipse中maven dependency下面就能看到这些依赖包
遇到问题:但是我的本地pom一直报错:
解决方法:
pom.xml:
<properties>
<maven.compiler.target>1.8</maven.compiler.target>
<maven.compiler.source>1.8</maven.compiler.source>
<!-- 文件拷贝时的编码 -->
<project.build.sourceencoding>utf-8</project.build.sourceencoding>
<project.reporting.outputencoding>utf-8</project.reporting.outputencoding>
<!-- 编译时的编码 -->
<maven.compiler.encoding>utf-8</maven.compiler.encoding>
<aspectj.version>1.8.10</aspectj.version>
</properties>
<dependencies>
<dependency>
<groupid>org.seleniumhq.selenium</groupid>
<artifactid>selenium-java</artifactid>
<version>3.141.0</version>
</dependency>
<!-- https://mvnrepository.com/artifact/com.google.j2objc/j2objc-annotations -->
<dependency>
<groupid>com.google.j2objc</groupid>
<artifactid>j2objc-annotations</artifactid>
<version>1.3</version>
</dependency>
<!-- https://mvnrepository.com/artifact/org.codehaus.mojo/animal-sniffer-annotations -->
<dependency>
<groupid>org.codehaus.mojo</groupid>
<artifactid>animal-sniffer-annotations</artifactid>
<version>1.17</version>
<scope>provided</scope>
</dependency>
</dependencies>
</project>
最終我的pom.xml(可用):
<project xmlns="http://maven.apache.org/pom/4.0.0" xmlns:xsi="http://www.w3.org/2001/xmlschema-instance" xsi:schemalocation="http://maven.apache.org/pom/4.0.0 " target="_blank">http://maven.apache.org/xsd/maven-4.0.0.xsd">
<modelversion>4.0.0</modelversion>
<groupid>com.twentythree</groupid>
<artifactid>webtest</artifactid>
<version>0.0.1-snapshot</version>
<name>com.webtest.auto</name>
<properties>
<maven.compiler.target>1.8</maven.compiler.target>
<maven.compiler.source>1.8</maven.compiler.source>
<!-- 文件拷贝时的编码 -->
<project.build.sourceencoding>utf-8</project.build.sourceencoding>
<project.reporting.outputencoding>utf-8</project.reporting.outputencoding>
<!-- 编译时的编码 -->
<maven.compiler.encoding>utf-8</maven.compiler.encoding>
<aspectj.version>1.8.10</aspectj.version>
</properties>
<dependencies>
<dependency>
<groupid>org.seleniumhq.selenium</groupid>
<artifactid>selenium-java</artifactid>
<version>3.141.0</version>
</dependency>
<!-- https://mvnrepository.com/artifact/com.google.j2objc/j2objc-annotations -->
<dependency>
<groupid>com.google.j2objc</groupid>
<artifactid>j2objc-annotations</artifactid>
<version>1.3</version>
</dependency>
<!-- https://mvnrepository.com/artifact/org.codehaus.mojo/animal-sniffer-annotations -->
<dependency>
<groupid>org.codehaus.mojo</groupid>
<artifactid>animal-sniffer-annotations</artifactid>
<version>1.17</version>
<scope>provided</scope>
</dependency>
</dependencies>
</project>
3 写代码
0.1 下载老版本的firefox-v56 &取消自动更新:
下载:http://ftp.mozilla.org/pub/firefox/releases/56.0/win64/zh-cn/
设置:
1 打开firefox浏览器->选项->常规->选中:不检查更新。
2 找到firefox安装路径:c:\program files\mozilla firefox,删掉下面的两个updater文件即可。
0.2 下载老版本的chrome-v68,且取消自动更新:
下载:https://www.chromedownloads.net/chrome64win/
设置:https://jingyan.baidu.com/article/76a7e409f2137afc3b6e15be.html
1 右键选中左下角,运行,msconfig,服务,选中:隐藏所有microsoft服务,取消选中google更新服务,确定即可。
1 chrome打开百度首页(好了):
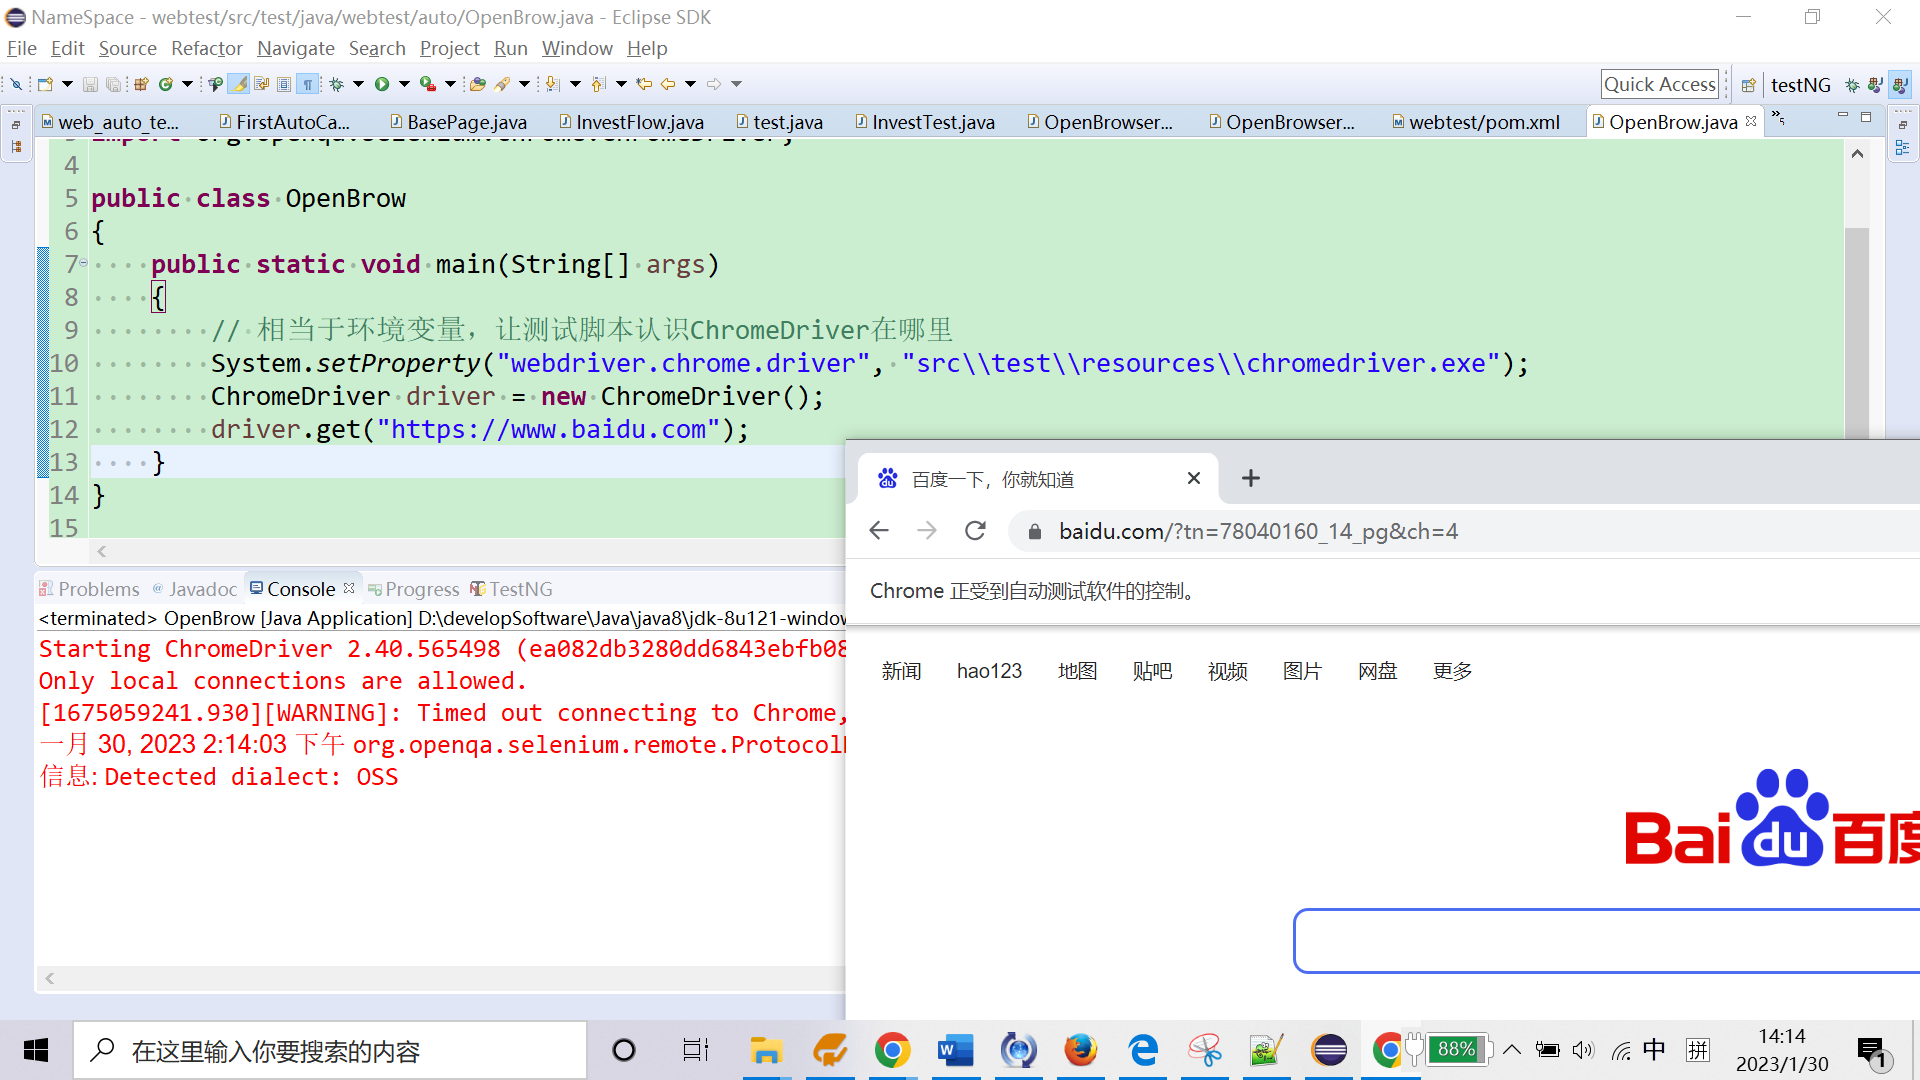
1 代码:
public class openbrow
{
public static void main(string[] args)
{
// 相当于环境变量,让测试脚本认识chromedriver在哪里
system.setproperty("webdriver.chrome.driver", "src\\test\\resources\\chromedriver.exe");
chromedriver driver = new chromedriver();
driver.get("https://www.baidu.com");
}
}
2 问题
q1: the path to the driver executable must be set by the webdirver.chrome.driver system properity
s1:
1 下载chromedriver:http://npm.taobao.org/mirrors/chromedriver,下载什么版本呢?在chrome地址栏输入:chrome://version/ ,查看当前chrome浏览器版本68,查看:http://npm.taobao.org/mirrors/chromedriver/2.40/notes.txt,则对应的chromedriver 可以是v2.41,v2.40,v2.39.先试下v2.40.下载到本地,解压得到一个exe文件,把这个chromedriver.exe文件复制到eclipse-src/test/resources路径下。
2 配置属性:
system.setproperty("webdriver.chrome.driver", "src\\main\\resources\\chromedriver.exe");
代码:
public static void main(string[] args)
{
//相当于环境变量,让测试脚本认识chromedriver在哪里
system.setproperty("webdriver.chrome.driver", "src\\main\\resources\\chromedriver.exe");
chromedriver driver = new chromedriver();
driver.get("https://www.baidu.com");
}
2 firefox 打开百度首页:
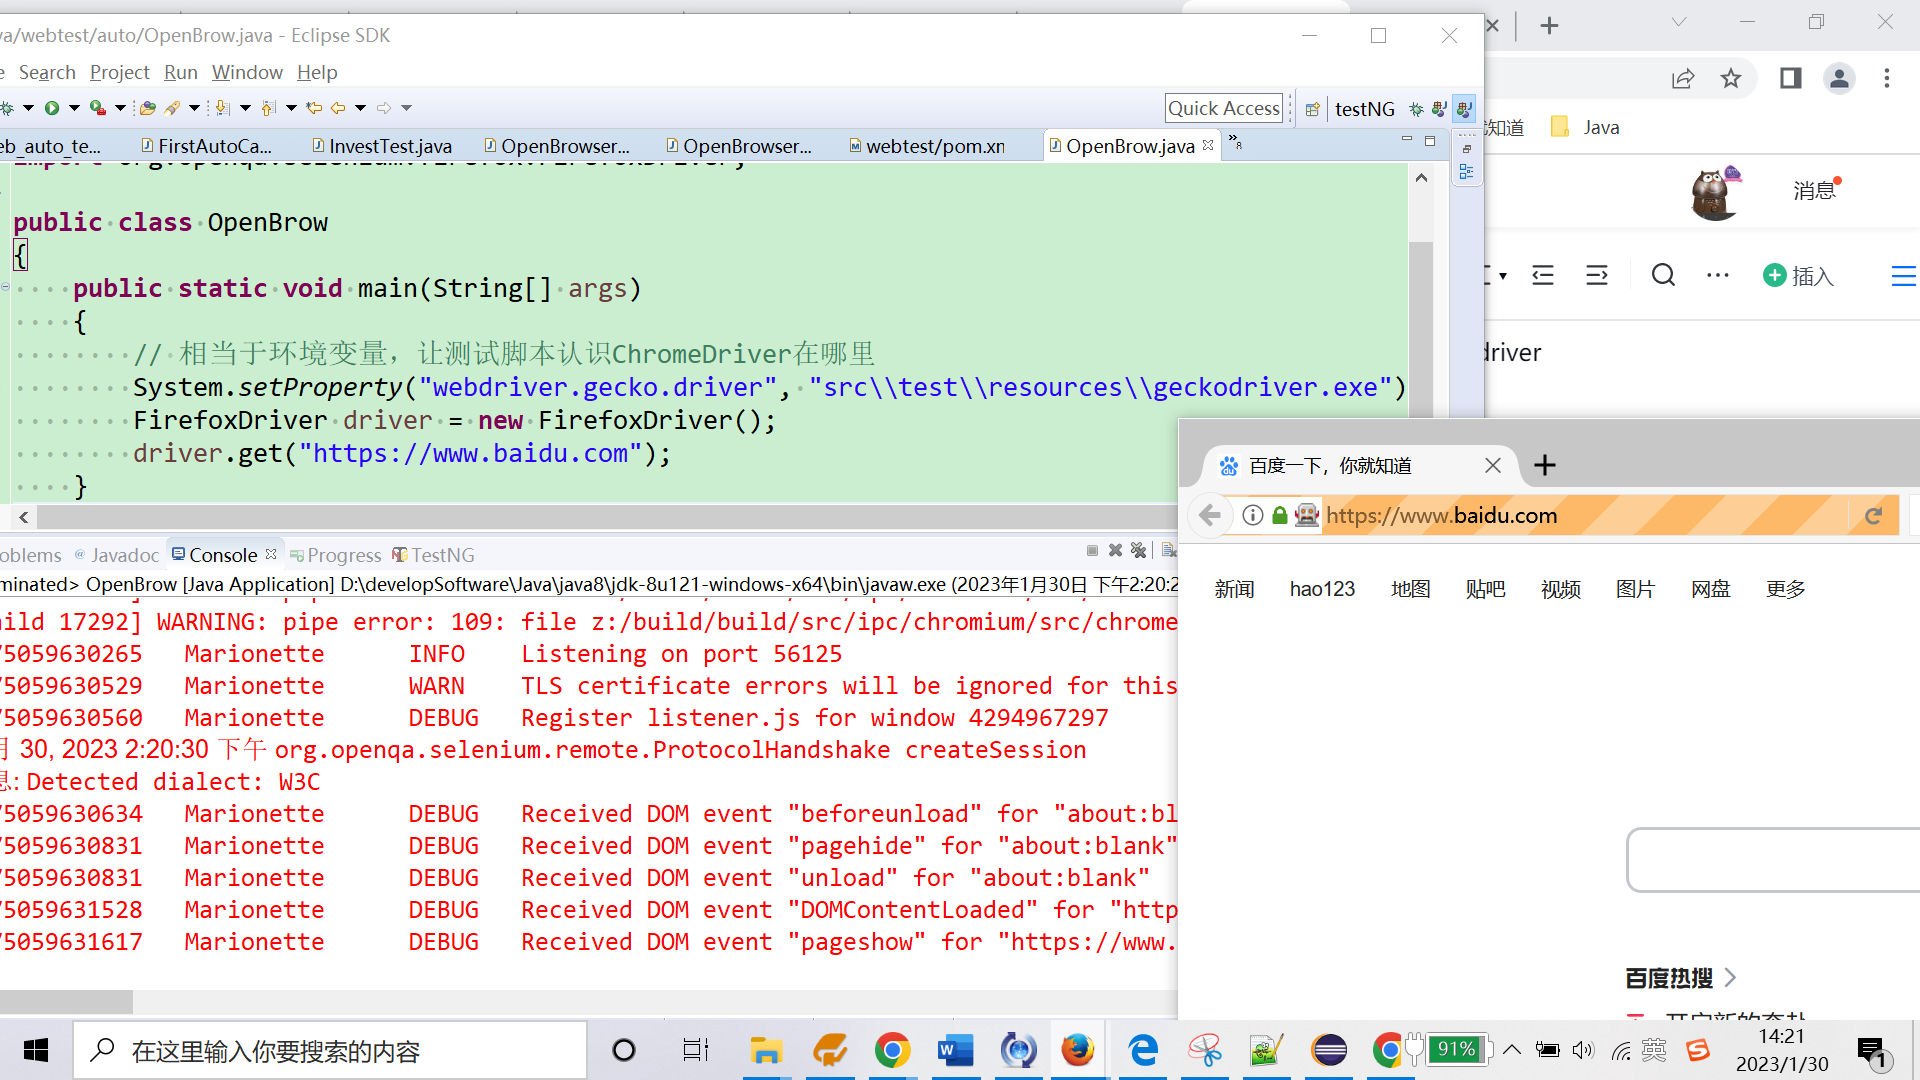
1 代码:
public class openbrow
{
public static void main(string[] args)
{
// 相当于环境变量,让测试脚本认识chromedriver在哪里
system.setproperty("webdriver.gecko.driver", "src\\test\\resources\\geckodriver.exe");
firefoxdriver driver = new firefoxdriver();
driver.get("https://www.baidu.com");
}
}
2 问题:
q1:cannot find firefox binary in path.
solution:
//如果firefox安装不是在默认的c盘,需要:设置系统属性:属性名:"webdriver.gecko.bin",属性值:firefox.exe安装的路径
//system.setproperty("webdriver.firefox.bin", value);
q2: the path to the driver executable must be set by the webdriver.gecko.driver
solution: 缺少火狐浏览器驱动包。
下载geckodriver驱动包?什么版本呢?根据firefox版本,找到合适的geckodriver版本。
因为firefox是v56,可以下载geckodriver是0.19或者0.21
geckodriver镜像地址:https://npm.taobao.org/mirrors/geckodriver/
选v0.20.0,下载,解压得到geckodriver.exe,把这个文件复制到eclipse,src/test/resources路径下面。
加一行代码:
system.setproperty("webdriver.gecko.driver", "src\\main\\resources\\geckodriver.exe");
3 ie打开百度首页:
q1:缺少ie浏览器驱动包:the path to the driver executable must be set by the webdriver.ie.driver
solution:下载ie浏览器驱动包,配置属性
注意:chromedriver、firefoxdriver版本是根据chrome、firefox浏览器版本决定的,但是iedriver的版本是根据selenium决定的。
因为selenium是3.141.0,所以iedriver选择:3.141
iedriver镜像下载:https://npm.taobao.org/mirrors/selenium/
iedriverserver,64位,3.141.0
把解压的iedriverserver.exe放到eclipse,src/test/resources路径下,加一行代码:
system.setproperty("webdriver.ie.driver", "src\\main\\resources\\iedriverserver.exe");
q2:protected mode settings are not the same for all zones
solution1: 不推荐
手动打开ie浏览器->工具->安全->所有选项的保护模式全部关闭
solution2:推荐,代码处理
//忽略ie protected mode的设置
desiredcapabilities capabilities = new desiredcapabilities();
capabilities.setcapability(internetexplorerdriver.introduce_flakiness_by_ignoring_security_domains, true);
internetexplorerdriver iedriver = new internetexplorerdriver(capabilities);
q3: unexpected error launching internet explorer. browser zoom level was set to 150%. it should be set to 100%
solution1:手动调整到100%,不推荐。
solution2:代码调整,推荐:
capabilities.setcapability(internetexplorerdriver.ignore_zoom_setting, true);
@suppresswarnings("deprecation")
internetexplorerdriver iedriver = new internetexplorerdriver(capabilities);
4 封装一个通用的方法来打开各浏览器chrome、firefox、ie:
public static void main(string[] args)
{
webdriver driver = openbrowser("ie");
driver.get("https://www.baidu.com");
}
//多态:父类webdriver接收子类返回对象:chromedriver/firefoxdriver/iedriver
public static webdriver openbrowser(string browser) {
if(browser.equalsignorecase("chrome")) {
system.setproperty("webdriver.chrome.driver", "src\\main\\resources\\chromedriver.exe");
chromedriver chromedriver = new chromedriver();
return chromedriver;
}else if (browser.equalsignorecase("firefox")) {
system.setproperty("webdriver.gecko.driver", "src\\main\\resources\\geckodriver.exe");
firefoxdriver firefoxdriver = new firefoxdriver();
return firefoxdriver;
}else if (browser.equalsignorecase("ie")) {
system.setproperty("webdriver.ie.driver", "src\\main\\resources\\iedriverserver.exe");
desiredcapabilities capabilities = new desiredcapabilities();
capabilities.setcapability(internetexplorerdriver.introduce_flakiness_by_ignoring_security_domains, true);
capabilities.setcapability(internetexplorerdriver.ignore_zoom_setting, true);
@suppresswarnings("deprecation")
internetexplorerdriver iedriver = new internetexplorerdriver(capabilities);
return iedriver;
}
return null;
}
}


发表评论