devops完整搭建教程
1.简介:
devops(development operations)是一种软件开发方法论和工作流程,旨在促进软件开发团队和运维团队之间的协作与沟通,以实现更高效的软件交付和运营。
2.工作流程:
持续集成(continuous integration,ci):开发团队将代码频繁地集成到共享存储库中,确保代码的一致性和稳定性。
持续交付(continuous delivery,cd):自动化构建、测试和部署流程,以快速将代码交付到生产环境。
自动化测试(automated testing):使用自动化测试工具和技术,确保软件的质量和稳定性。
自动化部署(automated deployment):自动化部署工具的使用,以快速、准确地部署软件到目标环境。
监控与日志(monitoring and logging):实时监测和记录系统的运行状态和日志,帮助快速发现和解决问题。
3.优缺点
优点:
加快交付速度:通过自动化流程和协作,加快软件的交付速度和发布周期。
提高质量和稳定性:自动化测试和部署流程能够提高软件的质量和稳定性。
促进协作与沟通:devops强调开发团队和运维团队之间的协作与沟通,改善工作效率和团队合作。
减少错误和故障:自动化流程和实时监控能够减少人为错误和系统故障的发生。
缺点:
学习成本高:实施和运营devops需要一定的学习和实践成本,对团队和组织提出了技术和文化上的要求。
依赖自动化工具:devops依赖于各种自动化工具和技术,需要投入一定的资源和成本进行选型、集成和维护。
组织变革需求:devops要求开发团队和运维团队之间的协作与沟通,可能需要进行组织结构和文化上的变革。
总体而言,devops通过将开发和运维整合在一起,以协作和自动化的方式,提高软件交付效率和质量,同时促进团队协作和沟通。
环境准备:
| 主机名 | ip地址 | 作用 | 安装的软件 | 系统版本 |
|---|---|---|---|---|
| gitlab.example.com | 192.168.10.130 | 本地代码仓库 | gitlab-ce | |
| jenkins.example.com | 192.168.10.131 | 流水线 | jenkins、docker、git、maven | |
| harbor.example.com | 192.168.10.132 | 本地容器镜像仓库(存储镜像) | harbor、docker-compose、docker | |
| docker.example.com | 192.168.10.133 | 制作镜像、上传镜像 | docker |
环境部署
准备工作:(所有主机都要做)
关闭防火墙、配置selinuex、配置yum源
[root@localhost ~]# systemctl disable --now firewalld.service
[root@localhost ~]# setenforce 0
[root@localhost ~]# sed -i 's/^selinux=enforcing/selinux=disabled/g' /etc/selinux/config
[root@localhost ~]# rm -rf /etc/yum.repos.d/*
[root@localhost ~]# curl -o /etc/yum.repos.d/centos-base.repo https://mirrors.aliyun.com/repo/centos-vault-8.5.2111.repo
[root@localhost ~]# sed -i -e '/mirrors.cloud.aliyuncs.com/d' -e '/mirrors.aliyuncs.com/d' /etc/yum.repos.d/centos-base.repoyum
[root@localhost ~]# clean all
18 files removed
[root@localhost ~]# yum makecache
配置gitlab主机(第一台主机)
安装git工具
[root@localhost ~]# yum -y install epel-release git
安装依赖包
yum -y install curl openssh-server openssh-clients postfix cronie perl
启动postfix服务并设置开机自启
[root@localhost ~]# systemctl enable --now postfix
created symlink /etc/systemd/system/multi-user.target.wants/postfix.service → /usr/lib/systemd/system/postfix.service.
[root@localhost ~]#
下载policycoreutils-python依赖包
wget http://mirror.centos.org/centos/7/os/x86_64/packages/policycoreutils-python-2.5-34.el7.x86_64.rpm
解压
[root@localhost opt]# rpm -ivh --force --nodeps policycoreutils-python-2.5-34.el7.x86_64.rpm
# --nodeps 选项 过滤依赖,只装它本身
# --force 选项 强制安装,因为policycoreutils在安装postfix的时候已经安装了,如果不加这个参数安装不了
warning: policycoreutils-python-2.5-34.el7.x86_64.rpm: header v3 rsa/sha256 signature, key id f4a80eb5: nokey
verifying...                          ################################# [100%]
preparing...                          ################################# [100%]
updating / installing...
   1:policycoreutils-python-2.5-34.el7################################# [100%]
[root@localhost opt]#
安装清华大学gitlab软件包
[root@localhost opt]# wget https://mirrors.tuna.tsinghua.edu.cn/gitlab-ce/yum/el7/gitlab-ce-16.4.1-ce.0.el7.x86_64.rpm
解压
[root@localhost opt]# rpm -ivh gitlab-ce-16.4.1-ce.0.el7.x86_64.rpm
出现这个狐狸头则是成功了
[root@localhost opt]# rpm -ivh gitlab-ce-16.4.1-ce.0.el7.x86_64.rpm
warning: gitlab-ce-16.4.1-ce.0.el7.x86_64.rpm: header v4 rsa/sha1 signature, key id f27eab47: nokey
verifying...                          ################################# [100%]
preparing...                          ################################# [100%]
updating / installing...
   1:gitlab-ce-16.4.1-ce.0.el7        ################################# [100%]
it looks like gitlab has not been configured yet; skipping the upgrade script.

       *.                  *.
      ***                 ***
     *****               *****
    .******             *******
    ********            ********
   ,,,,,,,,,***********,,,,,,,,,
  ,,,,,,,,,,,*********,,,,,,,,,,,
  .,,,,,,,,,,,*******,,,,,,,,,,,,
      ,,,,,,,,,*****,,,,,,,,,.
         ,,,,,,,****,,,,,,
            .,,,***,,,,
                ,*,.


     _______ __  __          __
    / ____(_) /_/ /   ____ _/ /_
   / / __/ / __/ /   / __ `/ __ \
  / /_/ / / /_/ /___/ /_/ / /_/ /
  \____/_/\__/_____/\__,_/_.___/


thank you for installing gitlab!
配置gitlab配置文件
修改配置文件
[root@localhost ~]# vim /etc/gitlab/gitlab.rb
......
#通过/external_url查找到下面这一行,httpd://后面加这台主机的ip地址
external_url 'http://192.169.10.130'
通过8080找到一下这两行
/8080
# puma['port'] = 8080    #去掉注释

# gitlab_workhorse['auth_backend'] = "http://localhost:8080"  #去掉注释
编辑完配置文件后需要重载配置文件并重启gitlab
[root@localhost ~]# gitlab-ctl reconfigure
[root@localhost ~]# gitlab-ctl restart
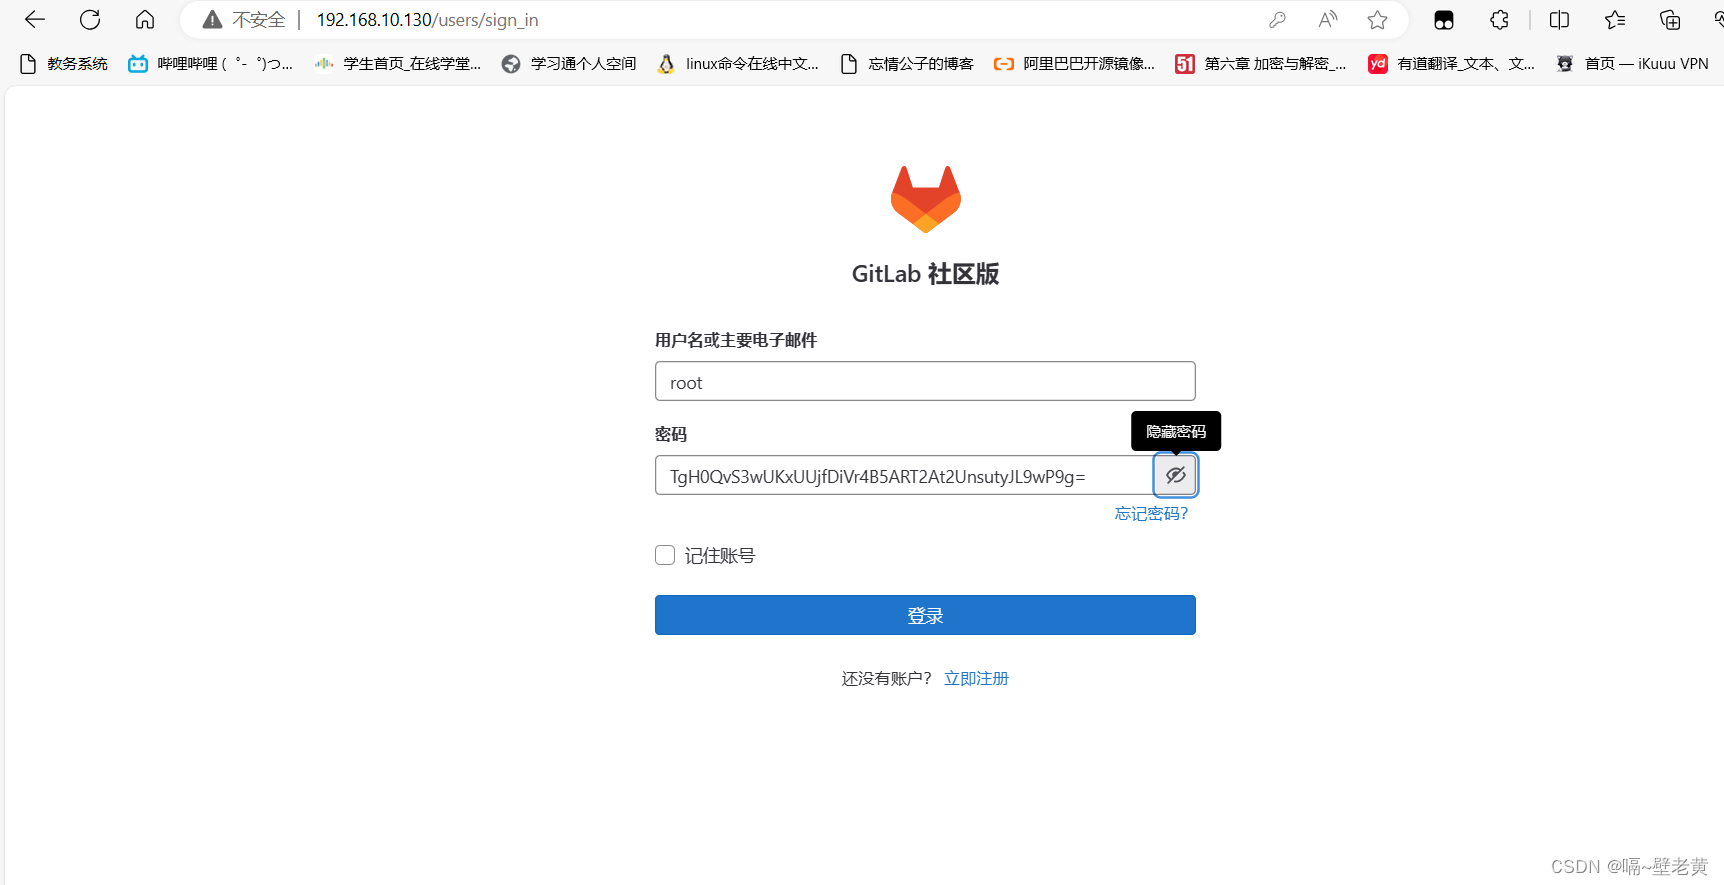
使用ip访问gitlab界面
用户名root,密码在/etc/gitlab/initial_root_password文件里面
[root@localhost ~]# cat /etc/gitlab/initial_root_password
# warning: this value is valid only in the following conditions
#          1. if provided manually (either via `gitlab_root_password` environment variable or via `gitlab_rails['initial_root_password']` setting in `gitlab.rb`, it was provided before database was seeded for the first time (usually, the first reconfigure run).
#          2. password hasn't been changed manually, either via ui or via command line.
#
#          if the password shown here doesn't work, you must reset the admin password following https://docs.gitlab.com/ee/security/reset_user_password.html#reset-your-root-password.

password: tgh0qvs3wukxuujfdivr4b5art2at2unsutyjl9wp9g=  #这里是密码

# note: this file will be automatically deleted in the first reconfigure run after 24 hours.
                                    #这里提示此文件将在第一次重新配置运行24小时后自动删除,所以登录后记得修改密码
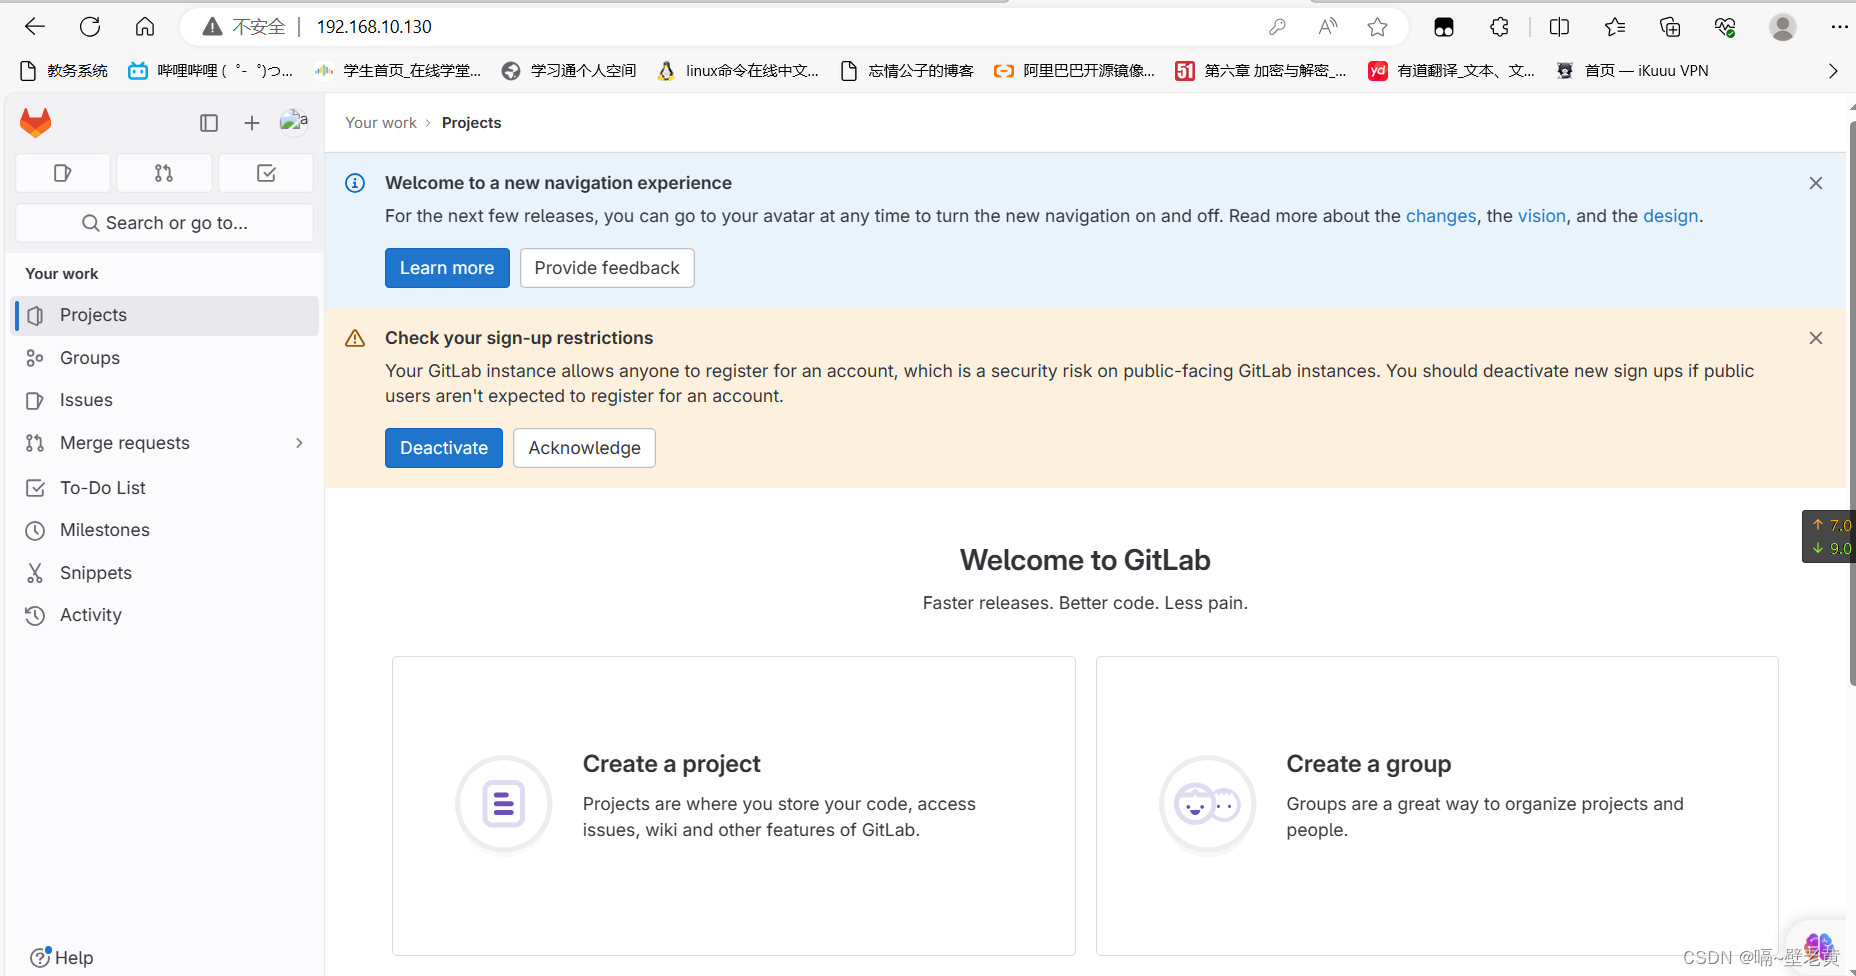
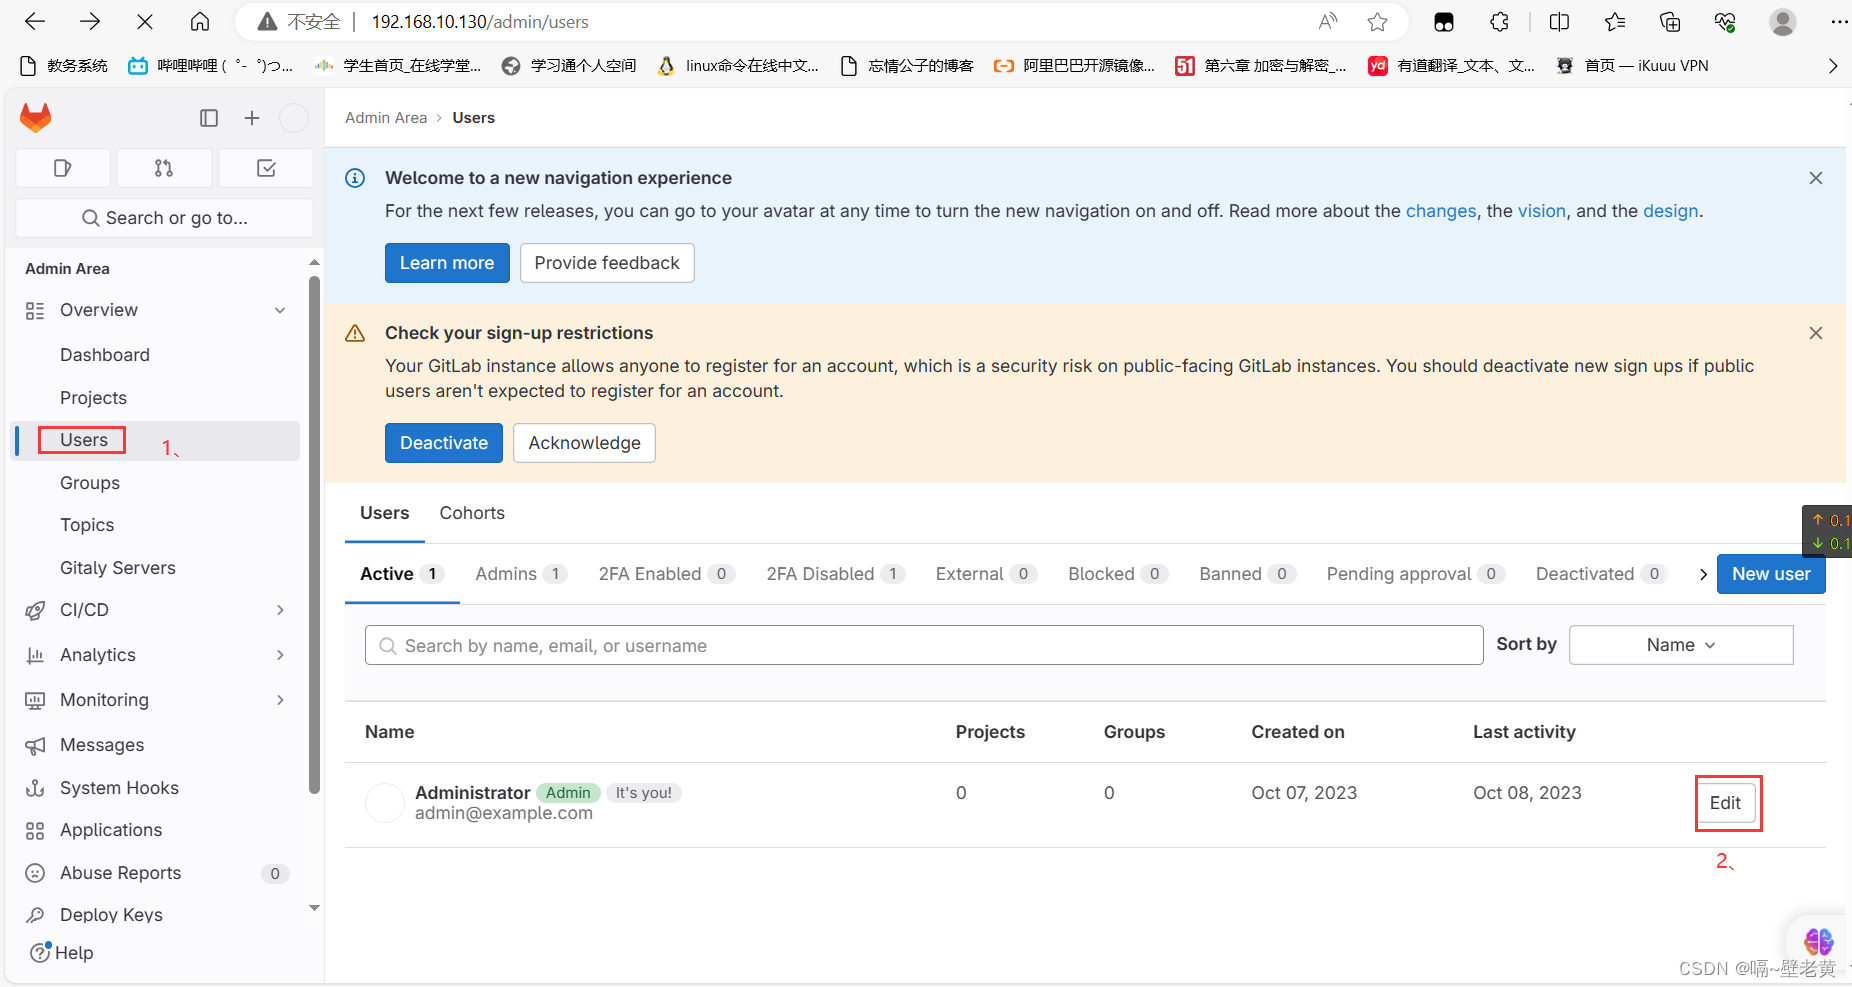
登录后的界面
修改密码
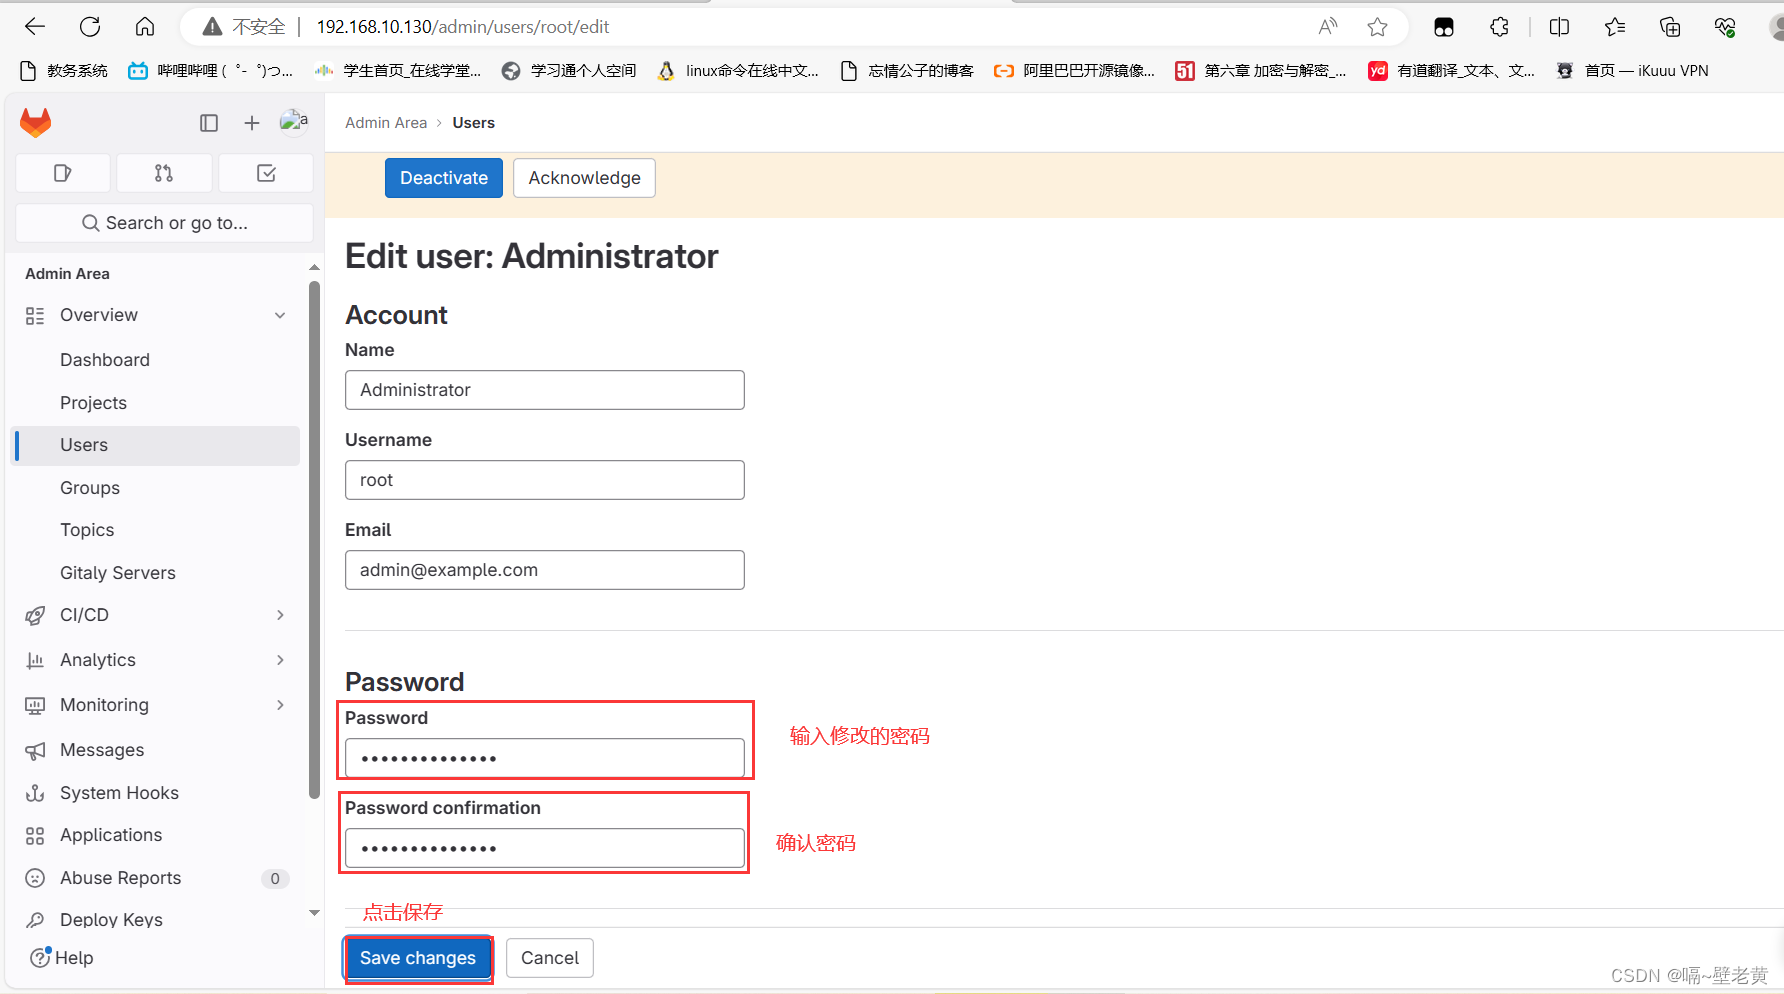
保存后会自动退出到登录界面,输入新的密码登录
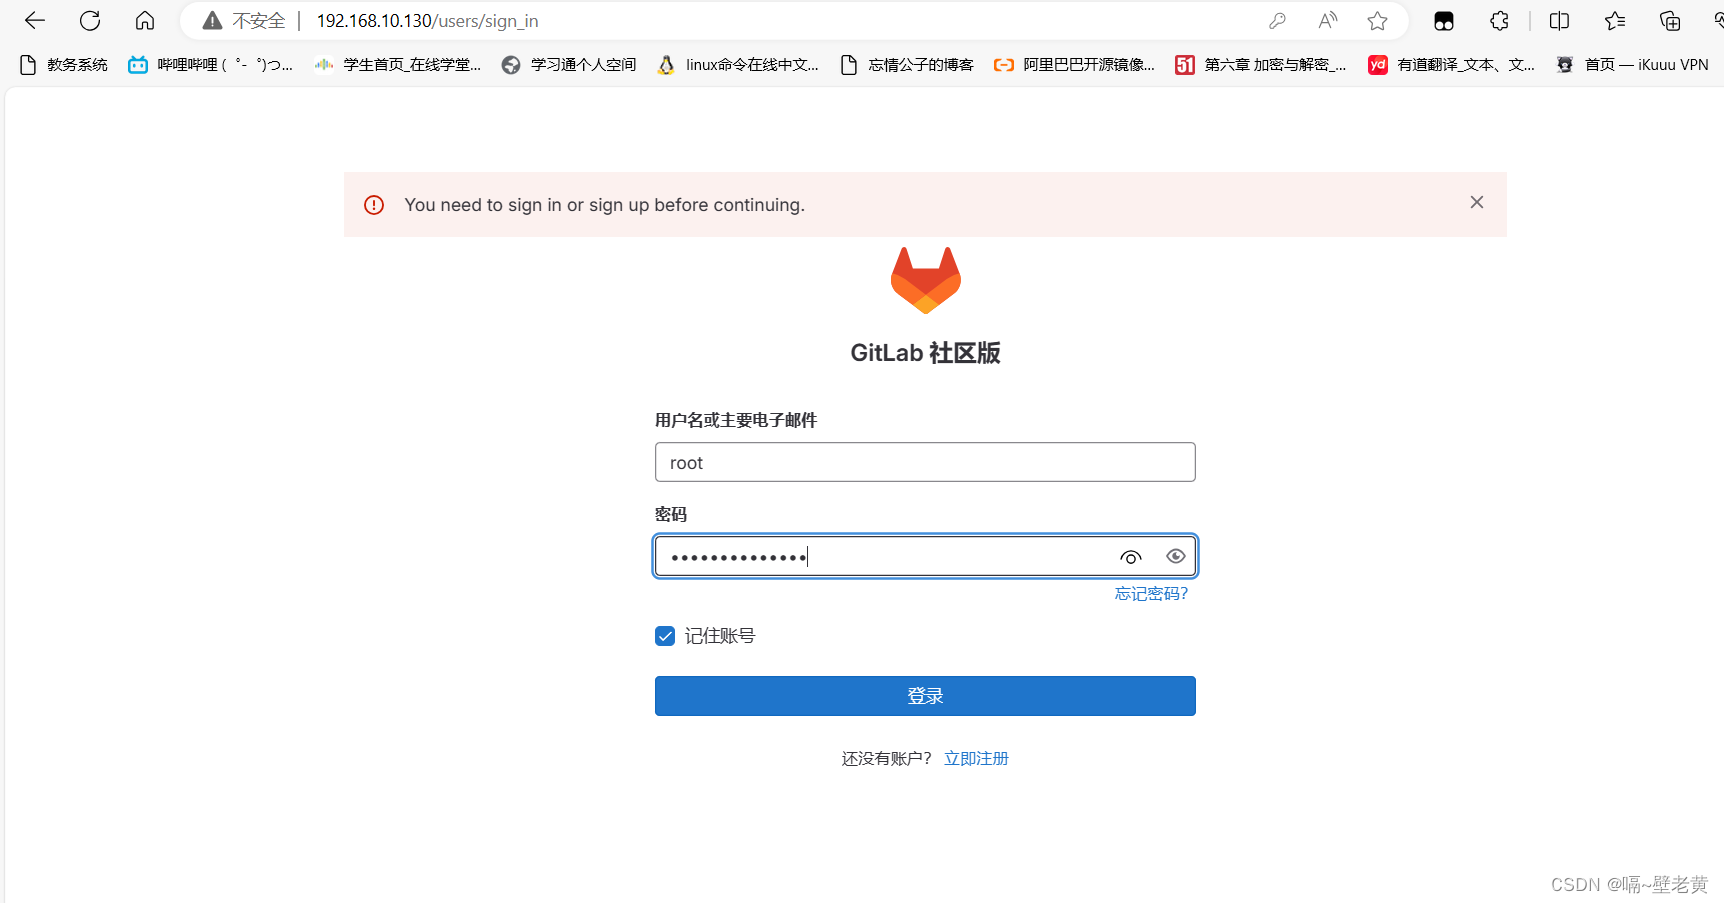
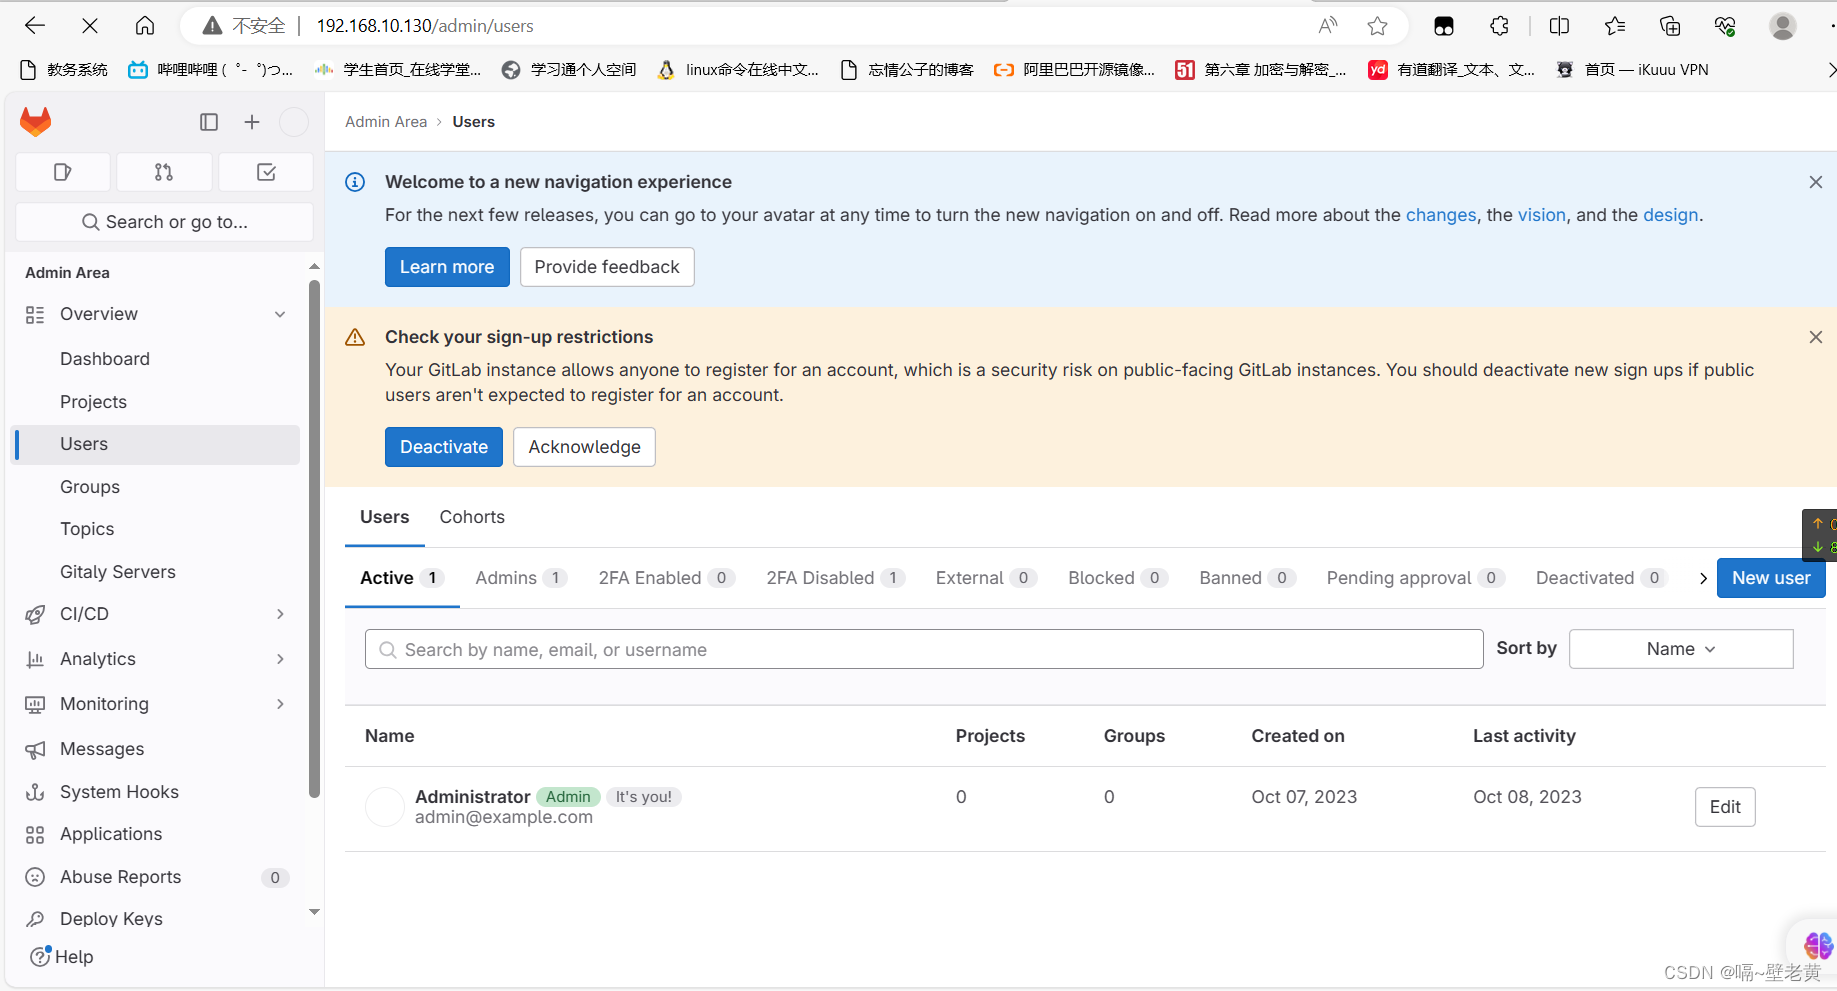
登录成功
部署tomcat和jenkins(第二台主机)
tomcat需要jdk的环境先下载jdk
[root@localhost ~]# yum -y install java-17-openjdk java-17-openjdk-devel
下载tomcat
[root@localhost ~]# wget https://archive.apache.org/dist/tomcat/tomcat-9/v9.0.80/bin/apache-tomcat-9.0.80.tar.gz
[root@localhost ~]# ls
anaconda-ks.cfg  apache-tomcat-9.0.80.tar.gz
解压缩至/usr/local/目录下
[root@localhost ~]# tar xf apache-tomcat-9.0.80.tar.gz -c /usr/local/
[root@localhost ~]# ls /usr/local/
apache-tomcat-9.0.80  bin  etc  games  include  lib  lib64  libexec  sbin  share  src
[root@localhost ~]# mv /usr/local/apache-tomcat-9.0.80  /usr/local/apache-tomcat
[root@localhost ~]# ls /usr/local/
apache-tomcat  bin  etc  games  include  lib  lib64  libexec  sbin  share  src
[root@localhost ~]#
创建软连接
[root@localhost ~]# ln -s /usr/local/apache-tomcat /usr/local/tomcat
[root@localhost ~]# cd /usr/local/
[root@localhost local]# ll
total 0
drwxr-xr-x  9 root root 220 oct 11 15:50 apache-tomcat
drwxr-xr-x. 2 root root   6 jun 22  2021 bin
drwxr-xr-x. 2 root root   6 jun 22  2021 etc
drwxr-xr-x. 2 root root   6 jun 22  2021 games
drwxr-xr-x. 2 root root   6 jun 22  2021 include
drwxr-xr-x. 2 root root   6 jun 22  2021 lib
drwxr-xr-x. 3 root root  17 jul 14 09:33 lib64
drwxr-xr-x. 2 root root   6 jun 22  2021 libexec
drwxr-xr-x. 2 root root   6 jun 22  2021 sbin
drwxr-xr-x. 5 root root  49 jul 14 09:33 share
drwxr-xr-x. 2 root root   6 jun 22  2021 src
lrwxrwxrwx  1 root root  24 oct 11 15:52 tomcat -> /usr/local/apache-tomcat
[root@localhost local]#
查看tomcat目录里的文件
[root@localhost ~]# cd /usr/local/tomcat/
[root@localhost tomcat]# ls
bin           conf             lib      logs    readme.md      running.txt  webapps
building.txt  contributing.md  license  notice  release-notes  temp         work
[root@localhost tomcat]# cd bin/
[root@localhost bin]# ls        # 下面这些文件有启动,关闭tomcat,检查配置文件的文件
bootstrap.jar       ciphers.sh                    daemon.sh     setclasspath.bat  startup.sh            version.bat
catalina.bat        commons-daemon.jar            digest.bat    setclasspath.sh   tomcat-juli.jar       version.sh
catalina.sh         commons-daemon-native.tar.gz  digest.sh     shutdown.bat      tomcat-native.tar.gz
catalina-tasks.xml  configtest.bat                makebase.bat  shutdown.sh       tool-wrapper.bat
ciphers.bat         configtest.sh                 makebase.sh   startup.bat       tool-wrapper.sh
[root@localhost bin]#
启动tomcat服务
[root@localhost bin]# ./catalina.sh stop      #停止服务
[root@localhost bin]# ./catalina.sh start     #开启服务
using catalina_base:   /usr/local/tomcat
using catalina_home:   /usr/local/tomcat
using catalina_tmpdir: /usr/local/tomcat/temp
using jre_home:        /usr
using classpath:       /usr/local/tomcat/bin/bootstrap.jar:/usr/local/tomcat/bin/tomcat-juli.jar
using catalina_opts:
tomcat started.
[root@localhost bin]# ss -antl      #8080和8005端口就是tomcat服务的端口,其中8080是网页端口
state        recv-q       send-q                  local address:port              peer address:port       process
listen       0            128                           0.0.0.0:22                     0.0.0.0:*
listen       0            100                                 *:8080                         *:*
listen       0            128                              [::]:22                        [::]:*
listen       0            1                  [::ffff:127.0.0.1]:8005                         *:*
[root@localhost bin]#
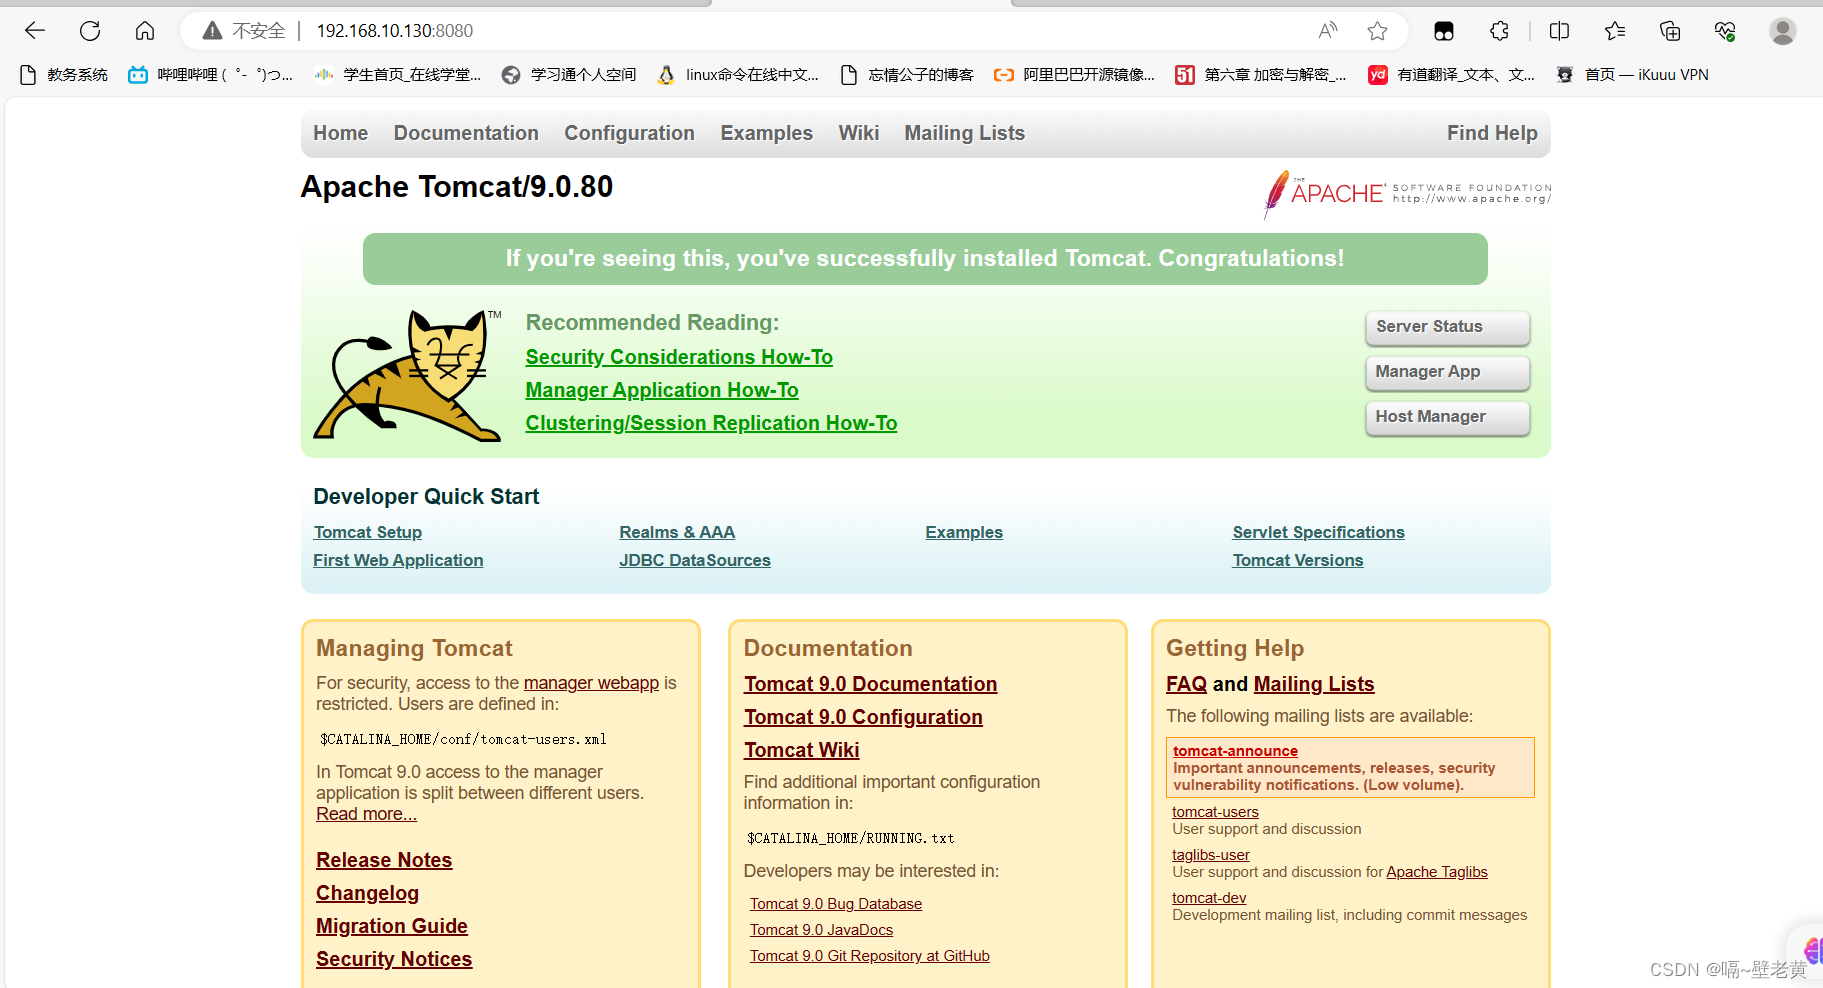
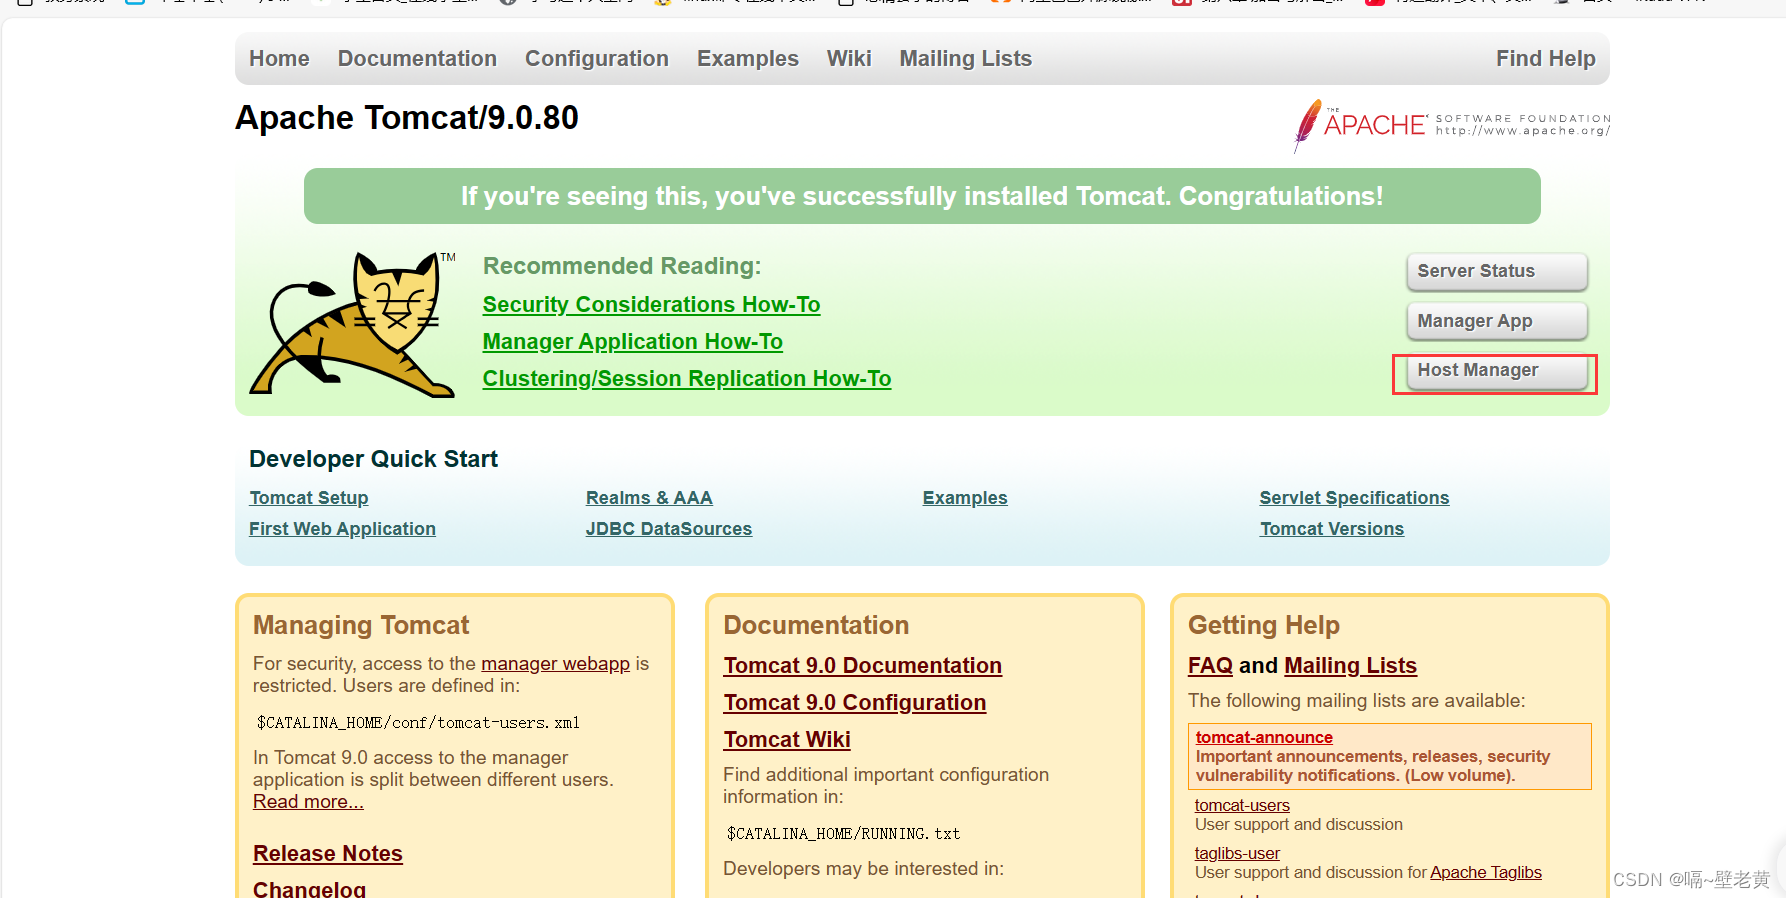
这时就可以通过8080端口访问tomcat页面了
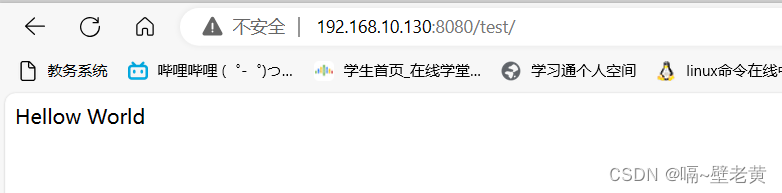
创建java页面
[root@localhost tomcat]# cd /usr/local/tomcat/webapps/   #进入webapps目录
[root@localhost webapps]# ls
docs  examples  host-manager  manager  root
[root@localhost webapps]# mkdir test                     #在webapps目录下创建存放网页文件的目录
[root@localhost webapps]# cd test/
[root@localhost test]# vim index.jsp                      #创建网页文件.jsp就是表示java语言的后缀
[root@localhost test]# cat index.jsp
<html>
<head>
        <title>test page</title>
</head>
<body>
        <%
            out.println("hellow world");
        %>
</body>
</html>

[root@localhost test]#
在ip访问的路径下加上test目录
但是这个时候访问webapps目录下的其它页面都需要设置权限
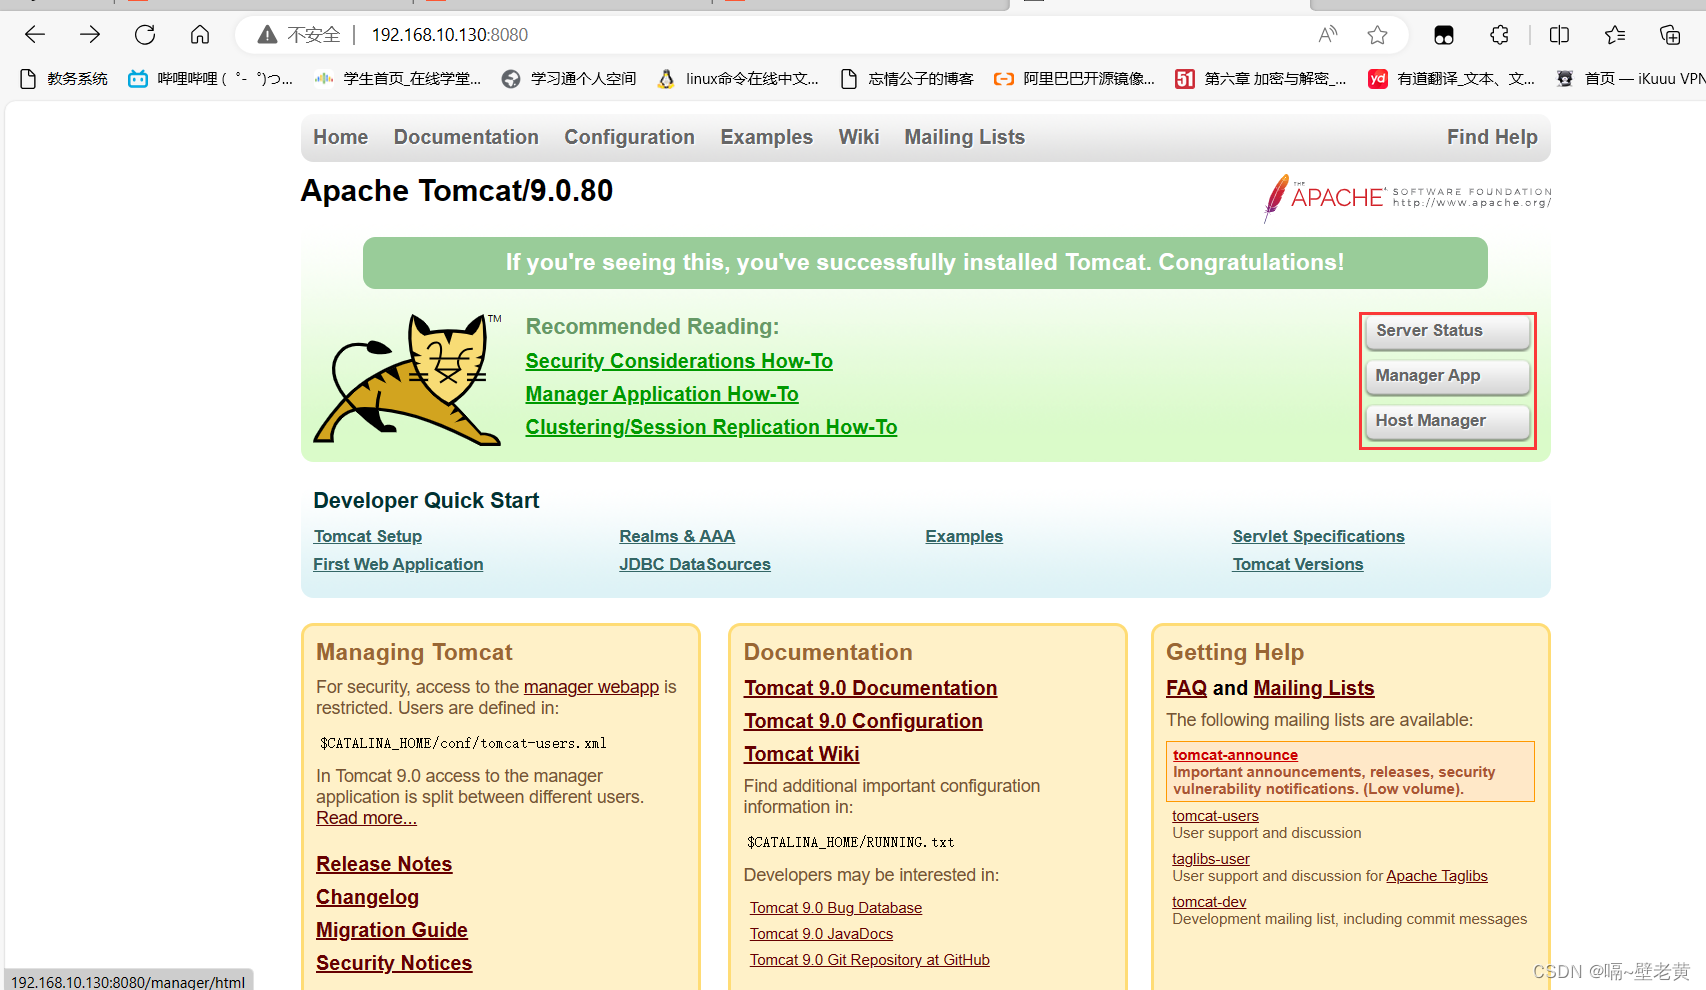
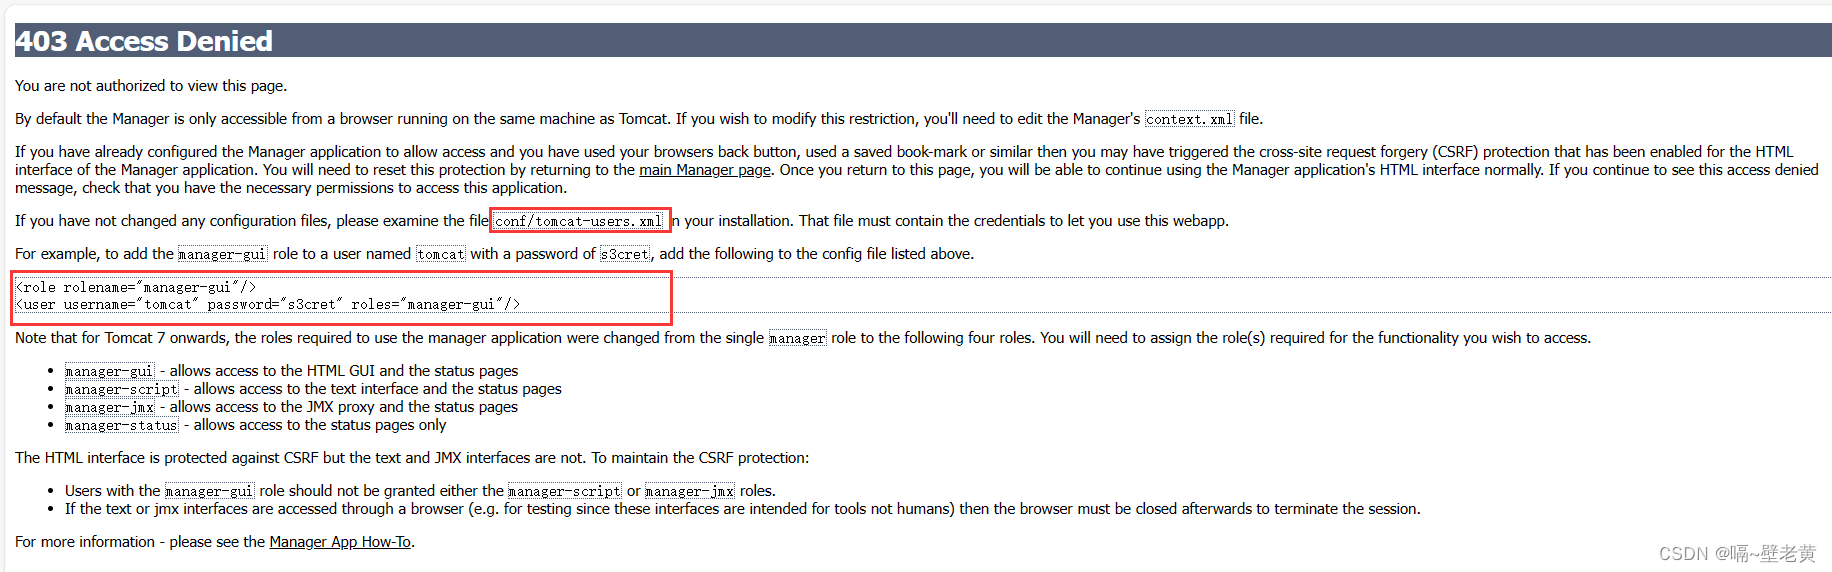
根据图中提示修改/usr/local/tomcat1/conf目录下的tomcat-users.xml文件
[root@localhost ~]# vim /usr/local/tomcat/conf/tomcat-users.xml
#在文件的最后面添加下面的内容
-->
<role rolename="manager-gui"/>
<user username="hte" password="hte666!" roles="manager-gui"/>      #定义用户
</tomcat-users>    #注意,内容只能写道这一行上面
修改了配置文件后要重启服务
[root@localhost tomcat]# pwd
/usr/local/tomcat
[root@localhost tomcat]# ./bin/catalina.sh stop  #停止服务
using catalina_base:   /usr/local/tomcat
using catalina_home:   /usr/local/tomcat
using catalina_tmpdir: /usr/local/tomcat/temp
using jre_home:        /usr
using classpath:       /usr/local/tomcat/bin/bootstrap.jar:/usr/local/tomcat/bin/tomcat-juli.jar
using catalina_opts:
note: picked up jdk_java_options:  --add-opens=java.base/java.lang=all-unnamed --add-opens=java.base/java.io=all-unnamed --add-opens=java.base/java.util=all-unnamed --add-opens=java.base/java.util.concurrent=all-unnamed --add-opens=java.rmi/sun.rmi.transport=all-unnamed
[root@localhost tomcat]# ./bin/catalina.sh start   #开启服务
using catalina_base:   /usr/local/tomcat
using catalina_home:   /usr/local/tomcat
using catalina_tmpdir: /usr/local/tomcat/temp
using jre_home:        /usr
using classpath:       /usr/local/tomcat/bin/bootstrap.jar:/usr/local/tomcat/bin/tomcat-juli.jar
using catalina_opts:
tomcat started.
[root@localhost tomcat]#
修改manager下的context.xml配置文件
[root@localhost ~]# cd /usr/local/tomcat/webapps/manager/meta-inf
[root@localhost meta-inf]# ls
context.xml
[root@localhost meta-inf]# vim context.xml
<context antiresourcelocking="false" privileged="true" >
  <cookieprocessor classname="org.apache.tomcat.util.http.rfc6265cookieprocessor"
                   samesitecookies="strict" />
  <valve classname="org.apache.catalina.valves.remoteaddrvalve"
         allow="127\.\d+\.\d+\.\d+|::1|0:0:0:0:0:0:0:1" />    #这里是正则表达式,要在这里把我们主机的网段添加进去
   修改为 allow="192\.168\.10\.\d+|127\.\d+\.\d+\.\d+|::1|0:0:0:0:0:0:0:1" />   #|表示或
  <manager sessionattributevalueclassnamefilter="java\.lang\.(?:boolean|integer|long|number|string)|org\.apache\.catalina\.filters\.csrfpreventionfilter\$lrucache(?:\$1)?|java\.util\.(?:linked)?hashmap"/>
</context>
再次访问manager界面
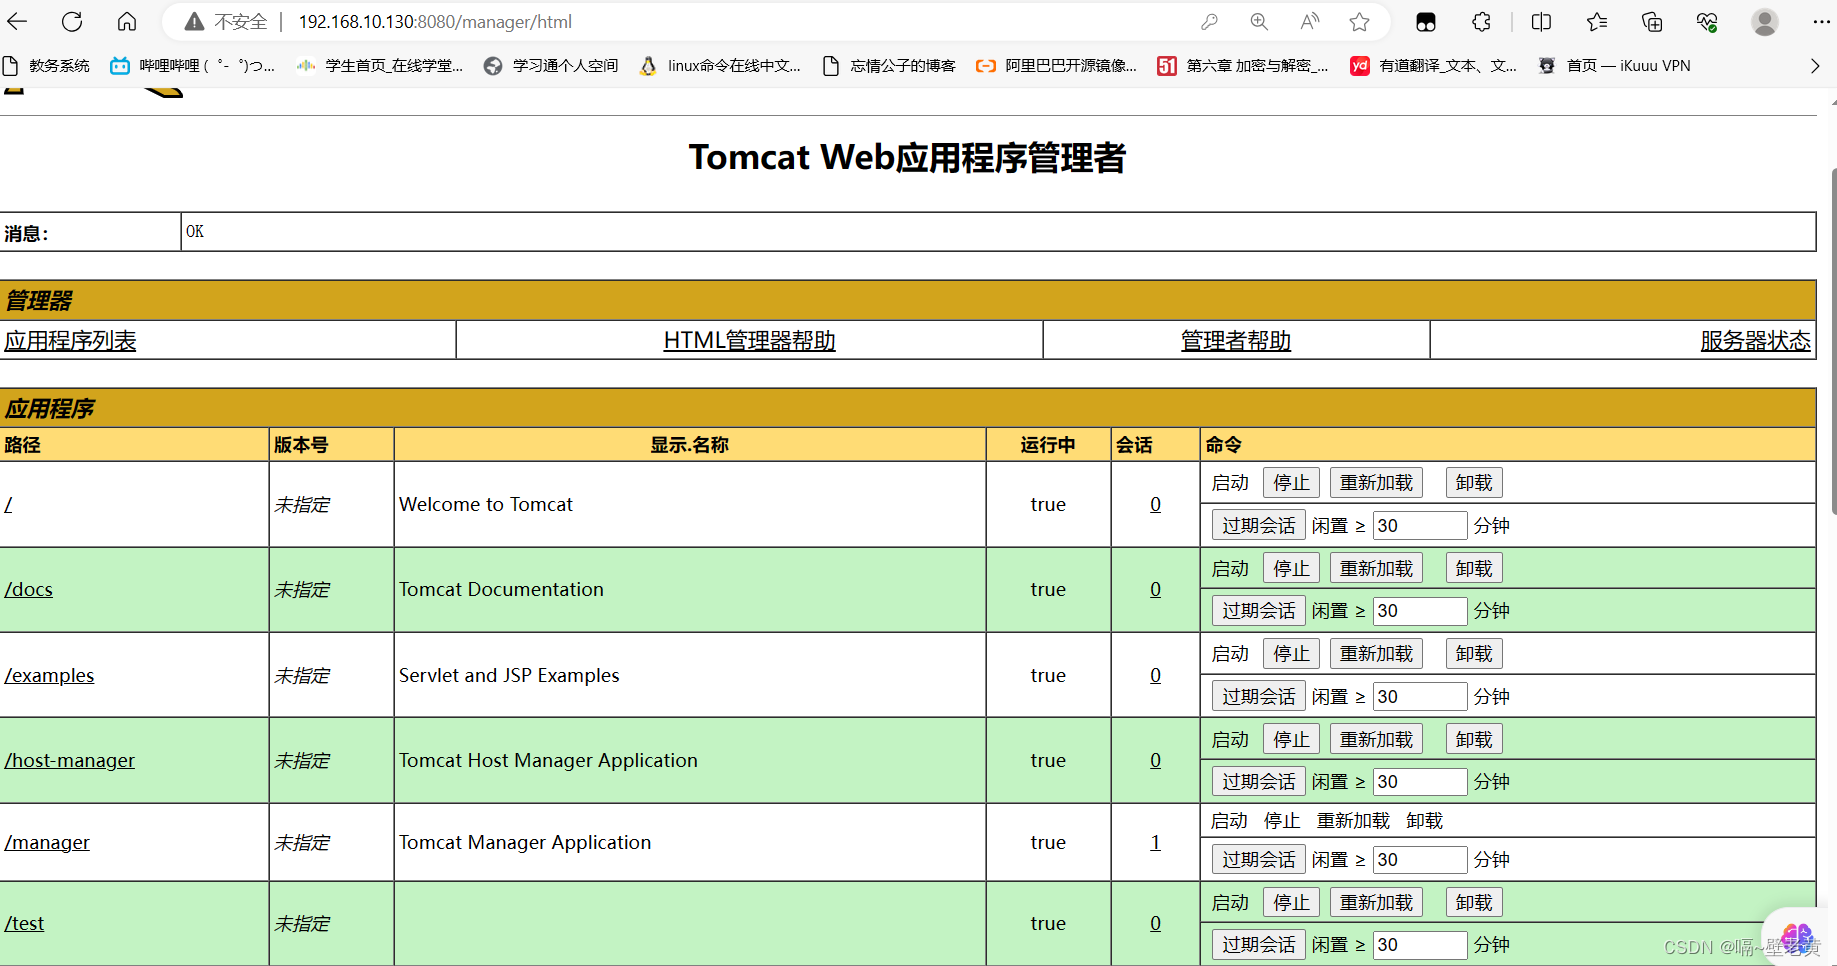
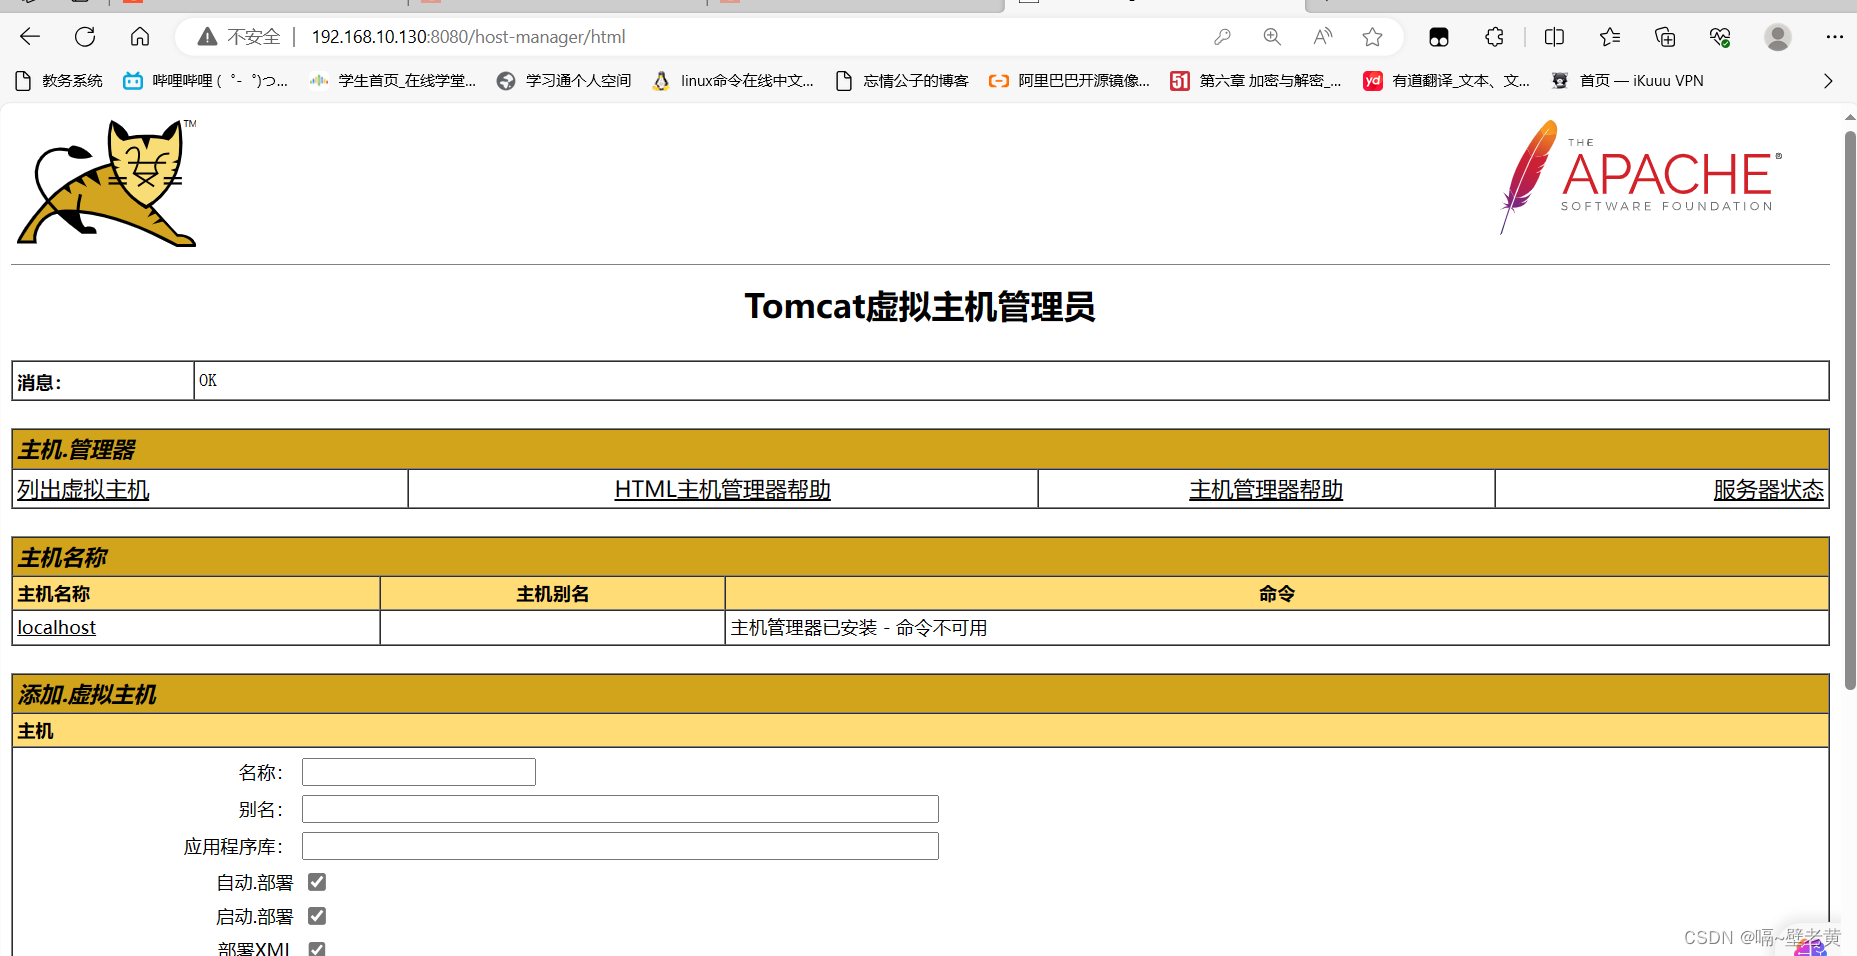
其它web页面的服务也是这么写
例如 host manager
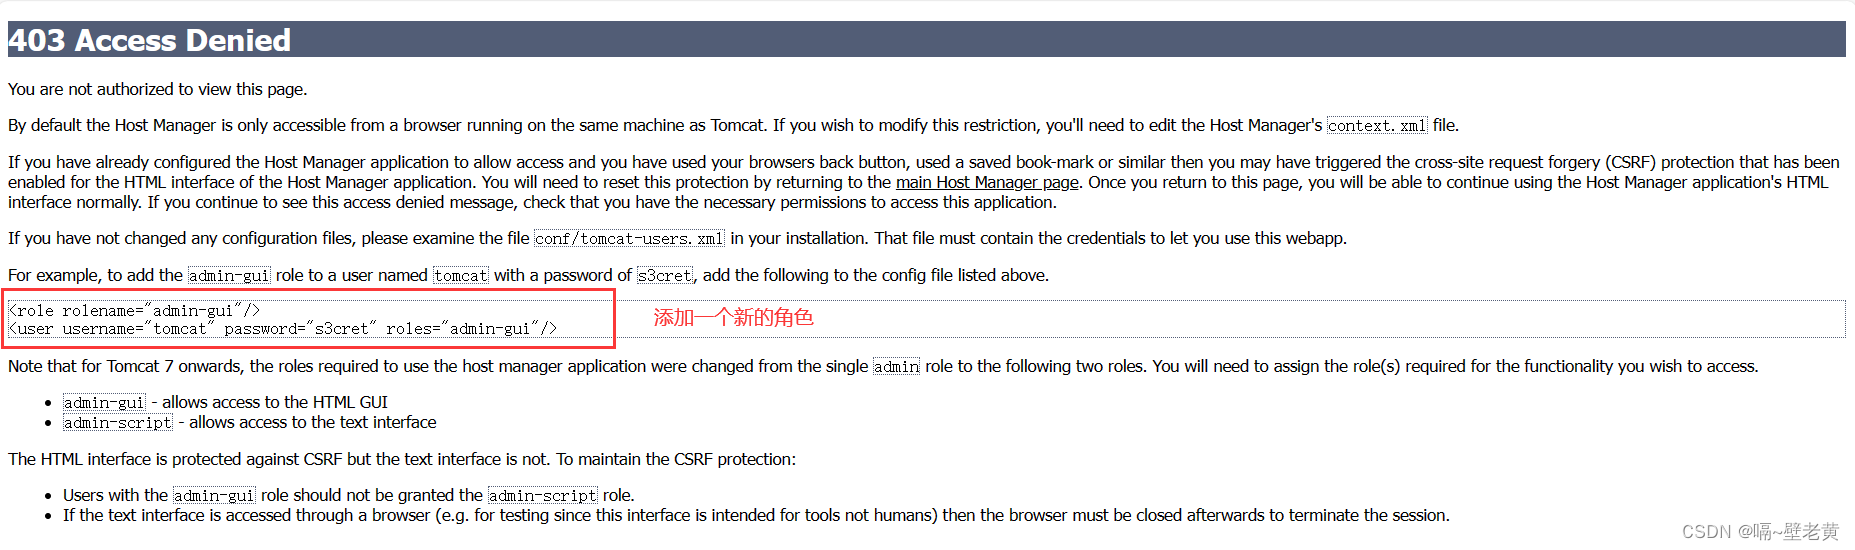
编辑/usr/local/tomcat/conf/tomcat-users.xml
[root@localhost ~]# vim /usr/local/tomcat/conf/tomcat-users.xml
<role rolename="manager-gui"/>
<role rolename="admin-gui"/>     #添加一个新的角色
<user username="hte" password="hte666!" roles="manager-gui,admin-gui"/>    #把新的角色添加到之前的用户
</tomcat-users>
在host-manager文件中放行本机的ip地址
[root@localhost ~]# cd /usr/local/tomcat/webapps/
[root@localhost webapps]# ls
docs  examples  host-manager  manager  root  test
[root@localhost webapps]# vim host-manager/meta-inf/context.xml
<context antiresourcelocking="false" privileged="true" >
  <cookieprocessor classname="org.apache.tomcat.util.http.rfc6265cookieprocessor"
                   samesitecookies="strict" />
  <valve classname="org.apache.catalina.valves.remoteaddrvalve"
         allow="192\.168\.10\.\d+|127\.\d+\.\d+\.\d+|::1|0:0:0:0:0:0:0:1" />    #同样这样添加ip
  <manager sessionattributevalueclassnamefilter="java\.lang\.(?:boolean|integer|long|number|string)|org\.apache\.catalina\.filters\.csrfpreventionfilter\$lrucache(?:\$1)?|java\.util\.(?:linked)?hashmap"/>
</context>
重启服务
[root@localhost webapps]# cd ..
[root@localhost tomcat]# ./bin/catalina.sh stop
[root@localhost tomcat]# ./bin/catalina.sh start
再次访问页面试试
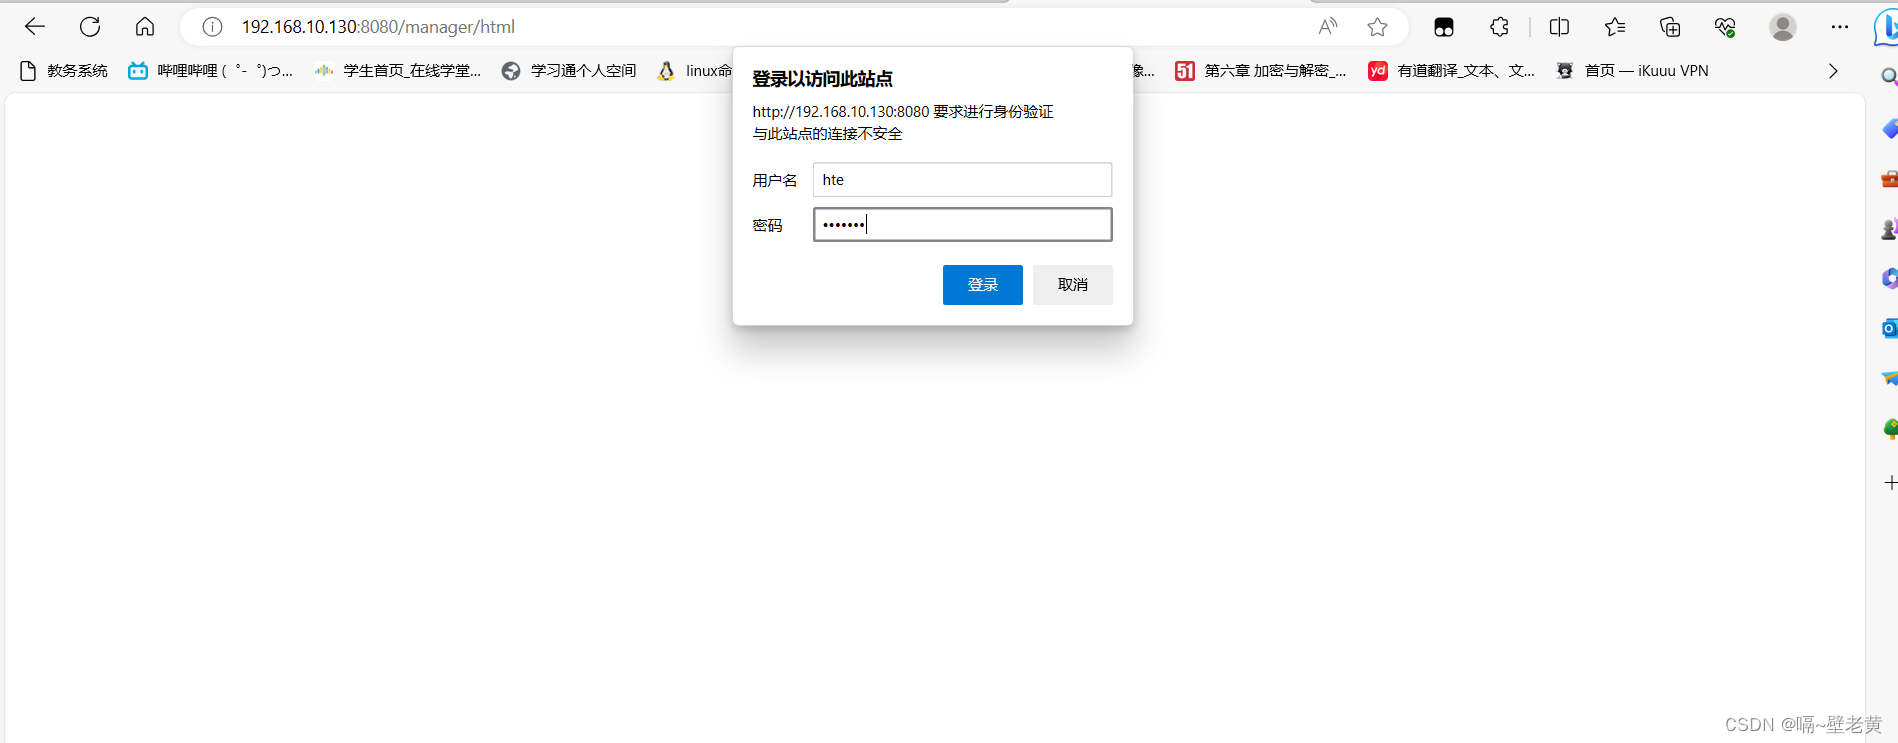
输入用户名和密码
部署jenkins部署
首先下载jenkins.war包
[root@localhost ~]# wget https://get.jenkins.io/war-stable/2.414.2/jenkins.war
[root@localhost ~]# ls
anaconda-ks.cfg  jenkins.war     #后缀为war的包是java程序打包后的包
安装jenkins所需要的java17
[root@localhost ~]# yum -y install java-17-openjdk java-17-openjdk-devel
由于安装tomcat时安装的java1.8,但是jenkins需要java17,所以切换一下java版本
[root@localhost ~]# alternatives --config java

there are 2 programs which provide 'java'.

  selection    command
-----------------------------------------------
*+ 1           java-1.8.0-openjdk.x86_64 (/usr/lib/jvm/java-1.8.0-openjdk-1.8.0.312.b07-2.el8_5.x86_64/jre/bin/java)
   2           java-17-openjdk.x86_64 (/usr/lib/jvm/java-17-openjdk-17.0.1.0.12-2.el8_5.x86_64/bin/java)

enter to keep the current selection[+], or type selection number: 2        #选择第二个版本
[root@localhost ~]#
java -jar命令用于执行java程序的可执行jar文件。
[root@localhost ~]# ls
anaconda-ks.cfg  jenkins.war
[root@localhost ~]# java -jar jenkins.war
然后将这个war包移动到tomcat的webapps目录下
[root@localhost ~]# cp jenkins.war /usr/local/tomcat/webapps/
[root@localhost ~]# ls /usr/local/tomcat/webapps/
docs  examples  host-manager  jenkins.war  manager  root  test
[root@localhost ~]#
重启tomcat服务,war将自动解压缩
[root@localhost ~]# cd /usr/local/tomcat/bin/
[root@localhost bin]# ./catalina.sh stop
[root@localhost bin]# ./catalina.sh start
[root@localhost bin]# ss -antl
state        recv-q       send-q                  local address:port              peer address:port       process
listen       0            128                           0.0.0.0:22                     0.0.0.0:*
listen       0            100                                 *:8080                         *:*
listen       0            128                                 *:80                           *:*
listen       0            128                              [::]:22                        [::]:*
listen       0            1                  [::ffff:127.0.0.1]:8005                         *:*
[root@localhost bin]# cd ../webapps/
[root@localhost webapps]# ls
docs  examples  host-manager  jenkins  jenkins.war  manager  root  test       #jenkins已经解压了
[root@localhost webapps]#
访问jenkins页面
ip地址后接:8080/jenkins
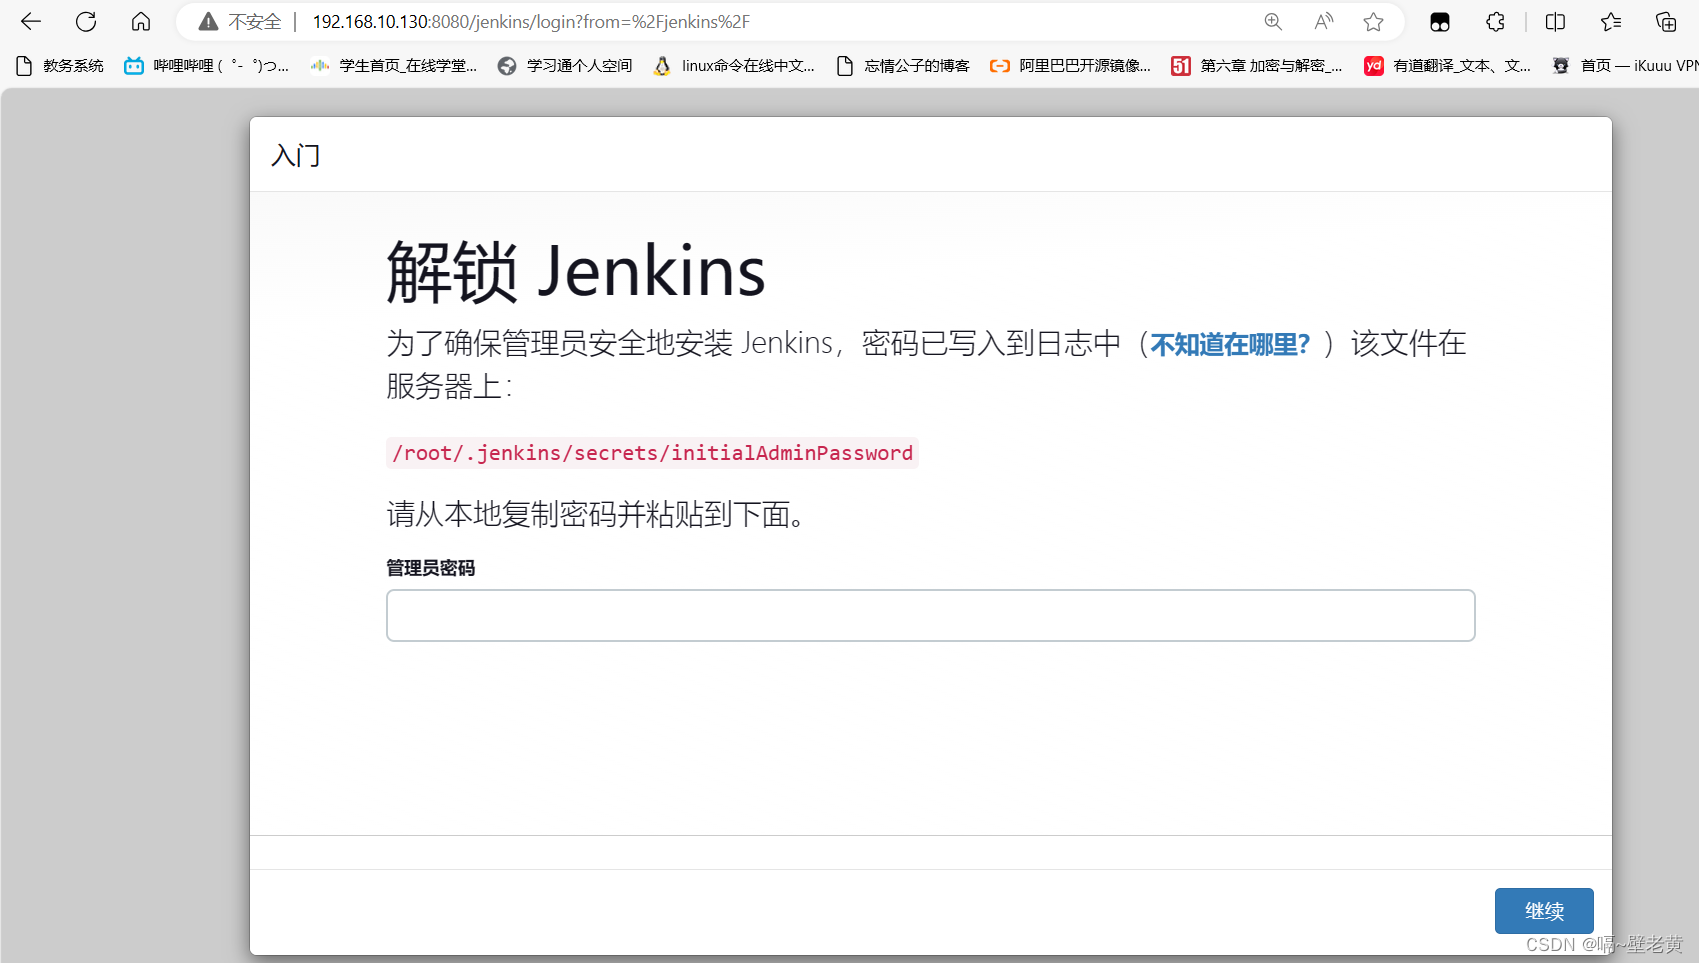
根据提示密码在/root/.jenkins/secrets/initialadminpassword这个位置
[root@localhost webapps]# cat /root/.jenkins/secrets/initialadminpassword
e76d60ca73a94f629e2911d2104476cf
[root@localhost webapps]#
输入密码登录后出现这个界面
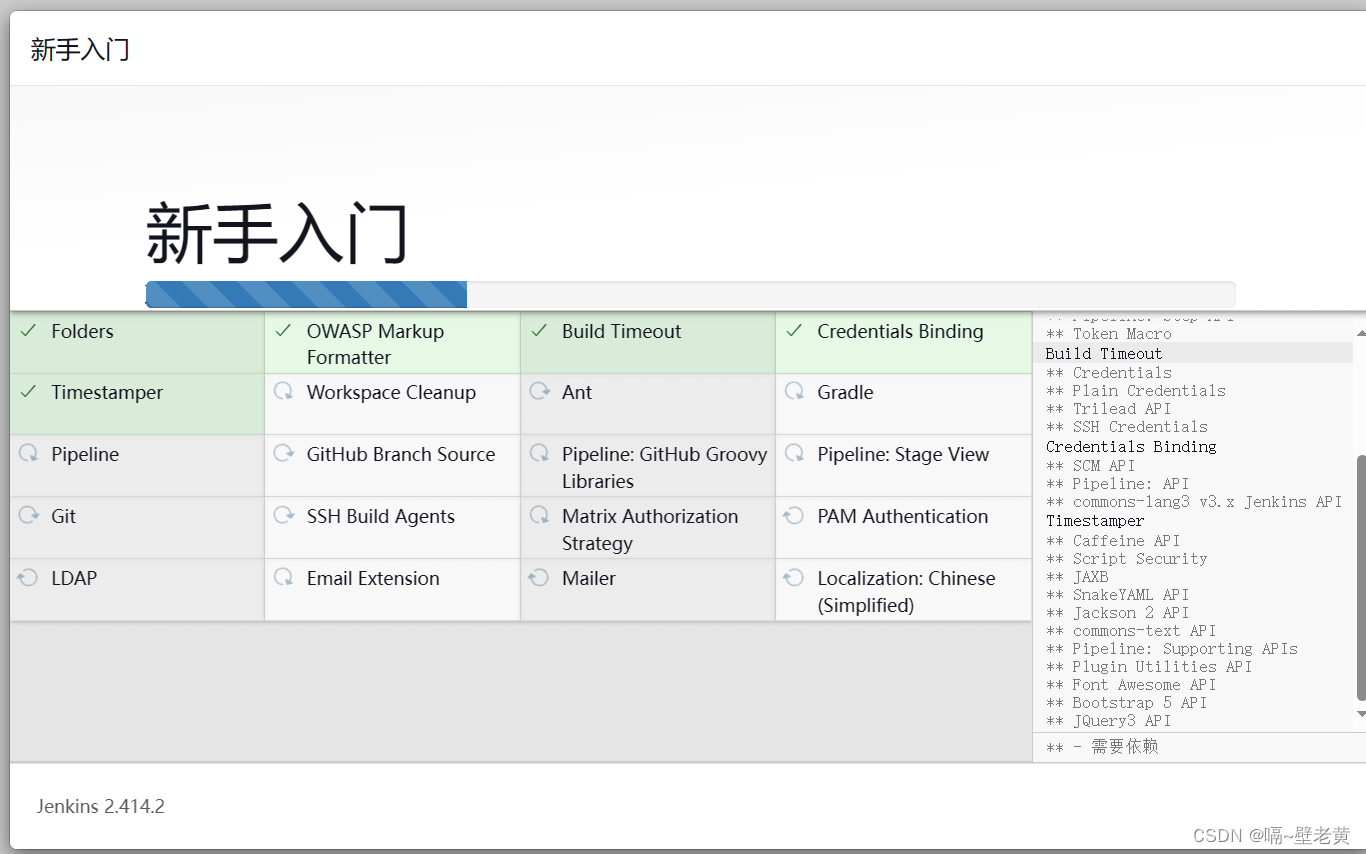
选择安装推荐的插件
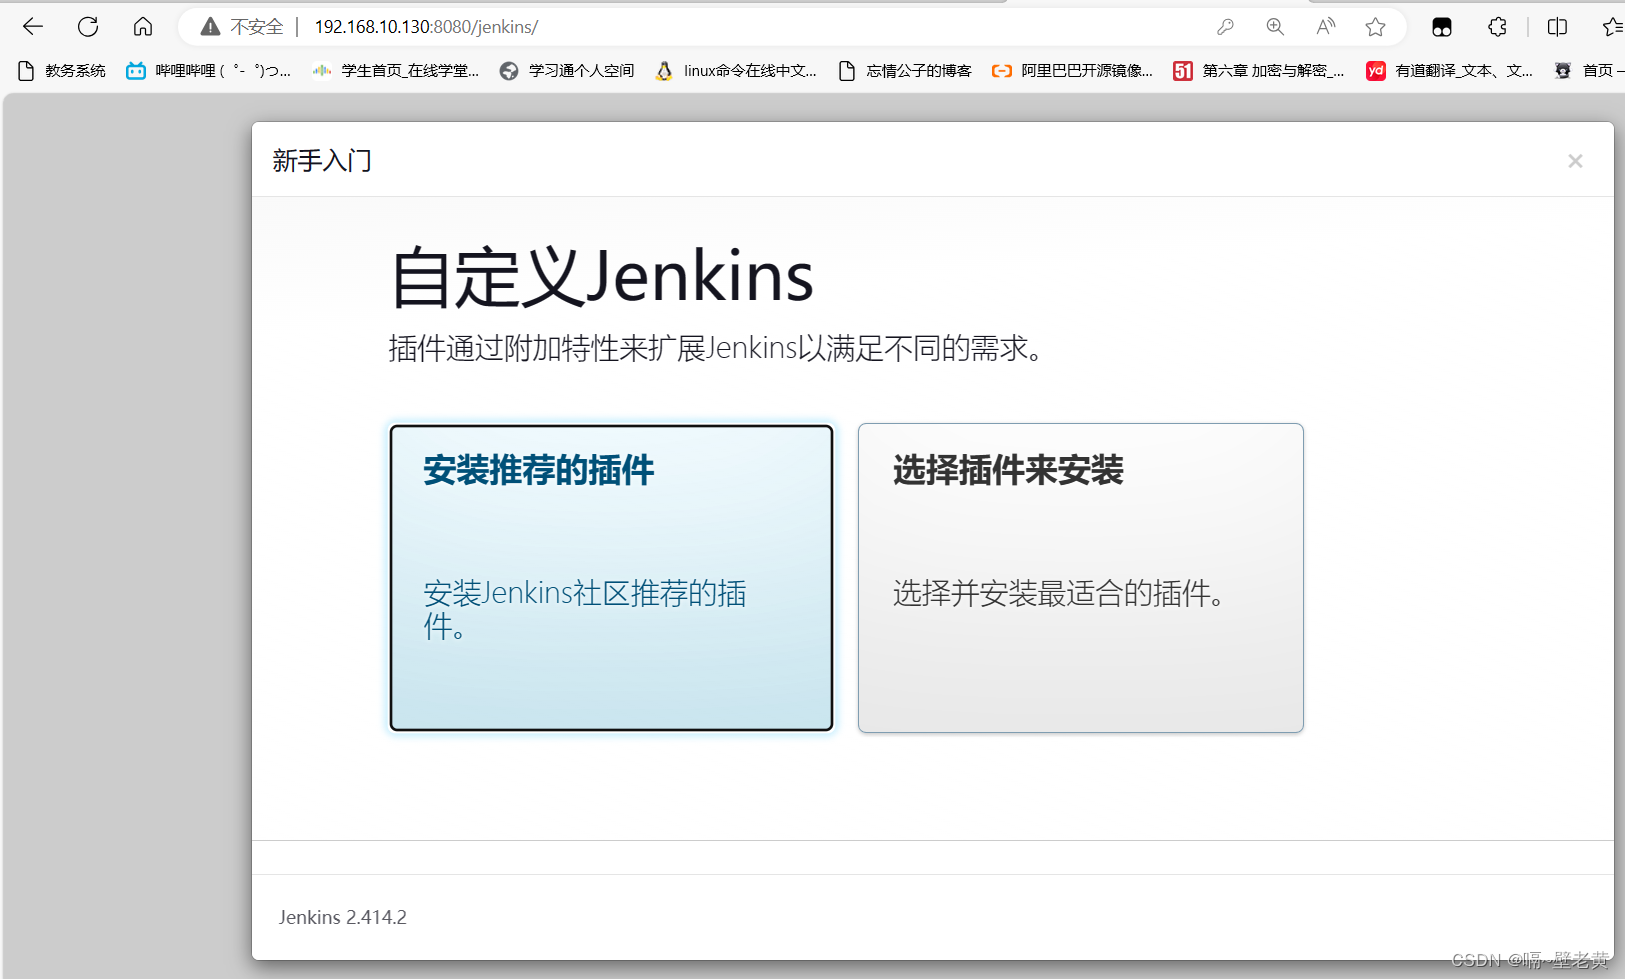
选择后会自动安装插件
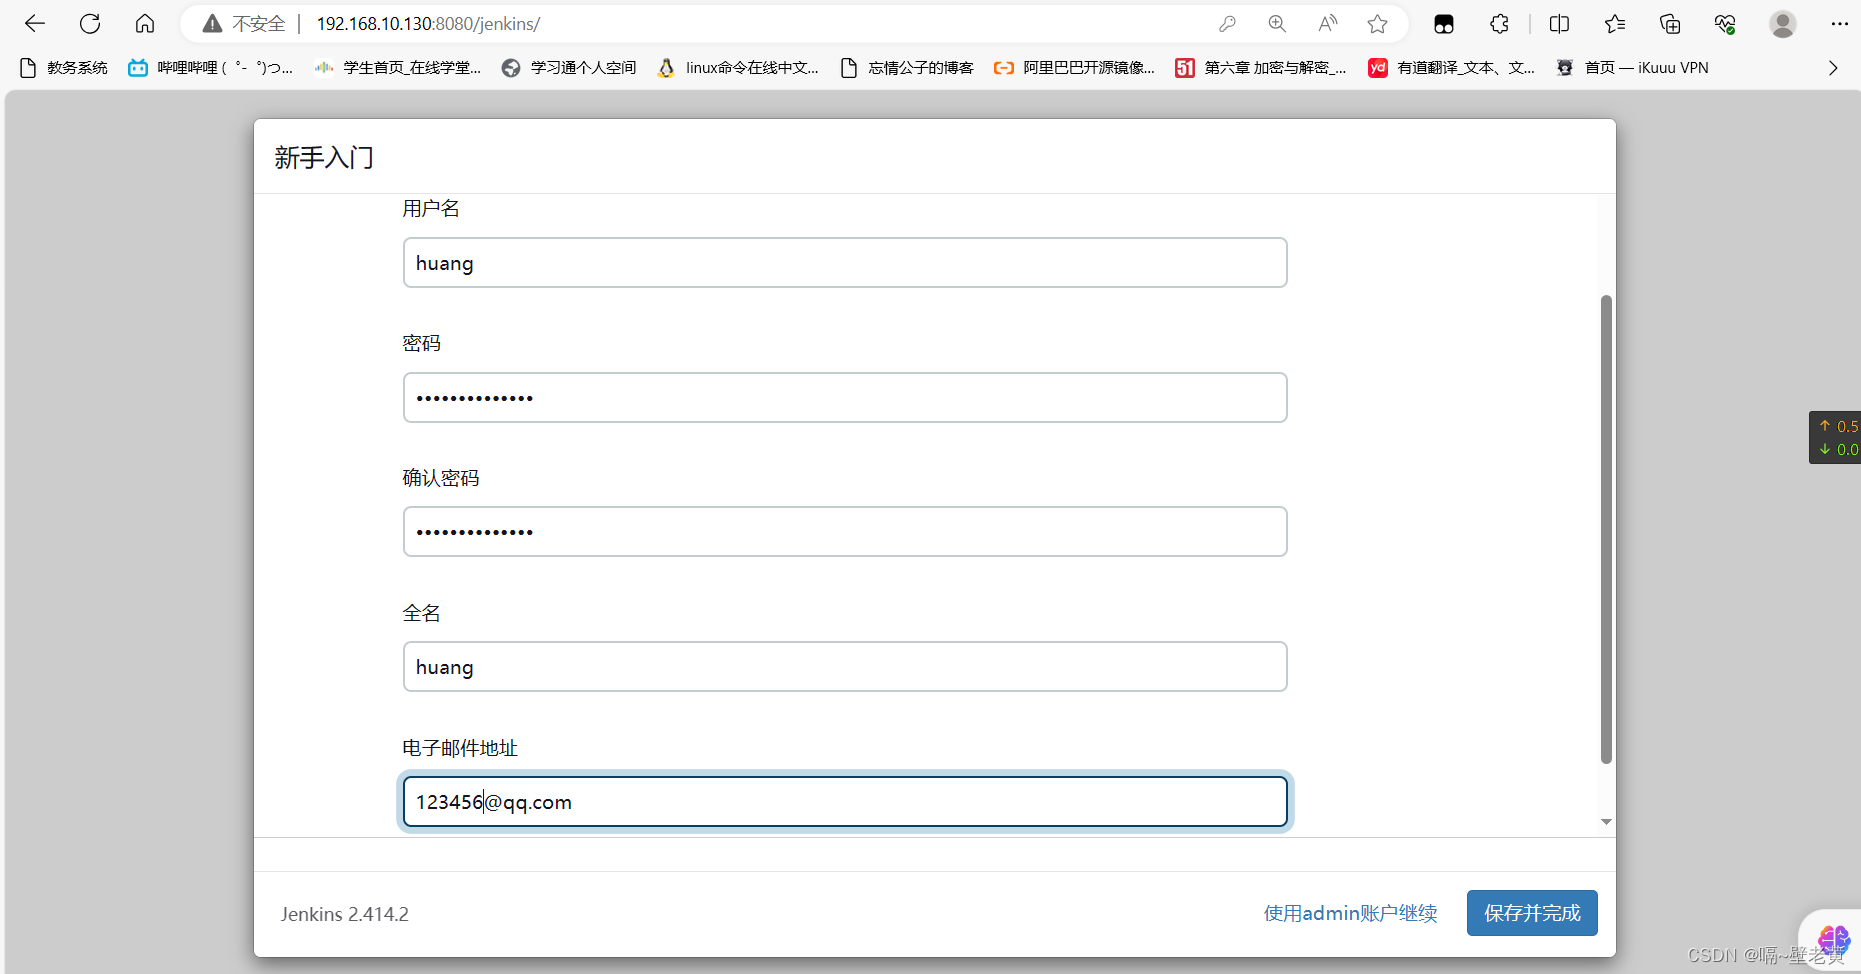
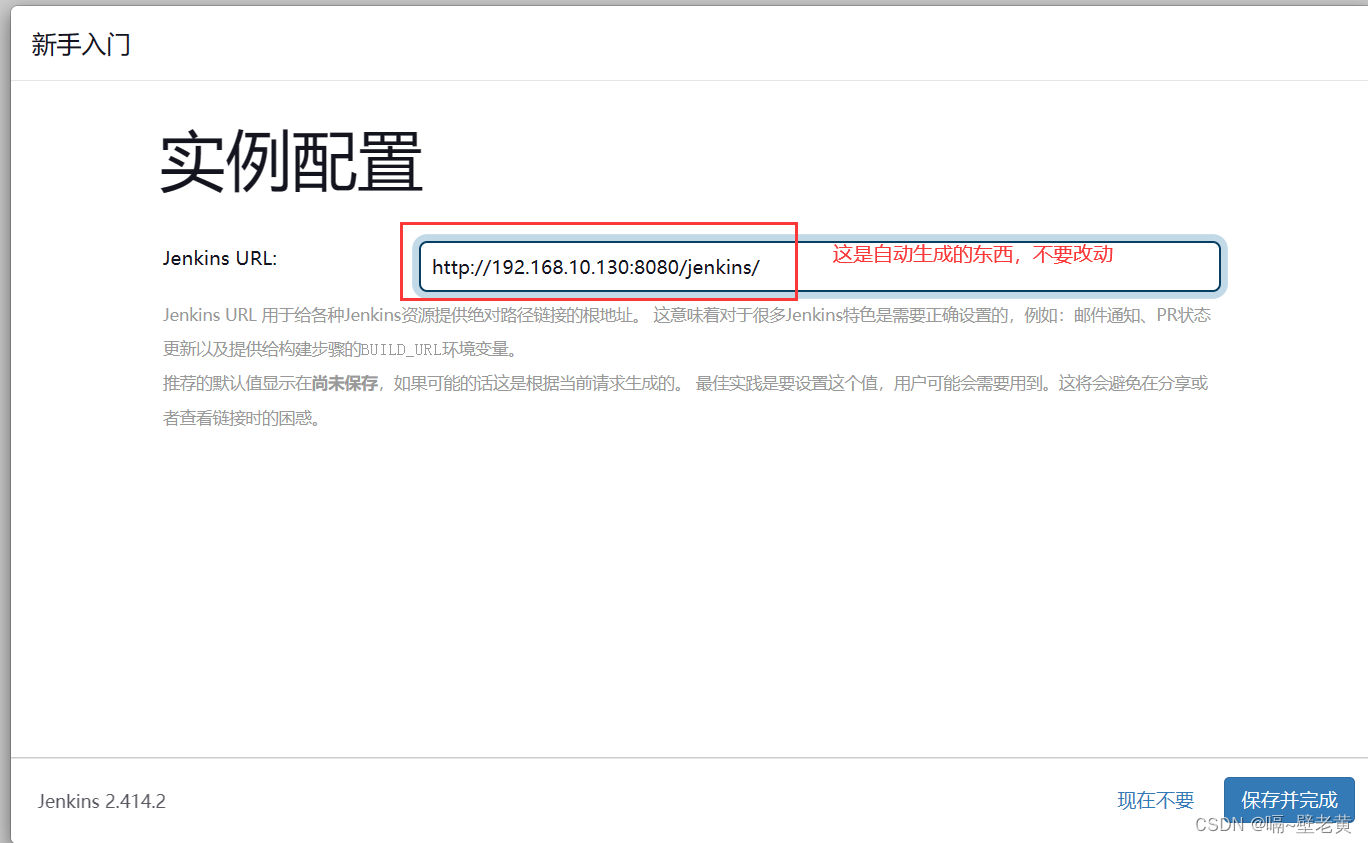
安装完成后会要求你创建一个用户
部署docker服务(第三、四台主机)
安装及使用docker
docker安装
cd /etc/yum.repos.d/
curl -o docker-ce.repo https://mirrors.tuna.tsinghua.edu.cn/docker-ce/linux/centos/docker-ce.repo
sed -i 's@https://download.docker.com@https://mirrors.tuna.tsinghua.edu.cn/docker-ce@g' docker-ce.repo

yum -y install docker-ce
docker加速
docker-ce的配置文件是/etc/docker/daemon.json,此文件默认不存在,需要我们手动创建并进行配置,而docker的加速就是通过配置此文件来实现的。
docker的加速有多种方式:
- docker cn
- 中国科技大学加速器
- 阿里云加速器(需要通过阿里云开发者平台注册帐号,免费使用个人私有的加速器)
阿里云平台域名:www.aliyun.com
登录平台后进入控制台

点击这三条杠
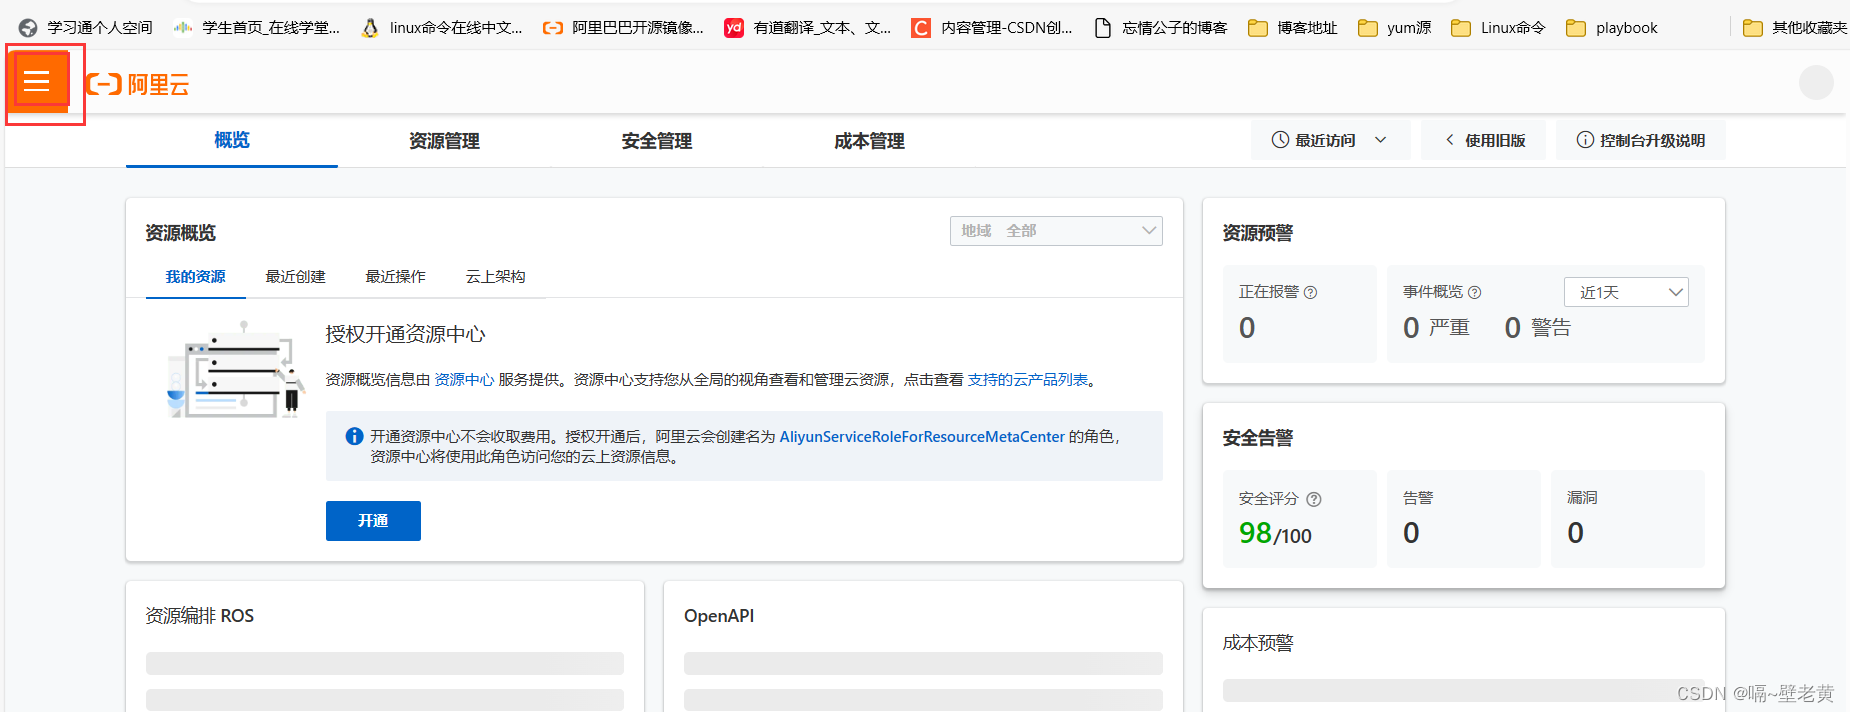
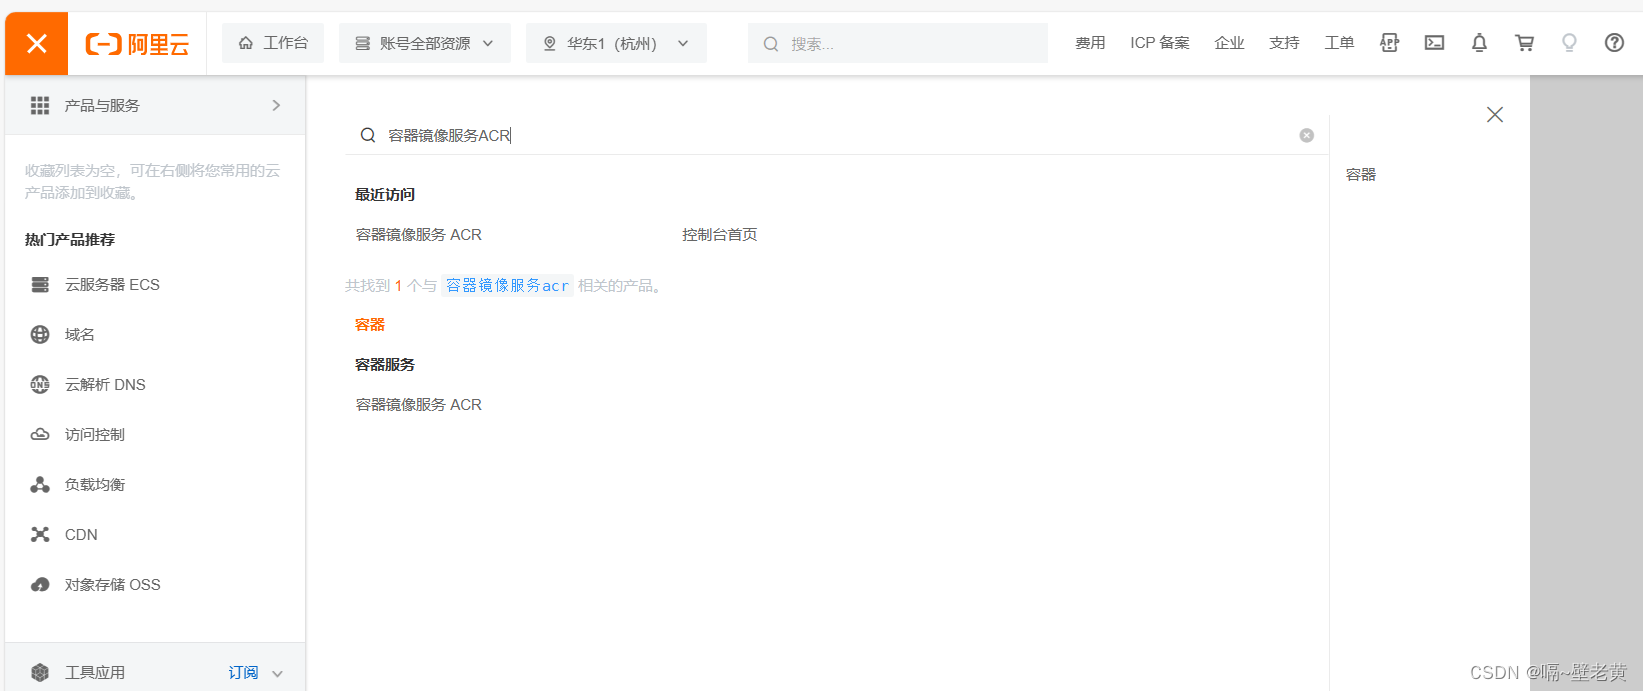
搜索容器镜像服务
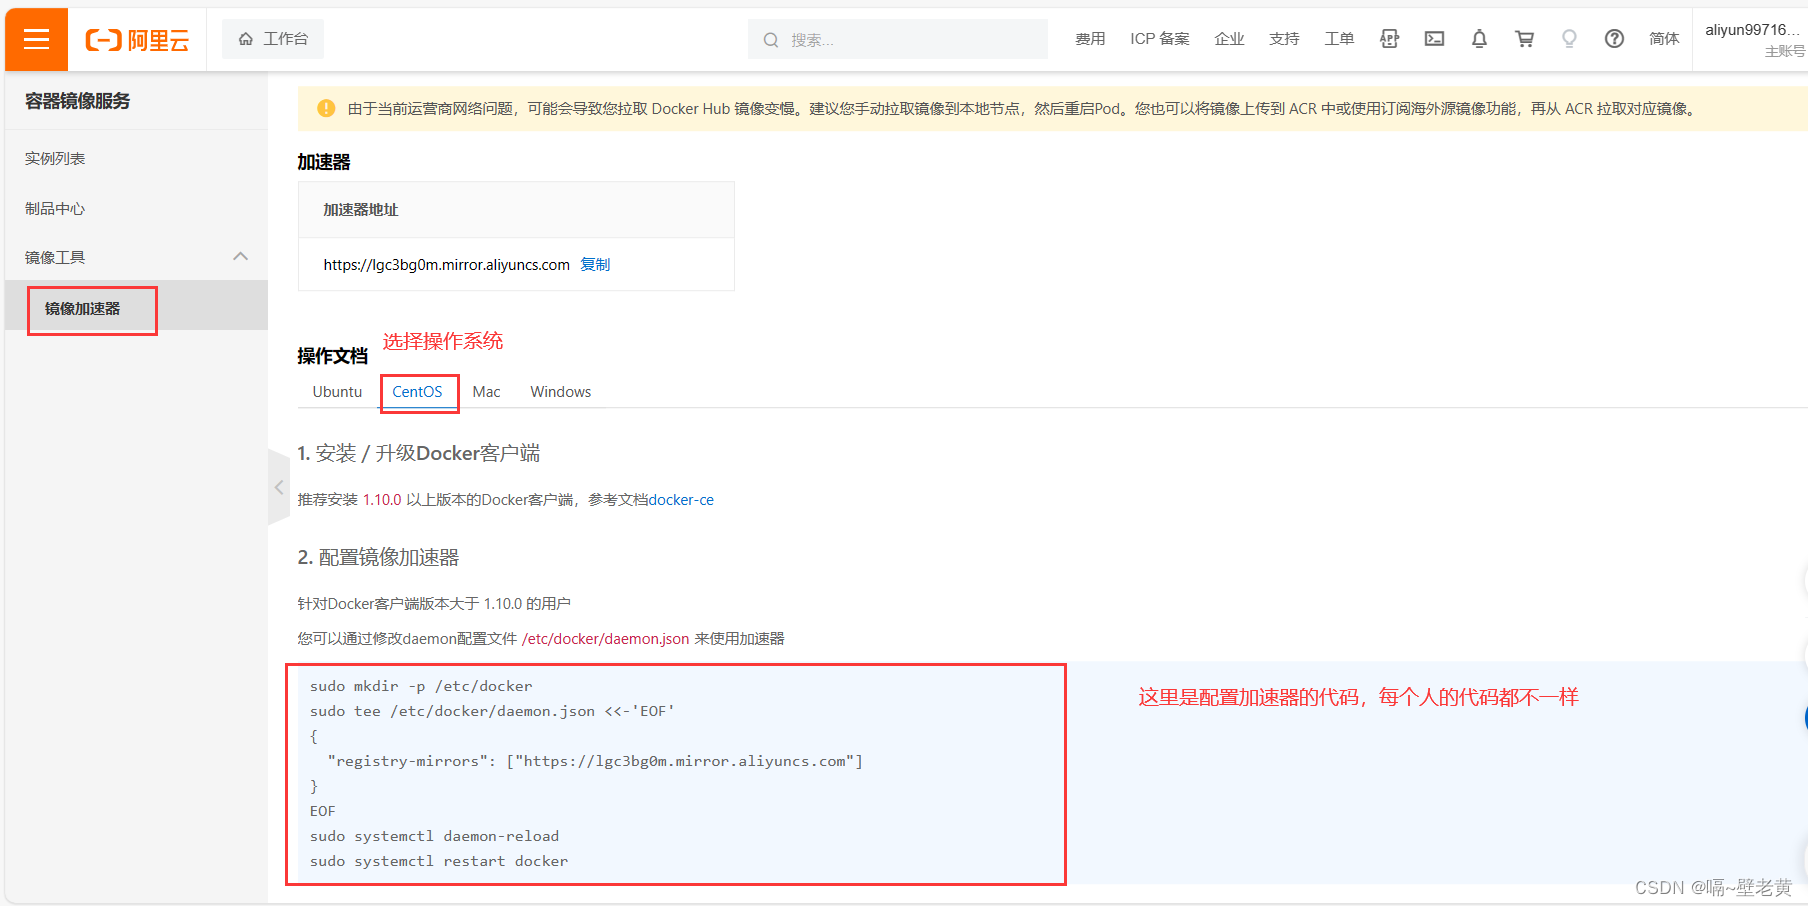
配置加速器
sudo mkdir -p /etc/docker    #docker目录启动docker服务后自动存在
sudo tee /etc/docker/daemon.json <<-'eof'
{
  "registry-mirrors": ["https://lgc3bg0m.mirror.aliyuncs.com"]
}
eof
sudo systemctl daemon-reload
sudo systemctl restart docker
查看加速器
[root@localhost ~]# docker info  #使用这个命令
.......
 registry mirrors:
  https://lgc3bg0m.mirror.aliyuncs.com/    #能看到这个就是加速器配置成功
 live restore enabled: false

[root@localhost ~]# docker info
部署harbor私有仓库(第3台主机)
配置步骤
关闭防火墙、配置selinuex、配置yum源
[root@localhost ~]# systemctl disable --now firewalld.service
[root@localhost ~]# setenforce 0
[root@localhost ~]# sed -i 's/^selinux=enforcing/selinux=disabled/g' /etc/selinux/config
[root@localhost ~]# rm -rf /etc/yum.repos.d/*
[root@localhost ~]# curl -o /etc/yum.repos.d/centos-base.repo https://mirrors.aliyun.com/repo/centos-vault-8.5.2111.repo
[root@localhost ~]# sed -i -e '/mirrors.cloud.aliyuncs.com/d' -e '/mirrors.aliyuncs.com/d' /etc/yum.repos.d/centos-base.repoyum
[root@localhost ~]# clean all
18 files removed
[root@localhost ~]# yum makecache
添加映射关系
[root@harbor ~]# vim /etc/hosts
[root@harbor ~]# cat /etc/hosts
127.0.0.1   localhost localhost.localdomain localhost4 localhost4.localdomain4
::1         localhost localhost.localdomain localhost6 localhost6.localdomain6

192.168.10.132 harbor.example.com
#在harbor和容器所在的主机的/etc/hosts文件中添加harbor
安装docker,开启docker服务并添加加速器(两台主机都要操作)
[root@harbor ~]# cd /etc/yum.repos.d/
[root@harbor yum.repos.d]# curl -o docker-ce.repo https://mirrors.tuna.tsinghua.edu.cn/docker-ce/linux/centos/docker-ce.repo
  % total    % received % xferd  average speed   time    time     time  current
                                 dload  upload   total   spent    left  speed
100  1919  100  1919    0     0   8379      0 --:--:-- --:--:-- --:--:--  8343
[root@harbor yum.repos.d]# sed -i 's@https://download.docker.com@https://mirrors.tuna.tsinghua.edu.cn/docker-ce@g' docker-ce.repo
[root@harbor yum.repos.d]# yum -y install docker-ce
......
[root@harbor ~]# systemctl enable --now docker
created symlink /etc/systemd/system/multi-user.target.wants/docker.service → /usr/lib/systemd/system/docker.service.
[root@harbor ~]#
4.进入harbor官网,拉取harbor二进制包
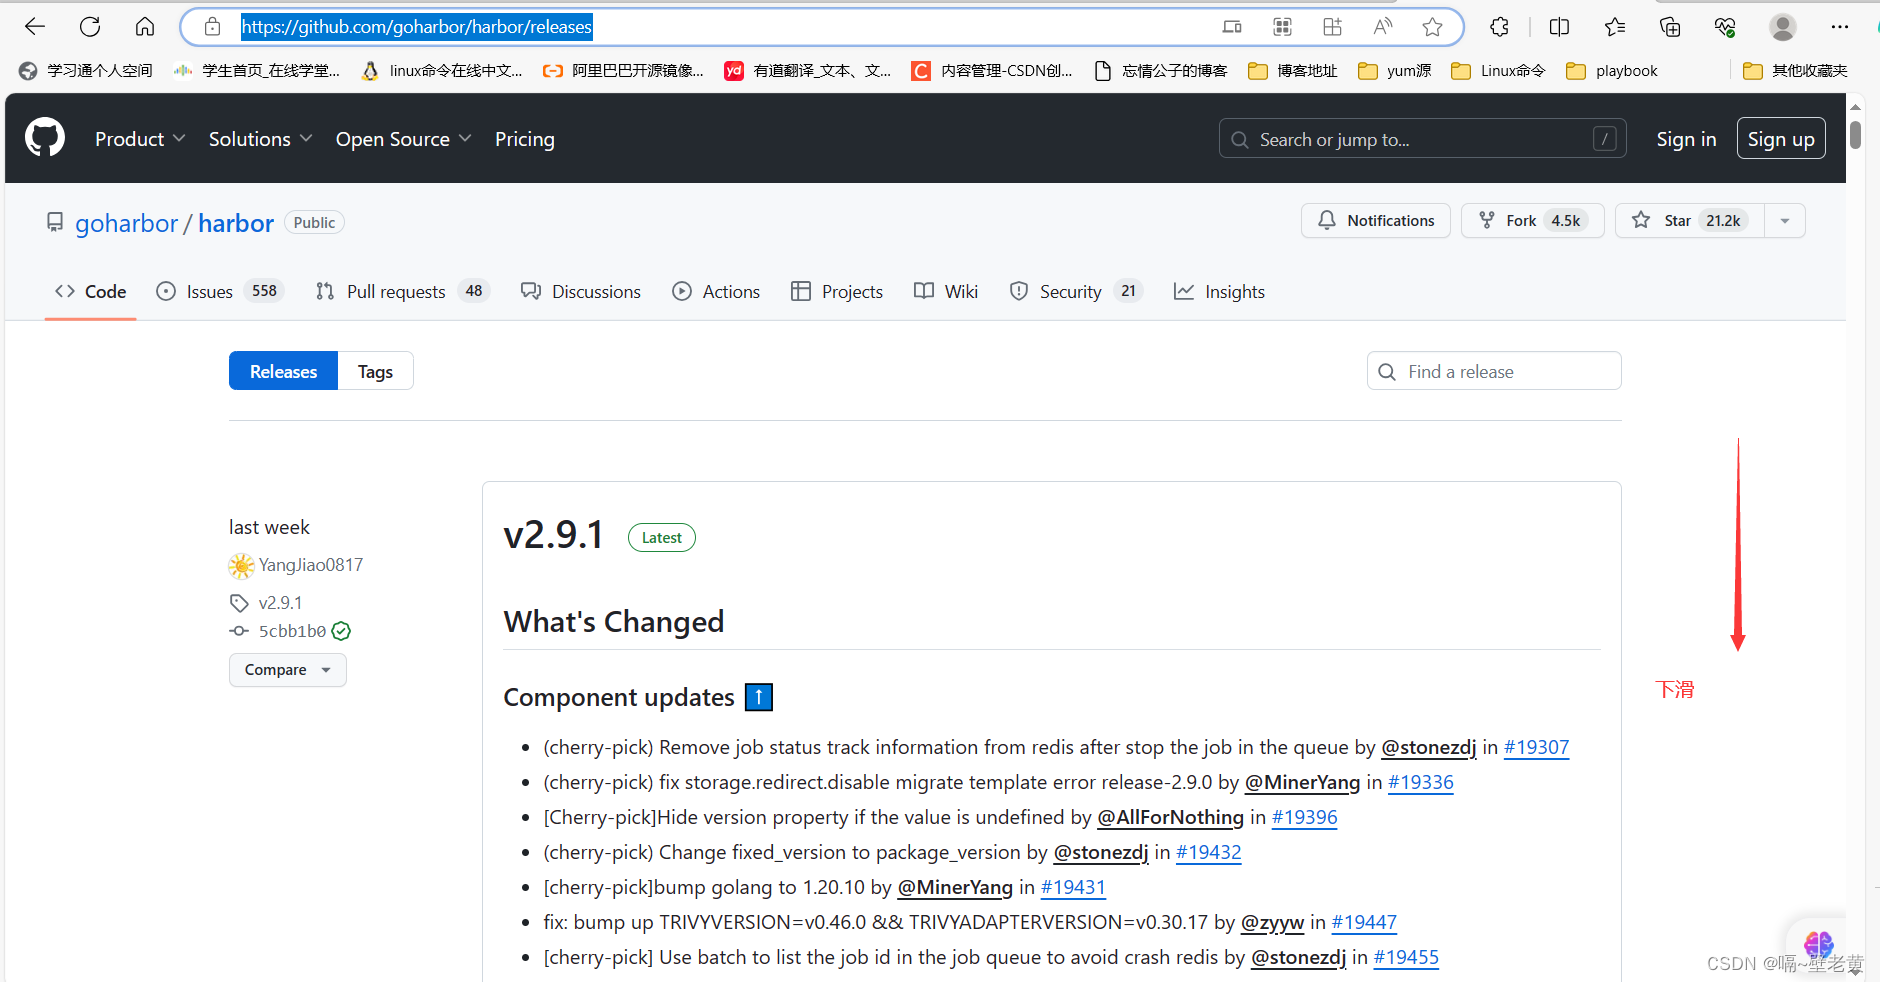
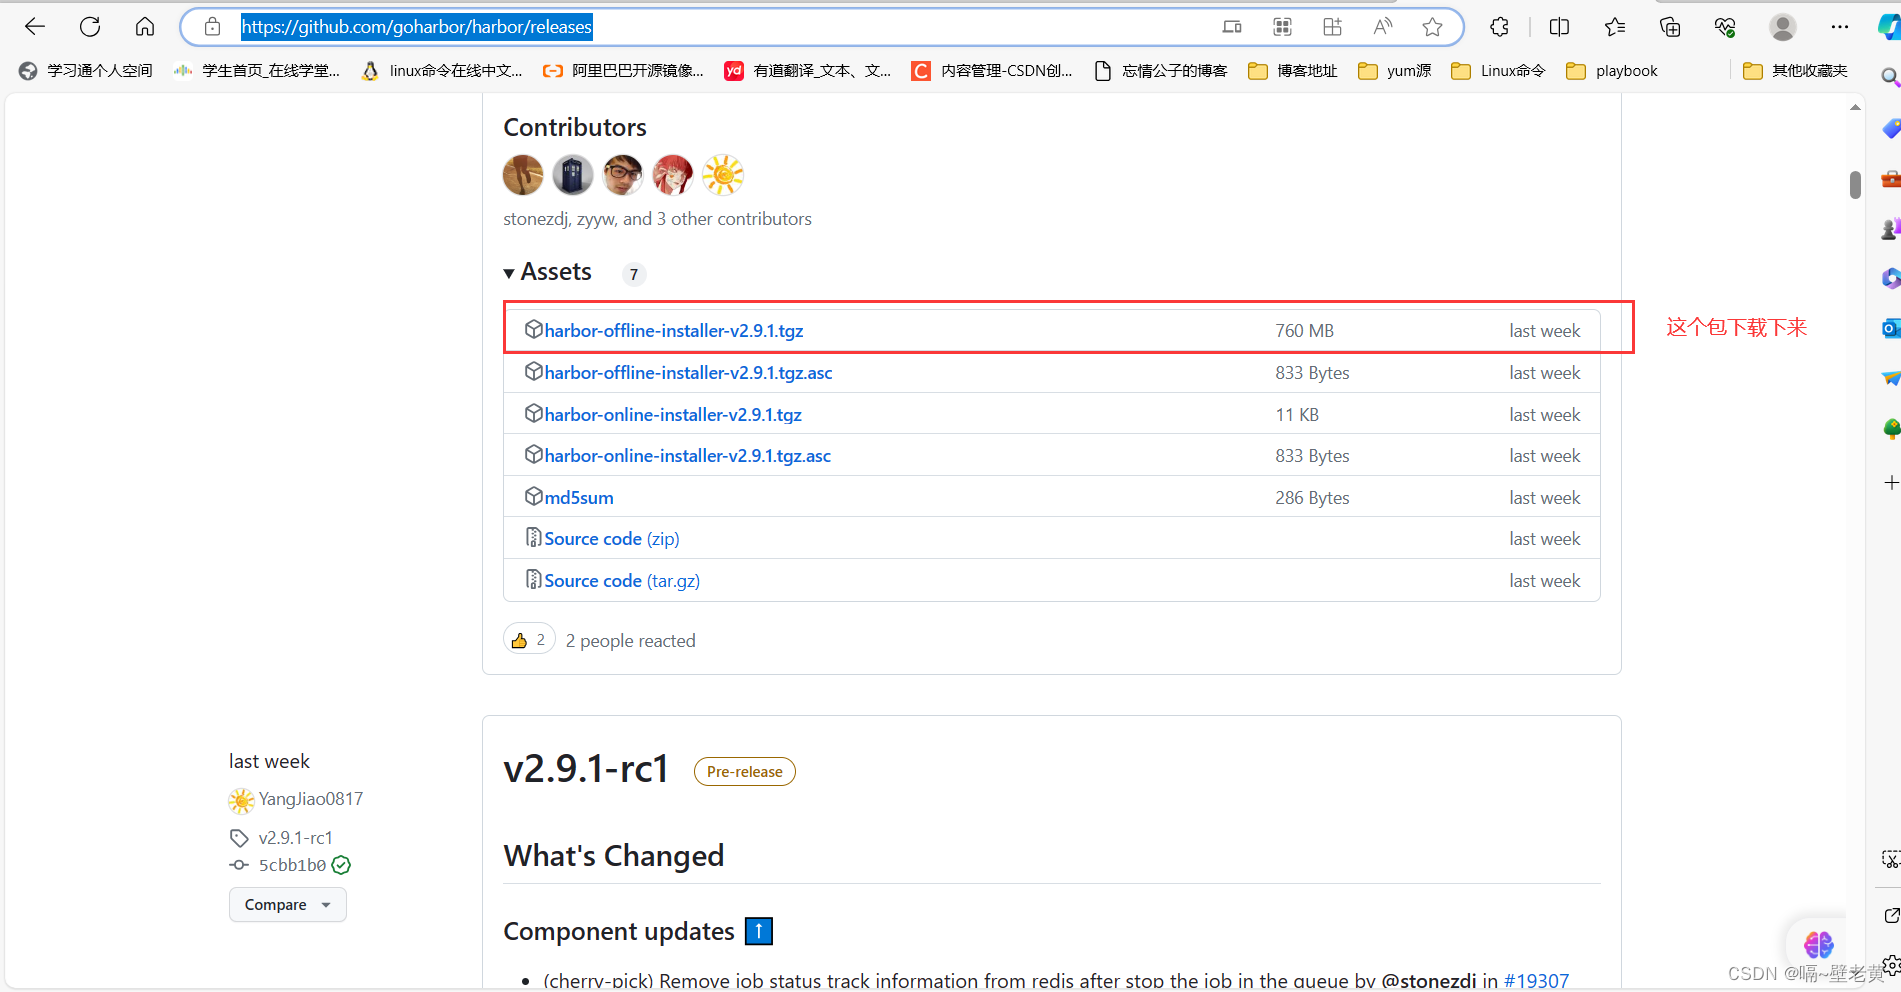
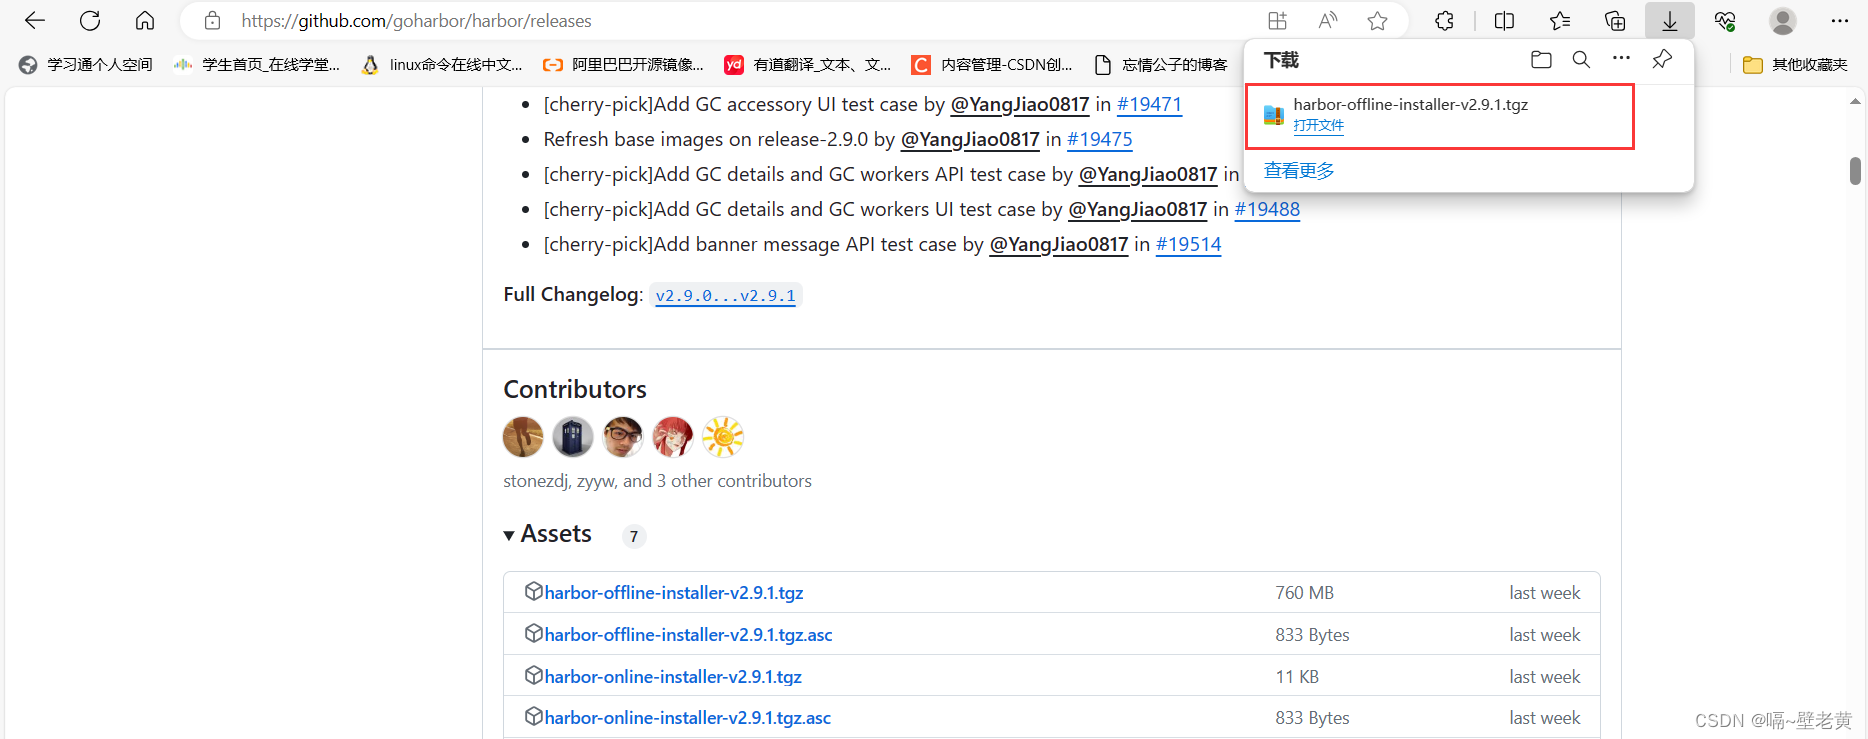
解压到/usr/local目录下
[root@harbor ~]# tar xf harbor-offline-installer-v2.9.1.tgz
[root@harbor ~]# ls
anaconda-ks.cfg  harbor  harbor-offline-installer-v2.9.1.tgz
[root@harbor ~]# mv harbor /usr/local/
[root@harbor ~]# ls /usr/local/
bin  etc  games  harbor  include  lib  lib64  libexec  sbin  share  src
[root@harbor local]# cd harbor/
[root@harbor harbor]# ls
common.sh  harbor.v2.9.1.tar.gz  harbor.yml.tmpl  install.sh  license  prepare
[root@harbor harbor]#
复制出一份harbor.yml文件,编辑/usr/local/harbor/下的harbor.yml文件
[root@harbor harbor]# cp harbor.yml.tmpl harbor.yml
[root@harbor harbor]# ls
common.sh  harbor.v2.9.1.tar.gz  harbor.yml  harbor.yml.tmpl  install.sh  license  prepare
[root@harbor harbor]#
[root@harbor harbor]# vim harbor.yml
......
# the ip address or hostname to access admin ui and registry service.
# do not use localhost or 127.0.0.1, because harbor needs to be accessed by external clients.
hostname: harbor.example.com       #把这里改成主机名
.......
# https related config     #把https注释掉
#https:
 #  https port for harbor, default is 443
 #  port: 443
 #  the path of cert and key files for nginx
 #  certificate: /your/certificate/path
 #  private_key: /your/private/key/path
 ......
 # the default data volume
data_volume: /data        #这里是存储位置
......
  # insecure the flag to skip verifying registry certificate
  insecure: true       #跳过证书验证
......
# remember change the admin password from ui after launching harbor.
harbor_admin_password: harbor12345     #harbor的密码,默认为harbor12345
执行install.sh文件
[root@harbor harbor]# ls
common  common.sh  docker-compose.yml  harbor.v2.9.1.tar.gz  harbor.yml  harbor.yml.tmpl  install.sh  license  prepare
[root@harbor harbor]# ./install.sh
.......
[+] running 10/10
 ✔ network harbor_harbor        created                                                                            0.1s
 ✔ container harbor-log         started                                                                            0.1s
 ✔ container harbor-portal      started                                                                            0.1s
 ✔ container registry           started                                                                            0.1s
 ✔ container redis              started                                                                            0.1s
 ✔ container registryctl        started                                                                            0.1s
 ✔ container harbor-db          started                                                                            0.1s
 ✔ container harbor-core        started                                                                            0.0s
 ✔ container nginx              started                                                                            0.0s
 ✔ container harbor-jobservice  started                                                                            0.0s
✔ ----harbor has been installed and started successfully.----
[root@harbor harbor]#
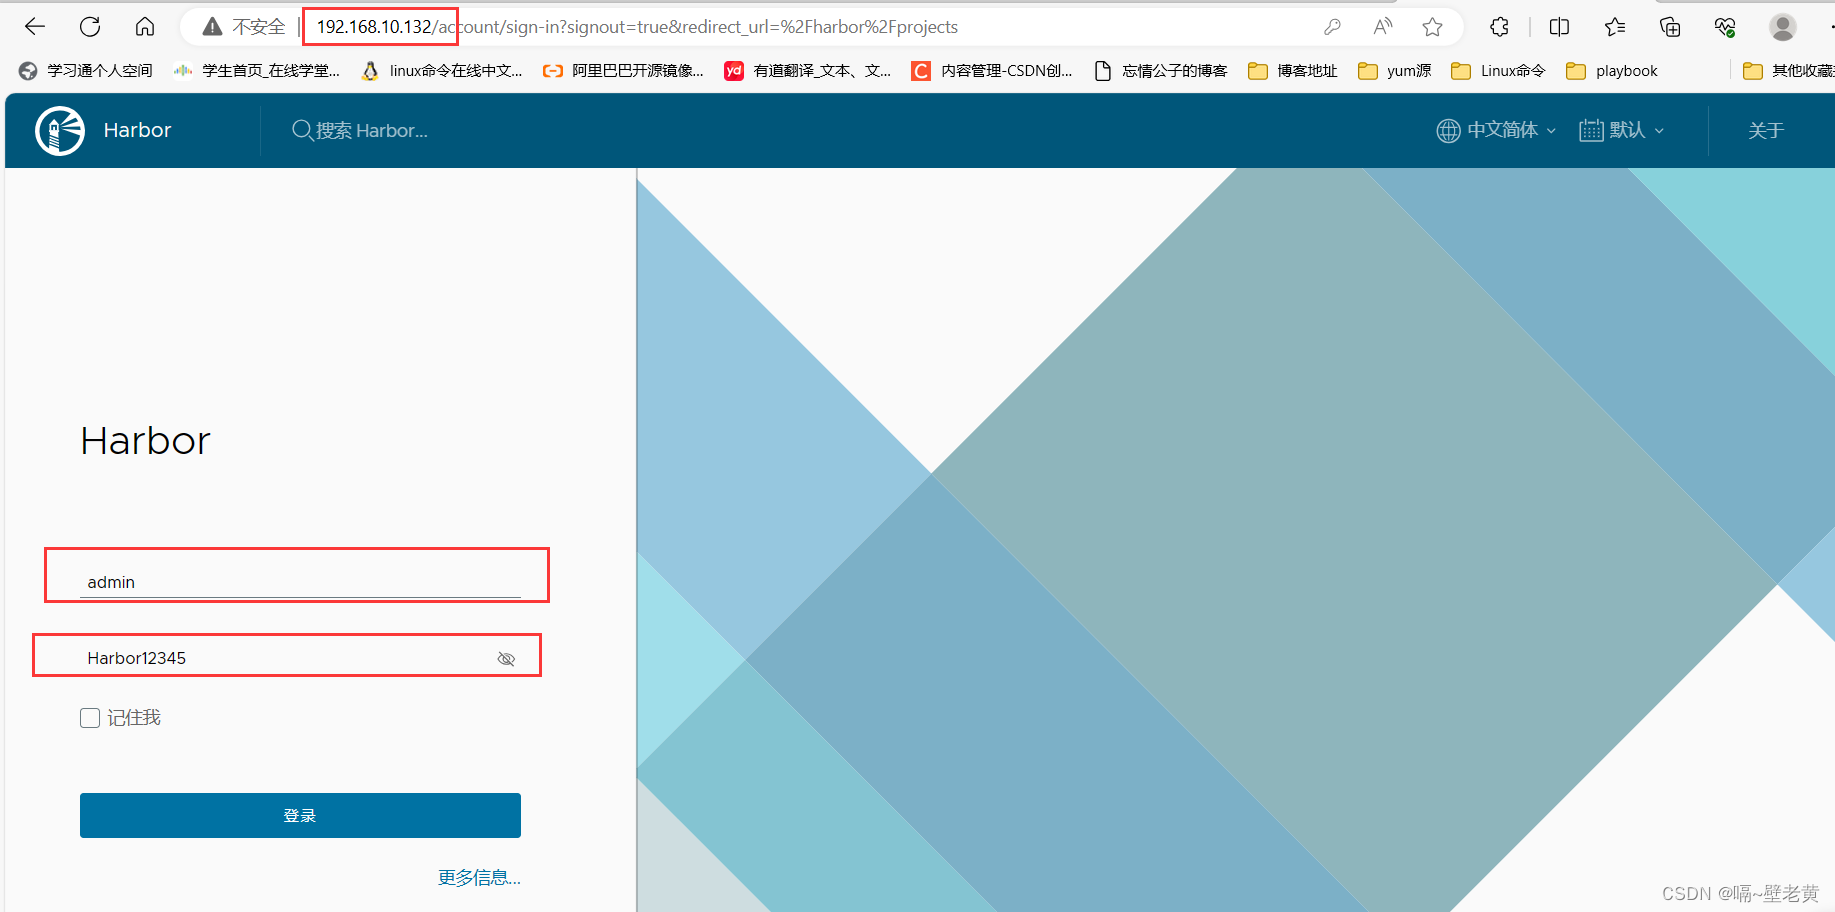
通过ip访问harbor的web界面

将harbor设置为开机自启
由于想要关闭或开启harbor需要进入到有docker-compose.yml文件的目录下执行,所以我们将该命令放到虚拟机启动最后执行的一个文件中去,也就是/etc/rc.local文件中
[root@harbor harbor]# vim /etc/rc.local
[root@harbor harbor]# cat /etc/rc.local
#!/bin/bash
cd /usr/local/harbor/ && docker-compose start    #添加这一行,系统启动时会自动执行这条命令
# this file is added for compatibility purposes
#
# it is highly advisable to create own systemd services or udev rules
# to run scripts during boot instead of using this file.
#
# in contrast to previous versions due to parallel execution during boot
# this script will not be run after all other services.
#
# please note that you must run 'chmod +x /etc/rc.d/rc.local' to ensure
# that this script will be executed during boot.

touch /var/lock/subsys/local

[root@harbor harbor]# ll /etc/rc.local
lrwxrwxrwx. 1 root root 13 feb 11  2022 /etc/rc.local -> rc.d/rc.local
[root@harbor harbor]# chmod +x /etc/rc.d/rc.local
[root@harbor harbor]# ll /etc/rc.d/rc.local
-rwxr-xr-x. 1 root root 520 nov 10 22:15 /etc/rc.d/rc.local
[root@harbor harbor]#
登录到docker的私有镜像仓库(harbor)
在登录我们的harbor私有仓库时,需在/etc/docker/daemon.json文件中添加harbor仓库的信息
[root@docker ~]# vi /etc/docker/daemon.json
[root@docker ~]# cat /etc/docker/daemon.json
{
  "dns": ["114.114.114.114"],
  "insecure-registries": ["harbor.example.com"],         #添加这一行,添加的是私有仓库
  "registry-mirrors": ["https://lgc3bg0m.mirror.aliyuncs.com"]
}
[root@docker ~]# systemctl restart docker.service   #重启服务
[root@docker ~]# docker login harbor.example.com     #登录仓库
username: admin
password:
warning! your password will be stored unencrypted in /root/.docker/config.json.
configure a credential helper to remove this warning. see
https://docs.docker.com/engine/reference/commandline/login/#credentials-store

login succeeded     #登陆成功
[root@docker ~]#
拉取一个官方镜像,将官方镜像名称更改后上传到我们的私有仓库
[root@docker ~]# docker pull nginx
using default tag: latest
latest: pulling from library/nginx
a2abf6c4d29d: pull complete
a9edb18cadd1: pull complete
589b7251471a: pull complete
186b1aaa4aa6: pull complete
b4df32aa5a72: pull complete
a0bcbecc962e: pull complete
digest: sha256:0d17b565c37bcbd895e9d92315a05c1c3c9a29f762b011a10c54a66cd53c9b31
status: downloaded newer image for nginx:latest
docker.io/library/nginx:latest
[root@docker ~]#
[root@docker ~]# docker images
repository   tag       image id       created         size
nginx        latest    605c77e624dd   22 months ago   141mb
[root@docker ~]# docker tag nginx:latest harbor.example.com/library/nginx:v0.1
[root@docker ~]# docker images
repository                         tag       image id       created         size
harbor.example.com/library/nginx   v0.1      605c77e624dd   22 months ago   141mb
nginx                              latest    605c77e624dd   22 months ago   141mb
[root@docker ~]# docker push harbor.example.com/library/nginx:v0.1
the push refers to repository [harbor.example.com/library/nginx]
d874fd2bc83b: pushed
32ce5f6a5106: pushed
f1db227348d0: pushed
b8d6e692a25e: pushed
e379e8aedd4d: pushed
2edcec3590a4: pushed
v0.1: digest: sha256:ee89b00528ff4f02f2405e4ee221743ebc3f8e8dd0bfd5c4c20a2fa2aaa7ede3 size: 1570
[root@docker ~]#
进入私有仓库查看
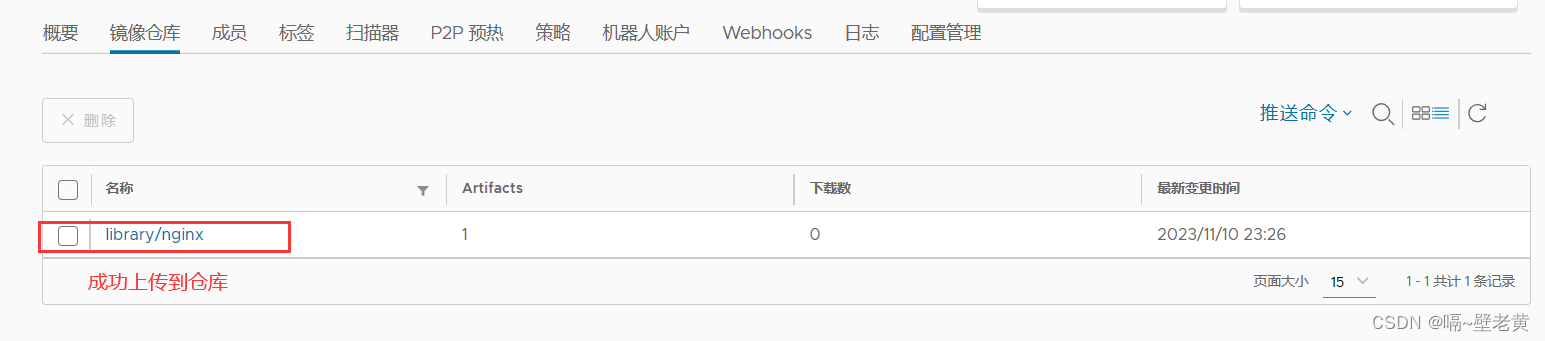
删除现存镜像,尝试从私有仓库拉取镜像
[root@docker ~]# docker images
repository                         tag       image id       created         size
harbor.example.com/library/nginx   v0.1      605c77e624dd   22 months ago   141mb
nginx                              latest    605c77e624dd   22 months ago   141mb
[root@docker ~]# docker rmi -f 605c77e624dd
[root@docker ~]# docker images
repository   tag       image id   created   size
[root@docker ~]# docker pull harbor.example.com/library/nginx:v0.1
v0.1: pulling from library/nginx
a2abf6c4d29d: pull complete
a9edb18cadd1: pull complete
589b7251471a: pull complete
186b1aaa4aa6: pull complete
b4df32aa5a72: pull complete
a0bcbecc962e: pull complete
digest: sha256:ee89b00528ff4f02f2405e4ee221743ebc3f8e8dd0bfd5c4c20a2fa2aaa7ede3
status: downloaded newer image for harbor.example.com/library/nginx:v0.1
harbor.example.com/library/nginx:v0.1
[root@docker ~]# docker images
repository                         tag       image id       created         size
harbor.example.com/library/nginx   v0.1      605c77e624dd   22 months ago   141mb  #拉取成功
[root@docker ~]#
以上环境部署完成
在
c77e624dd 22 months ago 141mb
[root@docker ~]# docker rmi -f 605c77e624dd
[root@docker ~]# docker images
repository tag image id created size
[root@docker ~]# docker pull harbor.example.com/library/nginx:v0.1
v0.1: pulling from library/nginx
a2abf6c4d29d: pull complete
a9edb18cadd1: pull complete
589b7251471a: pull complete
186b1aaa4aa6: pull complete
b4df32aa5a72: pull complete
a0bcbecc962e: pull complete
digest: sha256:ee89b00528ff4f02f2405e4ee221743ebc3f8e8dd0bfd5c4c20a2fa2aaa7ede3
status: downloaded newer image for harbor.example.com/library/nginx:v0.1
harbor.example.com/library/nginx:v0.1
[root@docker ~]# docker images
repository tag image id created size
harbor.example.com/library/nginx v0.1 605c77e624dd 22 months ago 141mb #拉取成功
[root@docker ~]#
### 以上环境部署完成

在


发表评论