👀前置了解:(官网 https://cloudstudio.net/)
目录
📃初识cloud studio
对于第一次接触cloud studio的朋友可能对这个工具有点陌生,博主就在这简单的介绍一下该工具的一些使用事项,首先点击博主上面给出的官网连接,然后进行注册(这里微信注册即可),注册完毕之后就会进入如下页面:

进入 cloud studio 云端 ide,可以通过以下两种方式创建工作空间:
第一种方式:点击模板直接创建工作空间(可自动生成工作空间名称,并运行模板的预置环境及样本代码)。

第二种方式:单击【新建工作空间】,进入工作空间创建页面(需要选择预置环境,填写工作空间名、描述,并选择运行环境和代码来源)。

工作空间内代码运行的环境,您可以选择预置环境,包含 ubuntu、python、java和 node.js 四种;也可以选择将其连接到自己的云服务器上。您还可以创建代码来自于 git 仓库的工作空间,代码会被自动克隆到工作空间。
详细的操作大家还是阅读一下 官方文档 ,给出的具体的功能介绍,这里博主就不再详细赘述了。
📰快速构建3d交互式画面
本次博主打算用云 ide cloud studio社区版快速搭建实现一个3d交互式故事场景,关于这篇3d的具体文章,可以查看: 这篇文章,这里我们打算使用vue3来实现,体验云 ide 给我们带来的优势。闲话少说直接开始操作:
🍇日常项目基础搭建
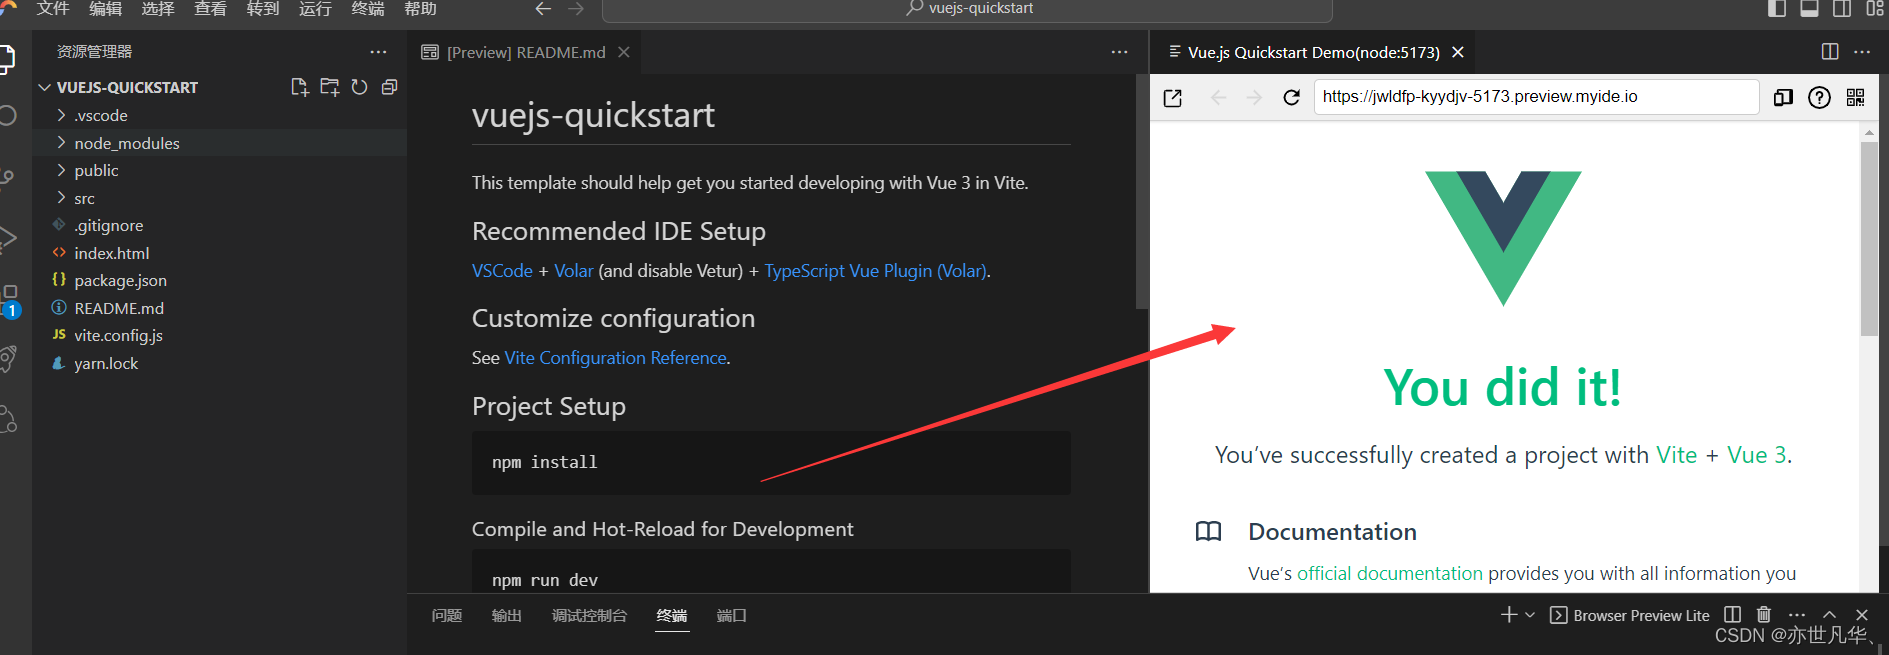
本项目选择使用vue模板来实现功能。点击 vue.js 模板卡片,进入集成环境加载页面,加载成功后即可进入开发环境进行编程,如下:

当我们点击完框架之后,等待不到 30s 左右(与带宽网速差异有区别),开发环境就初始化配好了。如下:

cloud studio 帮助我们初始化好开发 vue 环境,并且默认有一个小 demo,系统相关配置信息:
在平常的开发中可以直接引入一些相关的第三方库,方法如下,当然在本项目是用不到下面的一些库的,这里仅仅做一个普及,如下:
当然为了快速开发,一般我们会采用一些ui库,比如移动端我们经常会选择vant:
# 安装 vant:
yarn add vant@^3.6.12
在基于 vite、webpack 或 vue-cli 的项目中使用 vant 时,可以使用 unplugin-vue-components 插件,它可以自动引入组件,并按需引入组件的样式,如下:
// —d表示安装到开发依赖中
yarn add -d unplugin-vue-components@^0.22.7
本项目是基于 vite 的项目,所以,在根目录下,vite.config.js 文件中配置插件。完成以上安装和如下修改配置文件两步,就可以直接在模板中使用 vant 组件了,unplugin-vue-components 会解析模板并自动注册对应的组件。
import { fileurltopath, url } from 'node:url'

import { defineconfig } from 'vite'
import vue from '@vitejs/plugin-vue'
// 引入以下2个库
import components from 'unplugin-vue-components/vite';
import { vantresolver } from 'unplugin-vue-components/resolvers';

// https://vitejs.dev/config/
export default defineconfig({
  plugins: [
    vue(),
    // 增加以下配置
    components({
      // 不生成类型声明文件自己写
      dts: false,
      // 样式需要单独引入
      resolvers: [vantresolver({ importstyle: false })]
    }),
  ],
  resolve: {
    alias: {
      '@': fileurltopath(new url('./src', import.meta.url))
    }
  }
})
在css这块,我们也一般会使用scss和less这些css预处理语言,本项目中我们选择less。vite 和 webpack 不同,不需要 less-loader 等,只需安装 less,如下:
yarn add -d less@^3.12.2在根目录下,vite.config.js 文件中配置less配置:

normalize.css 是css重置的现代替代方案,可以为默认的html元素样式上提供了跨浏览器的高度一致性。相比于传统的css reset,normalize.css是一种现代的、为html5准备的优质替代方案。所以终端我们还是需要安装一下如下命令:
yarn add -d normalize.css@^8.0.1配置完成之后,接下来需要在入口文件 src/main.js 中进行引入,如下:
import { createapp } from 'vue'
import app from './app.vue'
// 按需引入 vant
import { tabbar, tabbaritem } from 'vant';
import 'vant/lib/index.css'
// css 重置的现代替代方案
import 'normalize.css/normalize.css'

// 实例化 vue 实例
const app = createapp(app)

// 安装 vant 相关使用插件
app.use(tabbar);
app.use(tabbaritem);

// 挂载到 #app 节点
app.mount('#app')
🍎本项目具体搭建
在本项目中因为是实现的3d可视化技术,所以我们需要安装如下的第三方库:
npm i three安装完成之后就可以调用一些基础的three库了,如下three.js开启必须用到的基础代码:
导入three库:
import * as three from 'three'初始化场景:
const scene = new three.scene()初始化相机:
// 创建相机
const camera = new three.perspectivecamera(
  45, // 视角
  window.innerwidth / window.innerheight, // 宽高比
  0.1, // 近平面
  1000 // 远平面
);
// 设置相机位置
camera.position.z = 1;
// camera.position.y = 2;
// camera.position.x = 2;
camera.lookat(0, 0, 0);初始化渲染器:
// 创建渲染器
const renderer = new three.webglrenderer({
  antialias: true, // 开启抗锯齿
});
renderer.shadowmap.enabled = true; // 启用阴影映射
renderer.setsize(window.innerwidth, window.innerheight);
document.body.appendchild(renderer.domelement);监听屏幕大小的改变,修改渲染器的宽高和相机的比例:
// 监听窗口变化
window.addeventlistener("resize", () => {
  // 重置渲染器宽高比
  renderer.setsize(window.innerwidth, window.innerheight);
  // 重置相机宽高比
  camera.aspect = window.innerwidth / window.innerheight;
  // 更新相机投影矩阵
  camera.updateprojectionmatrix();
});导入轨道控制器:
// 添加轨道控制器
import { orbitcontrols } from 'three/examples/jsm/controls/orbitcontrols'
// 添加轨道控制器
const controls = new orbitcontrols(camera, renderer.domelement);
// 设置带阻尼的惯性
controls.enabledamping = true;
// 设置阻尼系数
controls.dampingfactor = 0.05;
controls.maxdistance = 50;
// 设置旋转速度
// controls.autorotate = true;设置渲染函数:
// 渲染函数
const animate = () => {
  controls.update();
  requestanimationframe(animate);
  // 渲染
  renderer.render(scene, camera);
}
animate();
🍈具体项目书实现
项目具体实现是通过 textureloader 加载纹理,处理各种常见的图像格式,如jpeg、png和gif,并将它们转换为webgl可用的纹理对象。这里我们处理我们刚生成好的全景图。
然后再通过补间动画库 tween 进行实现一个简单的动画效果,所以这里需要我们按照tween:
npm i tween安装完成之后,项目的大概也就能基本完成了,如果不清楚 three 的朋友可以推荐看一下我的 ,关于本项目的具体实现可参考我上面分析的文章,ok接下来我们只需要把源代码直接粘贴到 cloud studio 当值运行即可:
<template>
  <div class="modal" v-show="data.modalvisible">
    <div class="playgame">
      <div class="btn" @click="togglecontent(0)">开始操作</div>
      <audio ref="audioplayer" loop autoplay src="../../public/sounds/love.mp3"></audio>
    </div>
  </div>
  <div class="textdiv" v-show="data.contentvisible">
    <div class="text">{{ data.contentlist[data.index].content }}</div>
    <div class="footer">
      <div
        v-for="(item, i) in data.contentlist[data.index].btns"
        class="btn"
        @click="togglecontent(item.index)"
      >
        {{ item.name }}
      </div>
    </div>
  </div>
</template>

<script setup>
import { ref ,reactive, onmounted } from 'vue'
// 导入threejs
import * as three from "three";
// 导入轨道控制器
import { orbitcontrols } from "three/examples/jsm/controls/orbitcontrols.js";
// 导入tween
import * as tween from "tween";

// 创建场景
const scene = new three.scene();
// 创建相机
const camera = new three.perspectivecamera(
  45, // 视角
  window.innerwidth / window.innerheight, // 宽高比
  0.1, // 近平面
  1000 // 远平面
);
// 设置相机位置
camera.position.z = 1;
// camera.position.y = 2;
// camera.position.x = 2;
camera.lookat(0, 0, 0);

// 创建渲染器
const renderer = new three.webglrenderer({
  antialias: true, // 开启抗锯齿
});
renderer.shadowmap.enabled = true; // 启用阴影映射
renderer.setsize(window.innerwidth, window.innerheight);
document.body.appendchild(renderer.domelement);

// 添加轨道控制器
const controls = new orbitcontrols(camera, renderer.domelement);
// 设置带阻尼的惯性
controls.enabledamping = true;
// 设置阻尼系数
controls.dampingfactor = 0.05;
controls.maxdistance = 50;
// 设置旋转速度
// controls.autorotate = true;

// 渲染函数
const animate = () => {
  controls.update();
  tween.update();
  requestanimationframe(animate);
  // 渲染
  renderer.render(scene, camera);
}
animate();


let data = reactive({
  contentlist: [
    {
      content:
        "阿伟坐在电脑前,一边打游戏,一边听着妈妈的唠叨。他的脸上满是不耐烦,心中充满了对妈妈的反感。此时,他的朋友小刚走进来,邀请他一起去网吧游玩。阿伟欣然答应,两人一起出门。",
      img: "./textures/story/1.jpg",
      sound: "./sounds/1.mp3",
      startangle: { x: 0, y: 0 },
      endangle: { x: -math.pi / 8, y: math.pi / 2 },
      duration: 15000,
      btns: [
        {
          name: "不能听妈妈的唠叨,我决定必须和朋友出去玩~",
          index: 1,
        },
        {
          name: "阿伟回头想了想,现在是学习的关键时刻,不能老是沉迷于游戏。悬崖勒马回头是岸!",
          index: 2,
        },
      ],
    },
    {
      content:
        "阿伟和小刚在网吧里玩得不亦乐乎,他们在游戏中大显身手,引来了众人的羡慕目光。下机后,他们准备离开,却被一位名叫杰哥的人叫住。",
      img: "./textures/story/2.jpg",
      sound: "./sounds/2.mp3",
      startangle: { x: math.pi / 16, y: math.pi - math.pi / 16 },
      endangle: { x: math.pi / 16, y: math.pi + math.pi / 16 },
      duration: 20000,
      btns: [
        {
          name: "是要发生什么事吗...",
          index: 3,
        },
      ],
    },
    {
      content:
        "阿伟和妈妈重新回到了宁静的生活,他们学会了如何面对生活中的困境和挑战,也更加珍惜彼此之间的感情。",
      img: "./textures/story/3.jpg",
      sound: "./sounds/3.mp3",
      startangle: { x: 0, y: -math.pi / 4 },
      endangle: { x: 0, y: -math.pi / 2 },
      duration: 25000,
      btns: [],
    },
    {
      content:
        "杰哥热情地邀请阿伟和小刚到他家玩,他们在欢笑声中喝得烂醉如泥。杰哥看着阿伟,眼神中闪烁着诡异的光芒。",
      img: "./textures/story/4.jpg",
      sound: "./sounds/4.mp3",
      startangle: { x: math.pi / 16, y: -math.pi / 2 - math.pi / 8 },
      endangle: { x: math.pi / 16, y: -math.pi / 2 },
      duration: 20000,
      btns: [
        {
          name: "阿伟被半推半就的被杰哥拉扯着...",
          index: 4,
        },
      ],
    },
    {
      content:
        "杰哥把阿伟带到他的房间,让他坐在桌前。阿伟的视线落在桌上,他看到了一些他从未见过的物品,他的心跳开始加速。",
      img: "./textures/story/5.jpg",
      sound: "./sounds/5.mp3",
      startangle: { x: math.pi / 16, y: math.pi / 2 - math.pi / 4 },
      endangle: { x: math.pi / 16, y: math.pi / 2 - math.pi / 8 },
      duration: 25000,
      btns: [
        {
          name: "这些到底是什么...",
          index: 5,
        },
      ],
    },
    {
      content:
        "杰哥趁阿伟脸红的时候,想看他法语正不正常。阿伟感到有些不安,但他无法反抗。杰哥一拳把他打到床上,他无力反抗,只能任由杰哥为所欲为。",
      img: "./textures/story/6.jpg",
      sound: "./sounds/6.mp3",
      startangle: { x: math.pi / 16, y: math.pi / 2 - math.pi / 4 },
      endangle: { x: math.pi / 16, y: math.pi / 2 - math.pi / 8 },
      duration: 25000,
      btns: [
        {
          name: "事后...",
          index: 6,
        },
      ],
    },
    {
      content:
        "杰哥笑着对阿伟说:“我是阳光dua郎大男孩,这是我们的秘密你别给我说出去。”阿伟无奈地点头,心中充满了恐惧和无助。第二天阿伟收到了杰哥发来的消息,说依然想他再来他家开party。阿伟心中充满了恐惧,他知道,他已经陷入了一个无法逃脱的深渊。",
      img: "./textures/story/7.jpg",
      sound: "./sounds/7.mp3",
      startangle: { x: math.pi / 16, y: math.pi / 2 - math.pi / 4 },
      endangle: { x: math.pi / 16, y: math.pi / 2 - math.pi / 8 },
      duration: 25000,
      btns: [
        {
          name: "阿伟:我不能就这么完了~",
          index: 7,
        },
      ],
    },
    {
      content:
        "阿伟决定向警察求助,他要揭露杰哥的罪行,让他得到应有的惩罚。他知道,这将是一场艰难的战斗,但他没有退路,他必须站出来,为自己和其他可能成为杰哥目标的人争取公正。",
      img: "./textures/story/8.jpg",
      sound: "./sounds/8.mp3",
      startangle: { x: 0, y: -math.pi / 2 - math.pi / 4 },
      endangle: { x: -math.pi / 8, y: -math.pi / 2 - math.pi / 8 },
      duration: 25000,
      btns: [],
    },
  ],
  contentvisible: false,
  modalvisible: true,
  index: 0,
});

let textureloader = new three.textureloader();
let textures = data.contentlist.map((item, i) => {
  let texture = textureloader.load(data.contentlist[i].img); // 循环加载每一张图片
  texture.mapping = three.equirectangularreflectionmapping; // 通过使用全景纹理图像来模拟环境反射
  texture.colorspace = three.srgbcolorspace; // 表示和描述颜色的数学模型或系统
  return texture;
});
let spheregeometry = new three.spheregeometry(100, 32, 32);
spheregeometry.scale(1, 1, -1);
let material = new three.meshbasicmaterial({ map: textures[data.index] });
let sphere = new three.mesh(spheregeometry, material);
sphere.rotation.order = "xyz";
scene.add(sphere);

let audio = new audio();
let tween;
let audioplayer = ref(null);

function togglecontent(dataindex) {
  audioplayer.value.play();
  settimeout(() => {
    data.contentlist[data.index].sound &&
      (audio.src = data.contentlist[data.index].sound);
    audio.play();
  }, 500);
  data.contentvisible = true;
  data.modalvisible = false;
  data.index = dataindex;
  camera.position.set(0, 0, 1);
  sphere.rotation.y = data.contentlist[dataindex].startangle.y;
  sphere.rotation.x = data.contentlist[dataindex].startangle.x;
  material.map = textures[data.index];
  material.needsupdate = true;

  tween && tween.stop();
  tween = new tween.tween(sphere.rotation);
  tween.to(
    {
      y: data.contentlist[data.index].endangle.y,
      x: data.contentlist[data.index].endangle.x,
    },
    data.contentlist[data.index].duration
  );
  // 设置缓动函数
  tween.easing(tween.easing.quadratic.inout);

  // 启动补间动画
  tween.start();
}

</script>

<style scoped>
* {
  margin: 0;
  padding: 0;
}
body {
  width: 100vw;
  height: 100vh;
}
canvas {
  display: block;
  position: fixed;
  left: 0;
  top: 0;
  width: 100vw;
  height: 100vh;
}

.textdiv {
  width: 80%;
  max-width: 500px;
  height: auto;
  padding: 20px 50px;
  border-radius: 10px;
  border: 1px solid #9999cc;
  box-shadow: 0 0 5px #ddddff;
  z-index: 100;
  position: fixed;
  left: 50%;
  bottom: 30px;
  transform: translate(-50%, 0);
  color: #ffffff;
  background-color: rgba(0, 0, 0, 0.5);
  text-align: left;
  line-height: 25px;
}
.playgame {
  width: 800px;
  height: 450px;
  background-image: url(../assets/imgs/boys.jpg);
  background-size: 100% 100%;
  border-radius: 50px;
  position: absolute;
  left: calc(50% - 400px);
  top: calc(50% - 225px);
  z-index: 100;
}
.modal {
  position: fixed;
  left: 0;
  top: 0;
  width: 100vw;
  height: 100vh;
  z-index: 100;
  background-color: rgba(0, 0, 0, 0.9);
}
.playgame .btn {
  width: 200px;
  height: 50px;
  background-color: rgba(0, 0, 0, 0.5);
  color: white;
  display: flex;
  justify-content: center;
  align-items: center;
  border-radius: 10px;
  position: absolute;
  left: calc(50% - 100px);
  bottom: 50px;
  cursor: pointer;
}
.playgame .btn:hover {
  background: red;
}
.textdiv .footer {
  display: flex;
  justify-content: end;
  padding: 15px 0;
  flex-direction: column;
  align-items: start;
}
.textdiv .btn {
  width: auto;
  height: auto;
  background-color: rgba(50, 50, 100, 0.5);
  color: white;
  display: flex;
  justify-content: center;
  align-items: center;
  border-radius: 5px;
  font-size: 12px;
  padding: 5px 10px;
  margin-bottom: 10px;
  line-height: 24px;
  cursor: pointer;
}
.textdiv .btn:hover {
  background: red
}
</style>
cloud studio 内置预览插件,可以实时显示网页应用,当代码发生改变之后,预览窗口会自动刷新,即可在 cloud studio 内实时开发调试网页了,还提供了二唯码在手机端进行调试。最终呈现的效果如下:

复制内置 chrome 浏览器窗口的地址栏,分享给团队的其它成员,免去了部署 nginx 的繁琐配置。
运行的项目不再需要服务器,将生成的网址复制就可以给任何人观看:


🔖项目上线git
由于工作中使用的 git 命令较多,所以使用命令进行 git 初始化。左边功能菜单区找到“源代码管理”

这里注意一下:git 首次安装必须设置一下用户签名,否则无法提交代码。签名的作用是区分不同操作者的身份,用户的签名信息在每一个版本的提交信息中能够看到,来以次确认本次提交是谁做的。(签名邮箱信息可以随便填,git并不会识别它是否存在,当然在公司开发过程中可以实名邮箱签名)注意:这里设置用户签名和将来登录 github(或其代码托管中心)的账号没有任何关系。
进行仓库初始化:
// git初始化操作
$ git init
initialized empty git repository in /workspace/vuejs-quickstart/webapp/.git/
// 添加文件
$ git add ./
// 提交
$ git commit -m "feat: 初始化项目"
以发布coding为例:点击“publish branch” -> 选择"publish to coding"

提示 cloud studio coding publish -> 点击"允许",会打开一个新的页面进行 coning 授权,授权完后再跳回原页面。

点击“publish branch” -> 选择"publish to coding",这里看自己的需求,这个直接输入仓库名,不需要单独在仓库中再额外创建才能推送,结果如下:

源代码地址:https://ztk63lrd.coding.net/public/xiangmu/vue_three/git/files
📑回顾总结
cloudstudio提供云端开发,基于云端的开发环境,无需安装任何软件。云端开发,不占用自己电脑内存,只需要通过浏览器就能够进行编程工作,非常方便。对于前端开发者来讲更是梦想中的福音,无需用代码初始化项目,只需一个模板点击即可生成:
网页版的vscode与我们一般用的编辑器别无二致,真正做到了随时随地,只需一个浏览器就能进行开发,非常的方便:

创建好的项目,如果不想在线上进行运行,只需关闭即可:

cloud studio也适配了很多的服务器版本,也提供了相应的免费版本,同时适合学生党和企业:


发表评论