一、选择系统
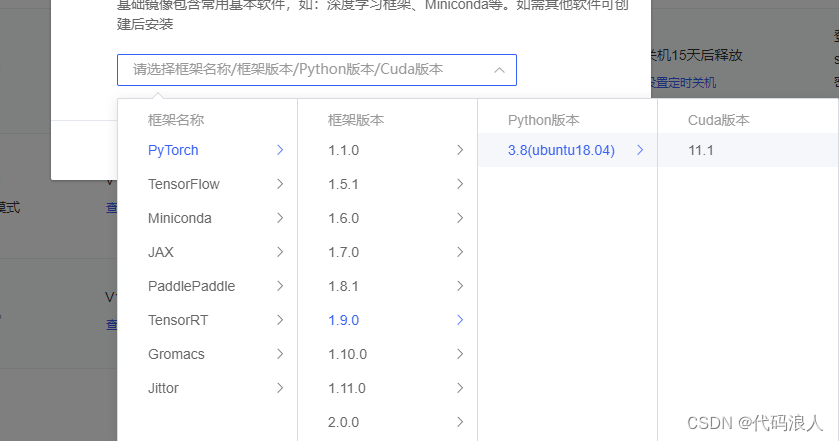
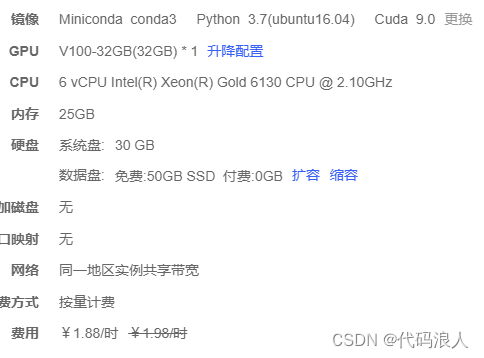
这个镜像可以

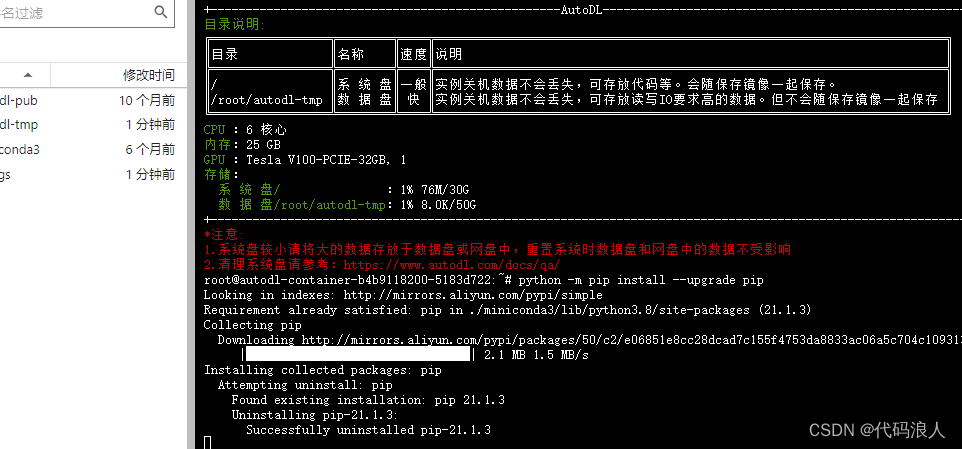
1.1 更新环境
python -m pip install --upgrade pip
二、安装使用whisper
我在另一篇博客也写道,互相交流学习
2.1 创建环境
# ssh登录系统
# 切换到root用户
mkdir /opt/tools/
cd /opt/tools/
# 安装miniconda
wget https://repo.anaconda.com/miniconda/miniconda3-latest-linux-x86_64.sh
chmod +x miniconda3-latest-linux-x86_64.sh
./miniconda3-latest-linux-x86_64.sh
#按提示操作,安装目录建议选择/opt/miniconda3
#创建软链接
ln -s /opt/miniconda3/bin/conda /usr/local/bin/conda
#退出shell重新登陆,然后后续操作
#创建环境
conda create -n whisper python=3.9
conda activate whisper
2.1 安装
2.1.1安装基础包
pip install -u openai-whisper
或者
pip install git+https://github.com/openai/whisper.git
或者
pip install -i https://pypi.tuna.tsinghua.edu.cn/simple openai-whisper
2.1.2安装依赖
pip install tiktoken
pip install setuptools-rust
#在conda whisper环境外执行,安装ffmpeg
sudo apt update && sudo apt install ffmpeg
3测试1
whisper audio.mp3 --model medium --language chinese
代码调用
import whisper
import arrow

# 定义模型、音频地址、录音开始时间
def excute(model_name,file_path,start_time):
    model = whisper.load_model(model_name)
    result = model.transcribe(file_path)
    for segment in result["segments"]:
        now = arrow.get(start_time)
        start = now.shift(seconds=segment["start"]).format("yyyy-mm-dd hh:mm:ss")
        end = now.shift(seconds=segment["end"]).format("yyyy-mm-dd hh:mm:ss")
        print("【"+start+"->" +end+"】:"+segment["text"])

if __name__ == '__main__':
    excute("base","1001.mp3","2022-10-24 16:23:00")
3测试2 语着分离
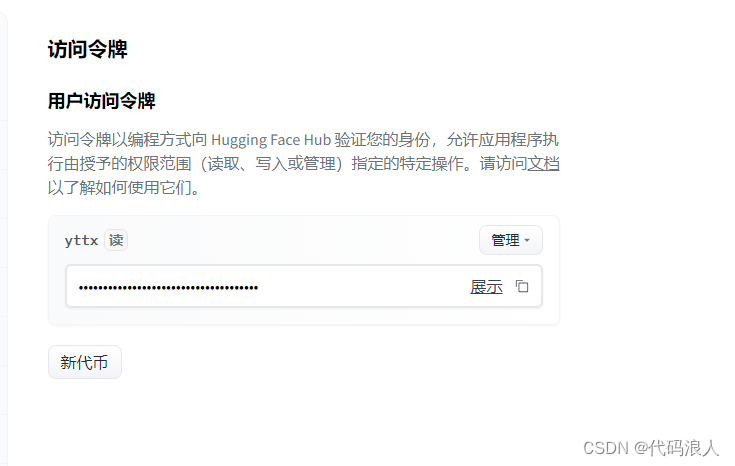
创建key
https://huggingface.co/settings/tokens
创建代码
- cache_dir:模型啥的下载后存放位置
- use_auth_token :创建的key
import os
import whisper
from pyannote.audio import pipeline
from pyannote_whisper.utils import diarize_text
import concurrent.futures
pipeline = pipeline.from_pretrained("pyannote/speaker-diarization", use_auth_token="你申请的key",cache_dir="/root/autodl-tmp/whisper/env")
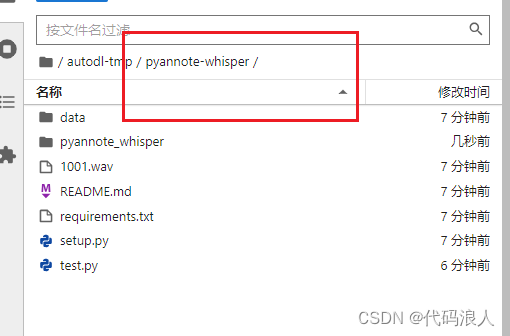
output_dir = '/root/autodl-tmp/pyannote-whisper'
def process_audio(file_path):
model = whisper.load_model("large")
asr_result = model.transcribe(file_path, initial_prompt="语音转换")
diarization_result = pipeline(file_path)
final_result = diarize_text(asr_result, diarization_result)
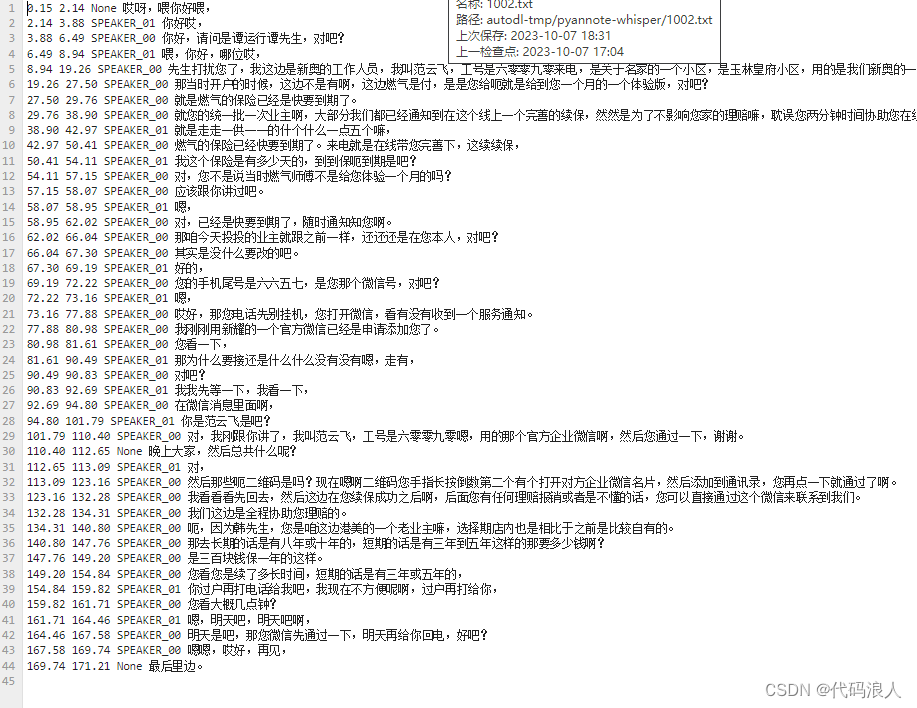
output_file = os.path.join(output_dir, os.path.basename(file_path)[:-4] + '.txt')
with open(output_file, 'w') as f:
for seg, spk, sent in final_result:
line = f'{seg.start:.2f} {seg.end:.2f} {spk} {sent}\n'
f.write(line)
if not os.path.exists(output_dir):
os.makedirs(output_dir)
wave_dir = '/root/autodl-tmp/pyannote-whisper'
# 获取当前目录下所有wav文件名
wav_files = [os.path.join(wave_dir, file) for file in os.listdir(wave_dir) if file.endswith('.wav')]
# 处理每个wav文件
with concurrent.futures.threadpoolexecutor(max_workers=3) as executor:
executor.map(process_audio, wav_files)
print('处理完成!')
报错modulenotfounderror: no module named 'pyannote'

解决方案
pip install pyannote.audio
报错no module named 'pyannote_whisper'
如果你使用使用autodl平台,你可以使用学术代理加速
source /etc/network_turbo
git clone https://github.com/yinruiqing/pyannote-whisper.git
cd pyannote-whisper
pip install -r requirements.txt

这个错误可能是由于缺少或不正确安装了所需的 sndfile 库。sndfile 是一个用于处理音频文件的库,它提供了多种格式的读写支持。
你可以尝试安装 sndfile 库,方法如下:
在 ubuntu 上,使用以下命令安装:sudo apt-get install libsndfile1-dev
在 centos 上,使用以下命令安装:sudo yum install libsndfile-devel
在 macos 上,使用 homebrew 安装:brew install libsndfile
然后重新执行如上指令
在项目里面写代码就可以了,或者复制代码里面的pyannote_whisper.utils模块代码
三、安装使用funasr
1 安装
1.1 安装 conda(可选)
wget https://repo.continuum.io/miniconda/miniconda3-latest-linux-x86_64.sh
sh miniconda3-latest-linux-x86_64.sh
source ~/.bashrc
conda create -n funasr python=3.8
conda activate funasr
1.2 安装 pytorch(版本 >= 1.11.0)
pip3 install torch torchaudio
如果您的环境中存在cuda,您应该安装与cuda匹配的版本的pytorch。匹配列表可以在docs中找到。
1.3 安装funasr
从 pip 安装
pip3 install -u funasr
# 对于中国的用户,您可以使用以下命令进行安装:
# pip3 install -u funasr -i https://mirror.sjtu.edu.cn/pypi/web/simple
或者从源码安装funasr
git clone https://github.com/alibaba/funasr.git && cd funasr
pip3 install -e ./
1.4 安装 modelscope(可选)
如果您想使用 modelscope 中的预训练模型,您应该安装 modelscope:
pip3 install -u modelscope
# 对于中国的用户,您可以使用以下命令进行安装:
# pip3 install -u modelscope -i https://mirror.sjtu.edu.cn/pypi/web/simple
1.5 如何从本地模型路径推断(可选)
通过 modelscope-sdk 将模型下载到本地目录
from modelscope.hub.snapshot_download import snapshot_download

local_dir_root = "./models_from_modelscope"
model_dir = snapshot_download('damo/speech_paraformer-large_asr_nat-zh-cn-16k-common-vocab8404-pytorch', cache_dir=local_dir_root)
或者通过 git lfs 将模型下载到本地目录
git lfs install
# git clone https://www.modelscope.cn/<namespace>/<model-name>.git
git clone https://www.modelscope.cn/damo/speech_paraformer-large_asr_nat-zh-cn-16k-common-vocab8404-pytorch.git
使用本地模型路径进行推断
local_dir_root = "./models_from_modelscope/damo/speech_paraformer-large_asr_nat-zh-cn-16k-common-vocab8404-pytorch"
inference_pipeline = pipeline(
    task=tasks.auto_speech_recognition,
    model=local_dir_root,
)
2 使用funasr
2.1 使用funasr
from modelscope.pipelines import pipeline
from modelscope.utils.constant import tasks
inference_pipeline = pipeline(
task=tasks.auto_speech_recognition,
model='damo/speech_paraformer-large-vad-punc_asr_nat-zh-cn-16k-common-vocab8404-pytorch',
model_revision="v1.2.4")
rec_result = inference_pipeline(audio_in='1001.wav')
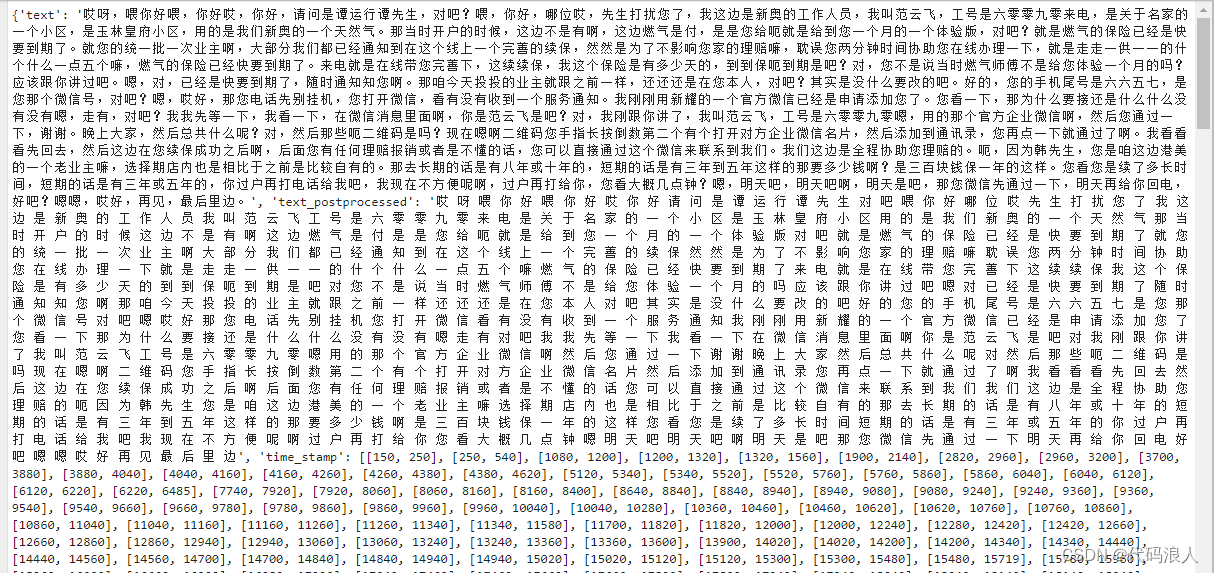
print(rec_result['sentences'])
with open('result.txt', 'w', encoding='utf-8') as f:
print(rec_result, file=f)
print(rec_result)
2.2 使用 pyannote.audio 进行语者分离
第一步:安装依赖
pip install pyannote.audio
第二步:创建key
https://huggingface.co/settings/tokens
第三步:测试pyannote.audio
from pyannote.audio import pipeline
pipeline = pipeline.from_pretrained("pyannote/speaker-diarization", use_auth_token="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")
# send pipeline to gpu (when available)
import torch
pipeline.to(torch.device("cuda"))
# apply pretrained pipeline
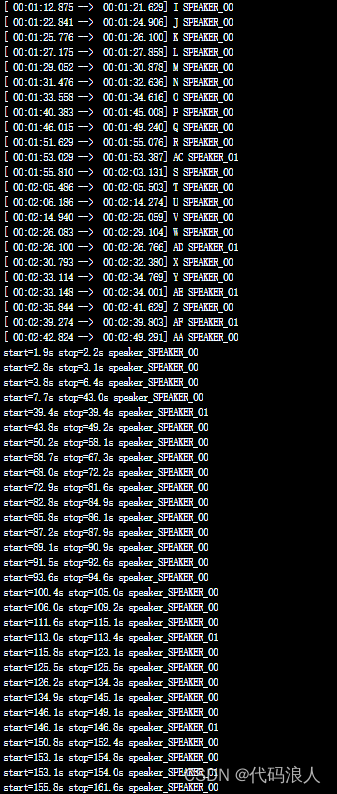
diarization = pipeline("1002.wav")
print(diarization)
# print the result
for turn, _, speaker in diarization.itertracks(yield_label=true):
print(f"start={turn.start:.1f}s stop={turn.end:.1f}s speaker_{speaker}")
# start=0.2s stop=1.5s speaker_0
# start=1.8s stop=3.9s speaker_1
# start=4.2s stop=5.7s speaker_0
# ...
2.3 funas整合pyannote.audio
1.1编写算法
from pyannote.core import segment, annotation, timeline


def get_text_with_timestamp(transcribe_res):
    timestamp_texts = []
    for item in transcribe_res['segments']:
        start = item['start']
        end = item['end']
        text = item['text']
        timestamp_texts.append((segment(start, end), text))

    print(timestamp_texts)
    return timestamp_texts


def get_text_with_timestampfun(transcribe_res):

    print(transcribe_res['sentences'])
    timestamp_texts = []
    for item in transcribe_res['sentences']:
        start = item['start']/1000.0
        end = item['end']/1000.0
        text = item['text']
        timestamp_texts.append((segment(start, end), text))
    return timestamp_texts


def add_speaker_info_to_text(timestamp_texts, ann):
    spk_text = []
    for seg, text in timestamp_texts:
        #这行代码的作用是在给定的时间段 seg 中根据说话人分离结果 ann 获取出现次数最多的说话人。
        spk = ann.crop(seg).argmax()
        spk_text.append((seg, spk, text))
    return spk_text


def merge_cache(text_cache):
    sentence = ''.join([item[-1] for item in text_cache])
    spk = text_cache[0][1]
    start = text_cache[0][0].start
    end = text_cache[-1][0].end
    return segment(start, end), spk, sentence


punc_sent_end = ['.', '?', '!', '。', '?', '!']


def merge_sentence(spk_text):
    merged_spk_text = []
    pre_spk = none
    text_cache = []
    for seg, spk, text in spk_text:
        if spk != pre_spk and pre_spk is not none and len(text_cache) > 0:
            merged_spk_text.append(merge_cache(text_cache))
            text_cache = [(seg, spk, text)]
            pre_spk = spk

        elif text[-1] in punc_sent_end:
            text_cache.append((seg, spk, text))
            merged_spk_text.append(merge_cache(text_cache))
            text_cache = []
            pre_spk = spk
        else:
            text_cache.append((seg, spk, text))
            pre_spk = spk
    if len(text_cache) > 0:
        merged_spk_text.append(merge_cache(text_cache))
    return merged_spk_text


def diarize_text(transcribe_res, diarization_result):
    timestamp_texts = get_text_with_timestampfun(transcribe_res)
    spk_text = add_speaker_info_to_text(timestamp_texts, diarization_result)
    res_processed = merge_sentence(spk_text)
    return res_processed


def write_to_txt(spk_sent, file):
    with open(file, 'w') as fp:
        for seg, spk, sentence in spk_sent:
            line = f'{seg.start:.2f} {seg.end:.2f} {spk} {sentence}\n'
            fp.write(line)
1.2调用
import os
import whisper
from pyannote.audio import pipeline
from pyannote_funasr.utils import diarize_text
import concurrent.futures
from modelscope.pipelines import pipeline
from modelscope.utils.constant import tasks


# 输出位置
output_dir = '/root/autodl-tmp/pyannote-whisper'


from modelscope.pipelines import pipeline
from modelscope.utils.constant import tasks

# 语音转文字的模型
inference_pipeline = pipeline(
    task=tasks.auto_speech_recognition,
    model='damo/speech_paraformer-large-vad-punc_asr_nat-zh-cn-16k-common-vocab8404-pytorch',
    model_revision="v1.2.4")

# rec_result = inference_pipeline(audio_in='1002.wav')

# with open('result.txt', 'w', encoding='utf-8') as f:
#     print(rec_result, file=f)

# # print(rec_result)


def process_audio(file_path):
    print("----------1")
    asr_result = inference_pipeline(audio_in=file_path)
    print("-----------2.2")
    # 语者分离pipeline
    pipeline = pipeline.from_pretrained("pyannote/speaker-diarization", use_auth_token="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")
    # 使用显卡加速
    import torch
    pipeline.to(torch.device("cuda"))
    #num_speakers 几个说话者,可以不带
    diarization_result = pipeline(file_path, num_speakers=2)
    # 转文字结果
    print(diarization_result)
    # 进行语着分离
    final_result = diarize_text(asr_result, diarization_result)
    print("-----------5")
    # 输出结果
    output_file = os.path.join(output_dir, os.path.basename(file_path)[:-4] + '.txt')
    with open(output_file, 'w') as f:
        for seg, spk, sent in final_result:
            line = f'{seg.start:.2f} {seg.end:.2f} {spk} {sent}\n'
            f.write(line)
            print(line)

# 判断输出文件夹是否存在
if not os.path.exists(output_dir):
    os.makedirs(output_dir)
wave_dir = '/root/autodl-tmp/pyannote-whisper'
# 获取当前目录下所有wav文件名
wav_files = [os.path.join(wave_dir, file) for file in os.listdir(wave_dir) if file.endswith('.wav')]


# 处理每个wav文件
with concurrent.futures.threadpoolexecutor() as executor:
    executor.map(process_audio, wav_files)

print('处理完成!')
3.微调
微调.py
import os
from modelscope.metainfo import trainers
from modelscope.trainers import build_trainer
from modelscope.msdatasets.audio.asr_dataset import asrdataset

def modelscope_finetune(params):
    if not os.path.exists(params.output_dir):
        os.makedirs(params.output_dir, exist_ok=true)
    # dataset split ["train", "validation"]
    ds_dict = asrdataset.load(params.data_path, namespace='speech_asr')
    kwargs = dict(
        model=params.model,
        data_dir=ds_dict,
        dataset_type=params.dataset_type,
        work_dir=params.output_dir,
        batch_bins=params.batch_bins,
        max_epoch=params.max_epoch,
        lr=params.lr)
    trainer = build_trainer(trainers.speech_asr_trainer, default_args=kwargs)
    trainer.train()


if __name__ == '__main__':
    from funasr.utils.modelscope_param import modelscope_args
    params = modelscope_args(model="damo/speech_paraformer-large_asr_nat-zh-cn-16k-common-vocab8404-pytorch")
    params.output_dir = "./checkpoint"                      # 模型保存路径
    params.data_path = "speech_asr_aishell1_trainsets"      # 数据路径,可以为modelscope中已上传数据,也可以是本地数据
    params.dataset_type = "small"                           # 小数据量设置small,若数据量大于1000小时,请使用large
    params.batch_bins = 2000                                # batch size,如果dataset_type="small",batch_bins单位为fbank特征帧数,如果dataset_type="large",batch_bins单位为毫秒,
    params.max_epoch = 50                                   # 最大训练轮数
    params.lr = 0.00005                                     # 设置学习率

    modelscope_finetune(params)


发表评论