因为windows应用一般大家都是从网上下载的,后期版本肯定会更新,那用flutter开发windows应用,怎么实现应用内版本更新功能了?可以使用auto_updater库,
这个插件允许 flutter 桌面 应用自动更新自己 (基于 sparkle 和 winsparkle)
地址如下:
pub仓库地址:auto_updater | flutter package
github仓库地址:https://github.com/leanflutter/auto_updater
中文文档地址:https://github.com/leanflutter/auto_updater/blob/main/readme-zh.md
开始使用
先添加依赖,将此添加到你的软件包的 pubspec.yaml 文件:
dependencies:
  auto_updater: ^0.1.7
windows使用需要安装openssl:
安装教程:windows安装chocolatey方法注意事项,以及安装openssl方法-csdn博客
然后在main.dart中添加下面代码:
import 'package:auto_updater/auto_updater.dart';

void main() async {
  // 必须加上这一行。
  widgetsflutterbinding.ensureinitialized();

  string feedurl = 'http://localhost:5002/appcast.xml';
  await autoupdater.setfeedurl(feedurl);
  await autoupdater.checkforupdates();
  await autoupdater.setscheduledcheckinterval(3600);

  runapp(myapp());
}
生成私钥
运行以下命令:需要分别在 macos 和 windows 系统中运行该命令。
dart run auto_updater:generate_keys
macos运行命令后输出:
a key has been generated and saved in your keychain. add the `supublicedkey` key to
the info.plist of each app for which you intend to use sparkle for distributing
updates. it should appear like this:

    <key>supublicedkey</key>
    <string>pfishu4dexqpd5obynfdbiqwcxozk7estwztnf9bamq=</string>
更改文件 macos/runner/info.plist 如下:
<?xml version="1.0" encoding="utf-8"?>
<!doctype plist public "-//apple//dtd plist 1.0//en" "http://www.apple.com/dtds/propertylist-1.0.dtd">
<plist version="1.0">
<dict>

  ...

+	<key>supublicedkey</key>
+	<string>bhaxclrrgmmkokp/3hjnr/jn2odtrpam3vzhhki9zvy=</string>
</dict>
</plist>
windows运行命令后输出:
generated two files:
dsa_priv.pem: your private key. keep it secret and don't share it!
dsa_pub.pem: public counterpart to include in youe app.
back up your private key and keep it safe!
if you lose it, your users will be unable to upgrade!
更改文件 windows/runner/runner.rc 如下:
...

+/
+//
+// winsparkle
+//

+// and verify signature using dsa public key:
+dsapub      dsapem      "../../dsa_pub.pem"
打包应用
#安装命令
dart pub global activate flutter_distributor
安装inno setup
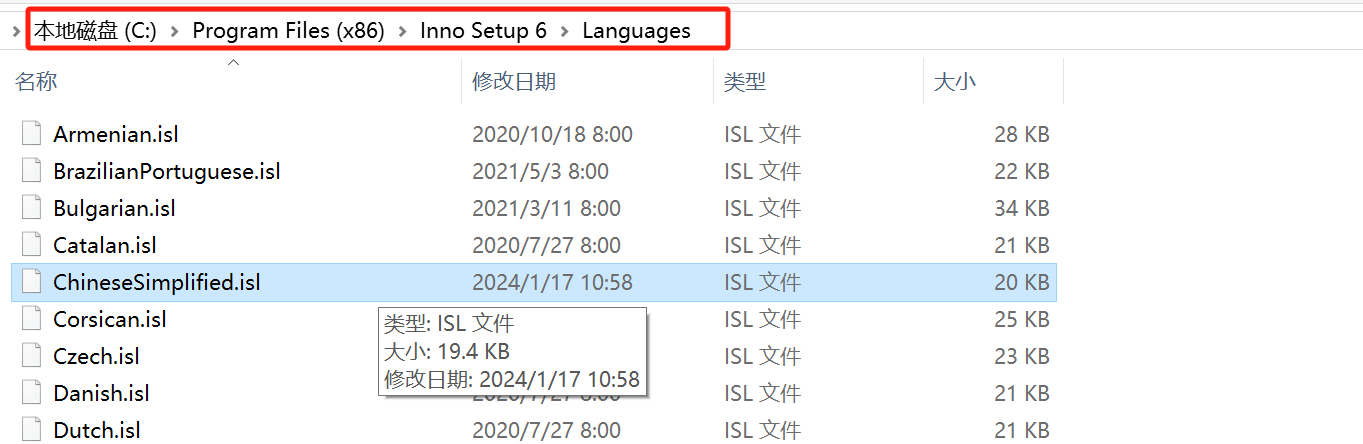
必须安装inno setup 6 并且添加中文语言包,且安装目录要使用默认的c盘里面,否则打包失败。因为flutter distributor打包exe是基于inno setup 6实现的,默认官网是英文版本的,打包exe之后点击安装都是英文,所以我找到了中文版的inno setup 6和中文语言包,下载地址如下
inno setup 6和中文安装包下载地址:inno setup 带中文包.zip - 蓝奏云
添加distribute_options.yaml添加到你的项目根目录
output: dist/
releases:
  - name: dev
    jobs:
      - name: release-windows
        package:
          platform: windows
          target: exe
          build_args:
            dart-define:
              app_env: dev
添加 make_config.yaml 到你的项目 windows/packaging/exe (需要手动创建)目录:

make_config.yaml内容: (安装目录和快捷方式的名字,发布者名称配置等)
# appid 的值唯一标识此应用。
# 不要在其他应用的安装程序中使用相同的 appid 值。
# 以下为示例代码,实际根据你的项目进行替换
app_id: 5b566538-42b1-4826-a479-af079f24a65d
publisher: jory cai
display_name: hello hado
create_desktop_icon: true
install_dir_name: hado_world
locales:
  - en
  - zh
开始生成exe文件:
flutter_distributor package --platform windows --targets exe编译成功后:
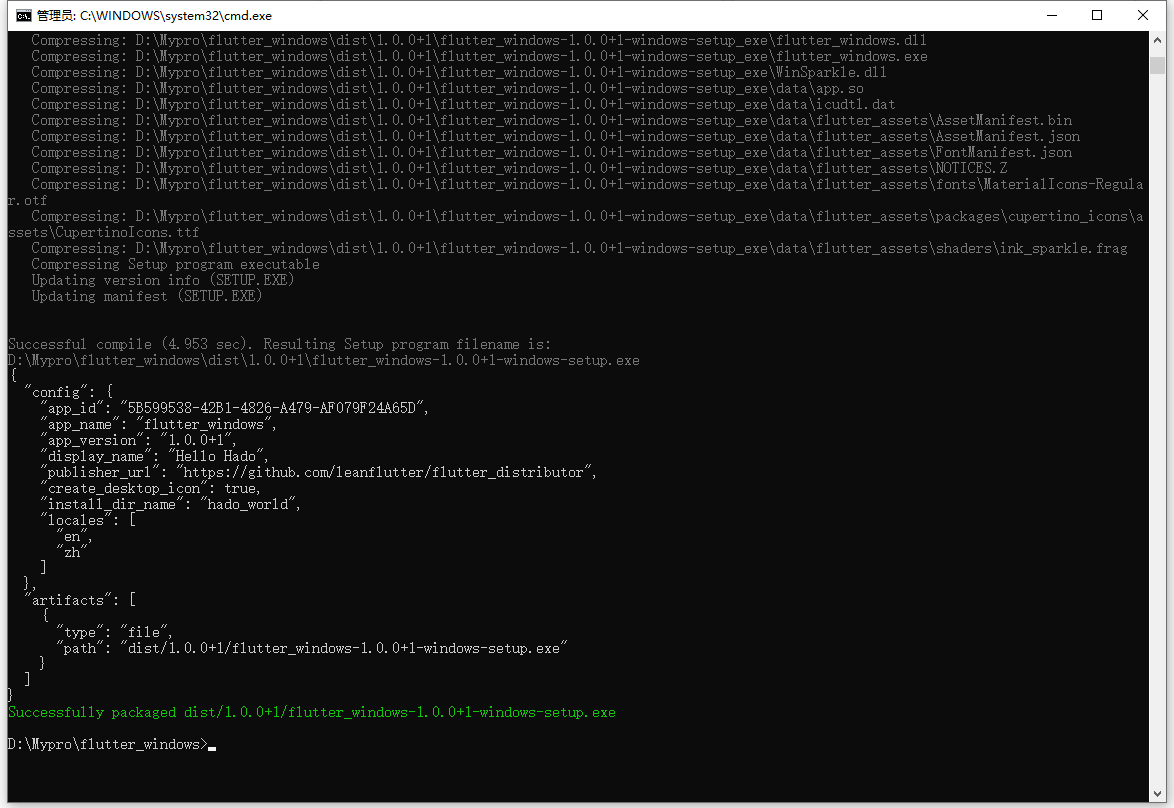
对生成的exe文件进行升级签名:后面的路径要是你自己生成的文件路径

dart run auto_updater:sign_update dist/1.1.1/flutter_windows-1.1.1+1.1.1-windows-setup.exe签名后的输入要添加到appcast.xml后面的dsasignature属性里面:

appcast.xml内容:(配置更新版本和更新说明,还有更新文件下载链接等内容)
<?xml version="1.0" encoding="utf-8"?>
<rss version="2.0" xmlns:sparkle="http://www.andymatuschak.org/xml-namespaces/sparkle">
    <channel>
        <title>auto_updater_example</title>
        <description>most recent updates to auto_updater_example</description>
        <language>en</language>
        <item>
            <title>version 1.1.0</title>
            #发行说明-读取html方式(2选1)
            <sparkle:releasenoteslink>
                https://your_domain/your_path/release_notes.html
            </sparkle:releasenoteslink>
            #发行说明-写死方式(2选1)
            <description>
                <![cdata[
            <ul>
              <li>1、新增xx功能</li>
              <li>2、新增xx功能</li>
            </ul>
                ]]>
            </description>
            <pubdate>sun, 16 feb 2022 12:00:00 +0800</pubdate>
            #你更新程序的地址
            <enclosure url="http://wwww.xxx.com/1.1.0+2/auto_updater_example-1.1.0+2-macos.zip"
                       sparkle:edsignature="pbdypt92pnpkzlfq7bhs9hbjcv9/ndkzsilwjfqiumcacnbafo2fzl0tismnjapg2potkzy0/kjq2yzyosvgaa=="
                       sparkle:version="1.1.0"
                       sparkle:os="macos"
                       length="13400992"
                       type="application/octet-stream" />
        </item>
        <item>
            <title>version 1.1.0</title>
            #发行说明-读取html方式(2选1)
            <sparkle:releasenoteslink>
                https://your_domain/your_path/release_notes.html
            </sparkle:releasenoteslink>
            #发行说明-写死方式(2选1)
            <description>
                <![cdata[
            <ul>
              <li>1、新增xx功能</li>
              <li>2、新增xx功能</li>
            </ul>
                ]]>
            </description>
            <pubdate>sun, 16 feb 2022 12:00:00 +0800</pubdate>
            #你更新程序的地址
            <enclosure url="http://www.xx.com/1.1.0+2/auto_updater_example-1.1.0+2-windows.exe"
                       sparkle:dsasignature="meuciqcvbvzvid7h3auzay5znpi+yszkznkukv8whlmfzkh66aigreugomvavlcg6hwawkb2o4iqve/d56ipibshiqch8rk="
                       sparkle:version="1.1.0+2"
                       sparkle:os="windows"
                       length="0"
                       type="application/octet-stream" />
        </item>
    </channel>
</rss>
新版本更新操作
如果你的程序后续更新了,版本升级了,就修改项目根目录里面的 pubspec.yaml文件版本:

修改完之后,再执行命令重新打包:
flutter_distributor package --platform windows --targets exe打包后就会在项目根目录dist下面出现响应版本的exe:

然后运行命令对这个exe进行签名:
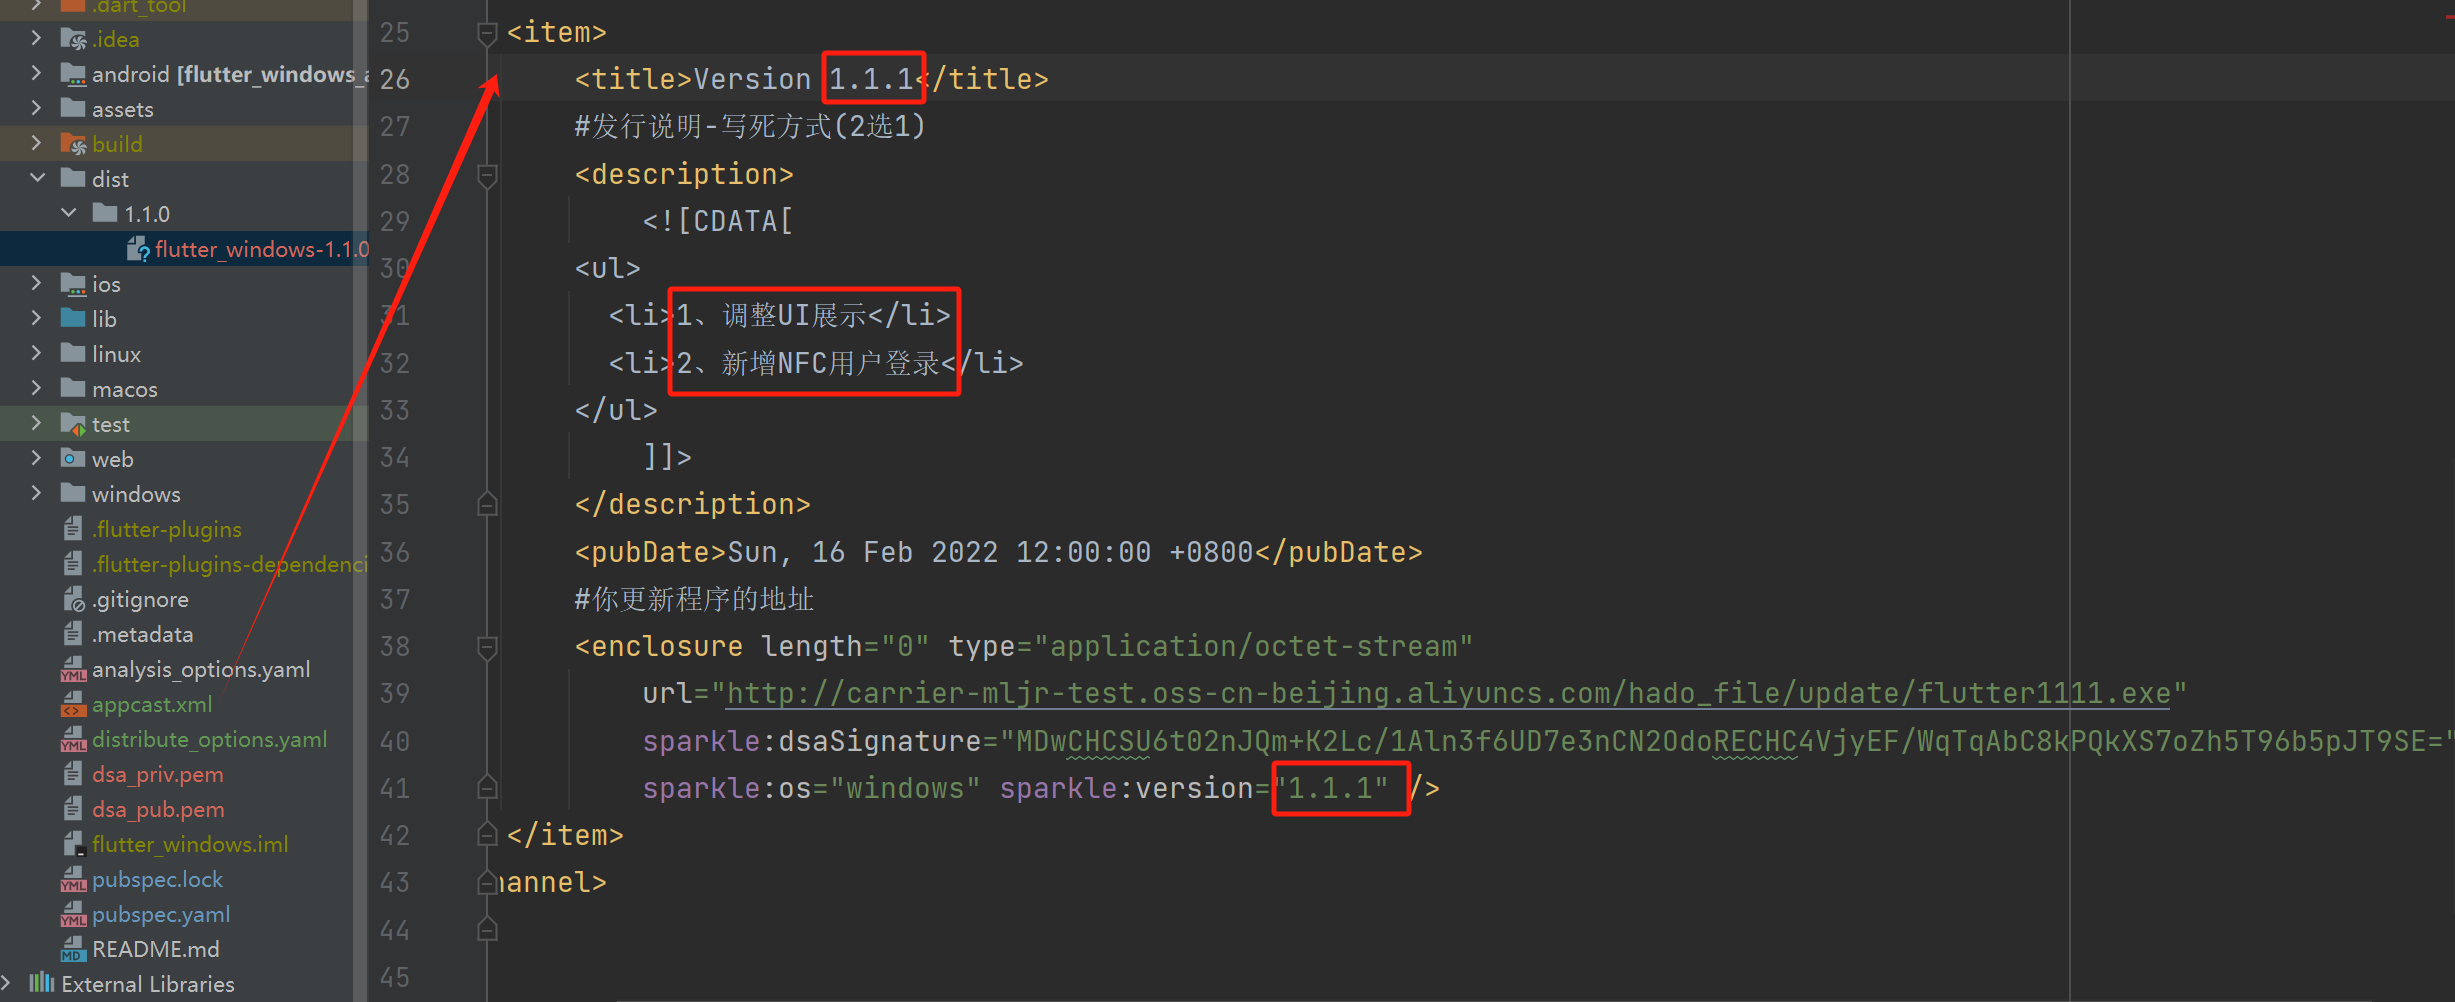
dart run auto_updater:sign_update dist/1.1.0/flutter_windows-1.1.0+1.1.0-windows-setup.exe将签名后的结果添加到appcast.xml里面:

并且修改appcast.xml里面响应的版本和更新说明:
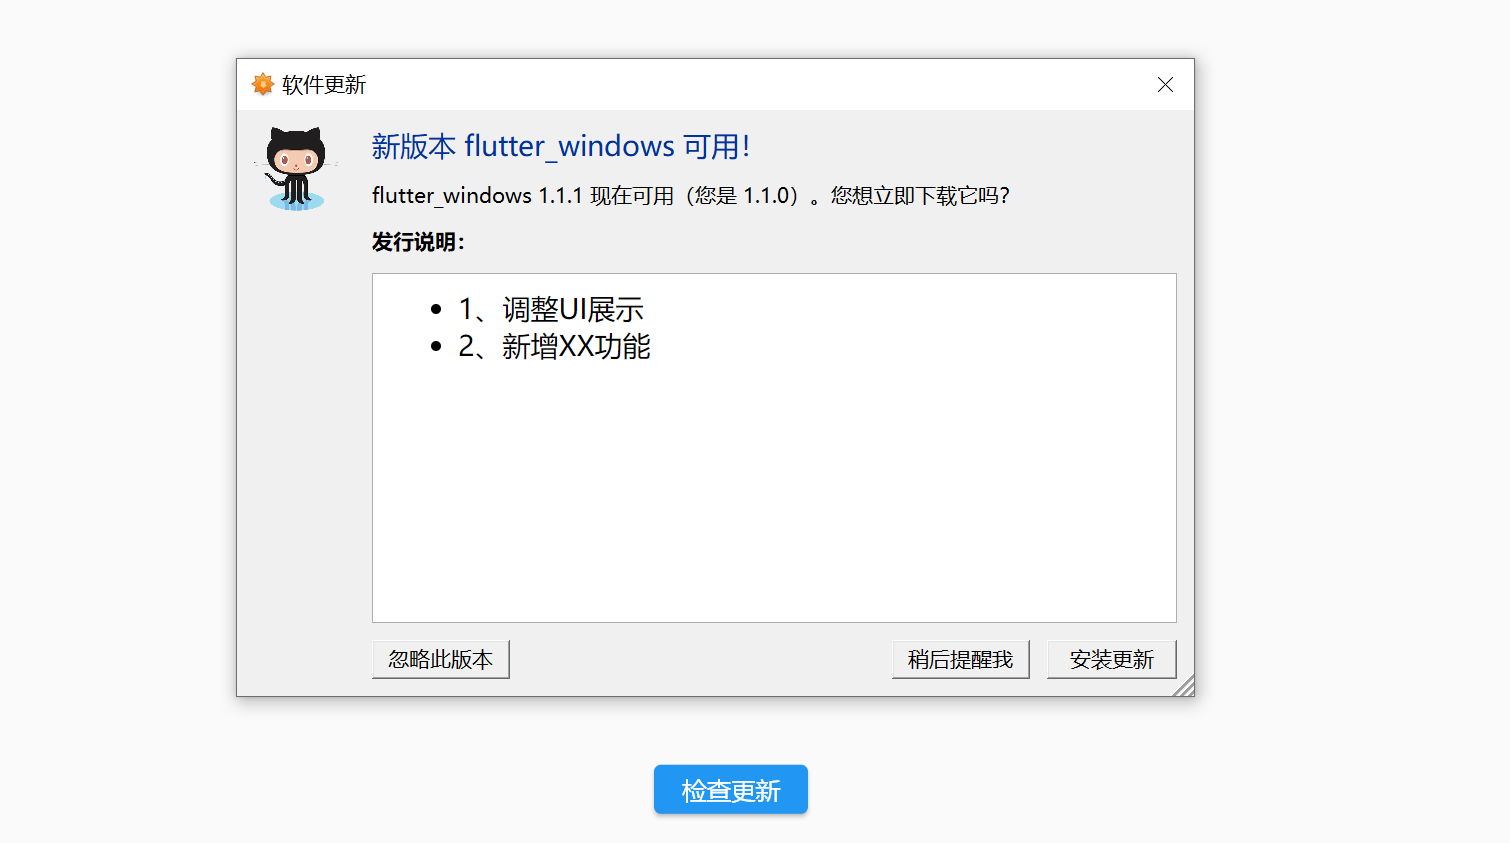
然后启动历史版本的程序,检查更新:
点击安装更新后:

等待下载完成:点击安装更新

就会杀死现在的进程,然后重新执行安装操作:
发表评论