*/temp #匹配所有目录内的以temp开头的文件和文件夹
!my* #在排除文件及文件夹中允许上传my开头的文件及文件夹
docker远程访问
docker守护进程启动选项
-
-h unix:///var/run/docker.sock
-
-h fd://(默认)
配置开始
第一步:配置远程的docker
vi /lib/systemd/system/docker.service
修改[service]->execstart
execstart=/usr/bin/dockerd -h fd:// --containerd=/run/containerd/containerd.sock -h 0.0.0.0:2375
重启docker
systemctl daemon-reload && systemctl restart docker
第二步:配置本地的系统环境变量
windows
set docker_host=tcp://远程ip
centos7
export docker_host=tcp://远程ip
注意:以上配置都是临时的
测试
docker info
是否有结果
如果想更准确的测试,可以先将远程的docker守护进程配置一个labels,然后执行命令即可
dockerfile指令
form
from [–platform=<平台>] [:] [as ]
–platform 指定平台 如,linux/amd64, linux/arm64,或windows/amd64;默认自动
image 镜像名称
tag 类似于版本
as 起别名
arg
arg version=latest
from busybox:${version} # form busybox:latest
label
label = = = …
例子:
label “com.example.vendor”=“acme incorporated”
label com.example.label-with-value=“foo”
label version=“1.0”
label description="this text illustrates \
that label-values can span multiple lines."
expost
expose [/…]
port 端口号
protocol 协议 tcp或udp
env
env
env = =…
例子:
env hi hello
run echo “${hi}” # hello
copy
copy [–chown=:] <源路径1>… <目标路径>
copy [–chown=:] [“<源路径1>”,… “<目标路径>”]
[–chown=:] 用户改变复制到容器内文件的拥有者和属组。
<源路径> 源文件或者源目录,这里可以是通配符表达式,其通配符规则要满足 go 的 filepath.match 规则
add
run
cmd <shell 命令>
cmd [“<可执行文件或命令>”,“”,“”,…]
cmd
cmd <shell 命令>
cmd [“<可执行文件或命令>”,“”,“”,…]
cmd [“”,“”,…] # 该写法是为 entrypoint 指令指定的程序提供默认参数
entrypoint
entrypoint [“”,“”,“”,…]
workdir
workdir <工作目录路径>
user
user <用户名>[:<用户组>]
healthcheck
healthcheck [选项] cmd <命令> #设置检查容器健康状况的命令
healthcheck none:如果基础镜像有健康检查指令,使用这行可以屏蔽掉其健康检查指令
healthcheck [选项] cmd <命令> # cmd 后面跟随的命令使用,可以参考 cmd 的用法。
onbuild
onbuild <dockerfile指令>
maintainer (官方不推荐)
maintainer
代替方案
label maintainer=
shell
shell [“<shell解释器>”, “<默认参数>”]
volume
volume [“<路径1>”, “<路径2>”…]
volume <路径>
dockerfile的构建原理
docker会在执行每条dockerfile的指令时会对from引入的基础镜像进行操作。
每操作一步会运行镜像->生成容器->修改容器->提交容器->生成新的镜像->删除容器,然后在新的镜像上继续修改提交,反复如此,最后生成出最终镜像。这些在中间生成的镜像被称为中间层镜像。
我们可以通过docker history <镜像名>来看生成镜像的过程。
dockerfile源文件和上下文目录
2020/01/18 11:34 17 .dockerignore
2020/01/18 14:52 277 dockerfile
2020/01/18 14:45
生成一个node的docker环境
from centos
label maintainer=“wm 15804854160@163.com”
run curl --silent --location https://rpm.nodesource.com/setup_12.x | bash - \
&& yum -y install nodejs
workdir /root/project
copy ./ ./
run cd src \
&& npm install
expose 8080:80
构建过程
e:\pj\程序设计\docker容器技术\dome\nodejsdockerfile>docker build -t demo .
sending build context to docker daemon 22.02kb
step 1/7 : from centos
—> 470671670cac
step 2/7 : label maintainer=“wm 15804854160@163.com” #修改镜像
—> running in 0a9bdf29772d #运行0a9bdf29772d容器
removing intermediate container 0a9bdf29772d #删除0a9bdf29772d容器
—> 6bed20c22168 #生成新的镜像
step 3/7 : run curl --silent --location https://rpm.nodesource.com/setup_12.x | bash - && yum -y install nodejs
—> running in a6f52a14bfbc
installing the nodesource node.js 12.x repo…
inspecting system…
-
rpm -q --whatprovides redhat-release || rpm -q --whatprovides centos-release || rpm -q --whatprovides cloudlinux-release || rpm -q --whatprovides sl-release
-
uname -m
confirming “el8-x86_64” is supported…
- curl -slf -o /dev/null ‘https://rpm.nodesource.com/pub_12.x/el/8/x86_64/nodesource-release-el8-1.noarch.rpm’
as yum will try to install node.js from the appstream repository
instead of the nodesource repository, the appstream’s version of node.js has to be disabled.
run sudo yum module enable -y nodejs to reactivate the appstream’s node.js repository.
- yum module disable -y nodejs
centos-8 - appstream 1.3 mb/s | 5.9 mb 00:04
centos-8 - base 190 kb/s | 4.0 mb 00:21
centos-8 - extras 367 b/s | 2.1 kb 00:05
dependencies resolved.
================================================================================
package architecture version repository size
================================================================================
disabling modules:
nodejs
transaction summary
================================================================================
complete!
downloading release setup rpm…
-
mktemp
-
curl -sl -o ‘/tmp/tmp.w4aojk1obl’ ‘https://rpm.nodesource.com/pub_12.x/el/8/x86_64/nodesource-release-el8-1.noarch.rpm’
installing release setup rpm…
- rpm -i --nosignature --force ‘/tmp/tmp.w4aojk1obl’
cleaning up…
- rm -f ‘/tmp/tmp.w4aojk1obl’
checking for existing installations…
- rpm -qa ‘node|npm’ | grep -v nodesource
run sudo yum install -y nodejs to install node.js 12.x and npm.
you may also need development tools to build native addons:
sudo yum install gcc-c++ make
to install the yarn package manager, run:
curl -sl https://dl.yarnpkg.com/rpm/yarn.repo | sudo tee /etc/yum.repos.d/yarn.repo
sudo yum install yarn
node.js packages for enterprise linux 8 - x86_6 37 kb/s | 94 kb 00:02
last metadata expiration check: 0:00:01 ago on sun jan 19 08:42:03 2020.
dependencies resolved.
================================================================================
package arch version repository size
================================================================================
installing:
nodejs x86_64 2:12.14.1-1nodesource nodesource 22 m
installing dependencies:
python2 x86_64 2.7.16-12.module_el8.1.0+219+cf9e6ac9 appstream 109 k
python2-libs x86_64 2.7.16-12.module_el8.1.0+219+cf9e6ac9 appstream 6.0 m
python2-pip-wheel
noarch 9.0.3-14.module_el8.1.0+219+cf9e6ac9 appstream 1.2 m
python2-setuptools-wheel
noarch 39.0.1-11.module_el8.1.0+219+cf9e6ac9 appstream 289 k
installing weak dependencies:
python2-pip noarch 9.0.3-14.module_el8.1.0+219+cf9e6ac9 appstream 2.0 m
python2-setuptools
noarch 39.0.1-11.module_el8.1.0+219+cf9e6ac9 appstream 643 k
enabling module streams:
python27 2.7
transaction summary
================================================================================
install 7 packages
total download size: 32 m
installed size: 104 m
downloading packages:
(1/7): python2-2.7.16-12.module_el8.1.0+219+cf9 165 kb/s | 109 kb 00:00
(2/7): python2-pip-9.0.3-14.module_el8.1.0+219+ 571 kb/s | 2.0 mb 00:03
(3/7): python2-pip-wheel-9.0.3-14.module_el8.1. 409 kb/s | 1.2 mb 00:02
(4/7): python2-libs-2.7.16-12.module_el8.1.0+21 1.5 mb/s | 6.0 mb 00:03
(5/7): python2-setuptools-39.0.1-11.module_el8. 1.7 mb/s | 643 kb 00:00
(6/7): python2-setuptools-wheel-39.0.1-11.modul 805 kb/s | 289 kb 00:00
(7/7): nodejs-12.14.1-1nodesource.x86_64.rpm 1.7 mb/s | 22 mb 00:12
total 1.8 mb/s | 32 mb 00:17
warning: /var/cache/dnf/appstream-02e86d1c976ab532/packages/python2-2.7.16-12.module_el8.1.0+219+cf9e6ac9.x86_64.rpm: header v3 rsa/sha256 signature, key id 8483c65d: nokey
centos-8 - appstream 1.6 mb/s | 1.6 kb 00:00
importing gpg key 0x8483c65d:
userid : “centos (centos official signing key) security@centos.org”
fingerprint: 99db 70fa e1d7 ce22 7fb6 4882 05b5 55b3 8483 c65d
from : /etc/pki/rpm-gpg/rpm-gpg-key-centosofficial
key imported successfully
warning: /var/cache/dnf/nodesource-c1a37d2599ffab0c/packages/nodejs-12.14.1-1nodesource.x86_64.rpm: header v4 rsa/sha512 signature, key id 34fa74dd: nokey
node.js packages for enterprise linux 8 - x86_6 1.6 mb/s | 1.6 kb 00:00
importing gpg key 0x34fa74dd:
userid : “nodesource gpg-rpm@nodesource.com”
fingerprint: 2e55 207a 95d9 944b 0cc9 3261 5ddb e8d4 34fa 74dd
from : /etc/pki/rpm-gpg/nodesource-gpg-signing-key-el
key imported successfully
running transaction check
transaction check succeeded.
running transaction test
transaction test succeeded.
running transaction
preparing : 1/1
installing : python2-setuptools-wheel-39.0.1-11.module_el8.1.0+21 1/7
installing : python2-pip-wheel-9.0.3-14.module_el8.1.0+219+cf9e6a 2/7
installing : python2-libs-2.7.16-12.module_el8.1.0+219+cf9e6ac9.x 3/7
installing : python2-pip-9.0.3-14.module_el8.1.0+219+cf9e6ac9.noa 4/7
installing : python2-setuptools-39.0.1-11.module_el8.1.0+219+cf9e 5/7
installing : python2-2.7.16-12.module_el8.1.0+219+cf9e6ac9.x86_64 6/7
running scriptlet: python2-2.7.16-12.module_el8.1.0+219+cf9e6ac9.x86_64 6/7
running scriptlet: nodejs-2:12.14.1-1nodesource.x86_64 7/7
installing : nodejs-2:12.14.1-1nodesource.x86_64 7/7
running scriptlet: nodejs-2:12.14.1-1nodesource.x86_64 7/7
verifying : python2-2.7.16-12.module_el8.1.0+219+cf9e6ac9.x86_64 1/7
verifying : python2-libs-2.7.16-12.module_el8.1.0+219+cf9e6ac9.x 2/7
verifying : python2-pip-9.0.3-14.module_el8.1.0+219+cf9e6ac9.noa 3/7
verifying : python2-pip-wheel-9.0.3-14.module_el8.1.0+219+cf9e6a 4/7
verifying : python2-setuptools-39.0.1-11.module_el8.1.0+219+cf9e 5/7
verifying : python2-setuptools-wheel-39.0.1-11.module_el8.1.0+21 6/7
verifying : nodejs-2:12.14.1-1nodesource.x86_64 7/7
installed:
nodejs-2:12.14.1-1nodesource.x86_64
python2-pip-9.0.3-14.module_el8.1.0+219+cf9e6ac9.noarch
python2-setuptools-39.0.1-11.module_el8.1.0+219+cf9e6ac9.noarch
python2-2.7.16-12.module_el8.1.0+219+cf9e6ac9.x86_64
python2-libs-2.7.16-12.module_el8.1.0+219+cf9e6ac9.x86_64
python2-pip-wheel-9.0.3-14.module_el8.1.0+219+cf9e6ac9.noarch
python2-setuptools-wheel-39.0.1-11.module_el8.1.0+219+cf9e6ac9.noarch
complete!
removing intermediate container a6f52a14bfbc
—> 29a93e78f5e2
step 4/7 : workdir /root/project
—> running in fe701814cbe8
removing intermediate container fe701814cbe8
—> eda559d13b87
step 5/7 : copy ./ ./
—> da28659ab618
step 6/7 : run cd src && npm install
—> running in e96081f27d89
npm warn src@1.0.0 no description
npm warn src@1.0.0 no repository field.
added 50 packages from 37 contributors and audited 126 packages in 169.473s
found 0 vulnerabilities
removing intermediate container e96081f27d89
—> da2897f4c613
step 7/7 : expose 8080:80
—> running in db58b4e3fe1f
removing intermediate container db58b4e3fe1f
—> 1447d55955ca
successfully built 1447d55955ca
successfully tagged demo:latest
用命令查看构建过程和中间层镜像
e:\pj\程序设计\docker容器技术\dome\nodejsdockerfile>docker history demo
image created created by size comment
1447d55955ca 13 minutes ago /bin/sh -c #(nop) expose 8080:80 0b
da2897f4c613 13 minutes ago /bin/sh -c cd src && npm install 2.31mb
da28659ab618 16 minutes ago /bin/sh -c #(nop) copy dir:51e2c52b32624331c… 15.4kb
eda559d13b87 16 minutes ago /bin/sh -c #(nop) workdir /root/project 0b
29a93e78f5e2 16 minutes ago /bin/sh -c curl --silent --location https://… 144mb
6bed20c22168 17 minutes ago /bin/sh -c #(nop) label maintainer=wm 15804… 0b
470671670cac 33 hours ago /bin/sh -c #(nop) cmd [“/bin/bash”] 0b
33 hours ago /bin/sh -c #(nop) label org.label-schema.sc… 0b
4 days ago /bin/sh -c #(nop) add file:aa54047c80ba30064… 237mb
docker容器网络基础
工具安装
$ yum install -y bridge-utils # 网桥管理工具
$ yum install -y net-tools # 安装ifconfig,自行查看自己的linux不是必须的
网桥管理
$ brctl addbr br0 # 新建br0网桥
$ brctl addif br0 eth0 # 让eth0 成为 br0 的一个 interface
ifconfig命令
$ ifconfig # 查看网卡状态
$ ifconfig eth0 {up|down} # 启动或关闭eth0网卡
$ ifconfig eth0 192.168.1.100 netmask 255.255.255.0 broadcast 192.168.1.255 # 配置eth0的ip地址,子网地址,广播地址
配置docker的网桥
$ brctl addbr br0 # 新建br0网桥
$ ifconfig br0 192.168.1.100 netmask 255.255.255.0 # 配置br0的ip地址,子网地址
$ vi /lib/systemd/system/docker.service
添加docker守护进程的启动参数 -b=br0
execstart=/usr/bin/dockerd -h fd:// --containerd=/run/containerd/containerd.sock -b=br0
$ systemctl daemon-reload && systemctl restart docker
docker容器间的通信
$ docker run -it --link <运行中容器名>:<标识名> <镜像名>
运行中的容器名 必须是运行中的容器
标识名 是在该容器中调用的名称,他类型于localhost
指定容器间通信
首先配置docker守护进程的启动参数
$ vi /lib/systemd/system/docker.service
添加docker守护进程的启动参数 —icc=false --iptables=true
execstart=/usr/bin/dockerd -h fd:// --containerd=/run/containerd/containerd.sock --icc=false --iptables=true
–iptables=true 将策略写入宿主机iptables进行隔离控制
然后使用 --link参数启动
$ docker run -it --link <运行中容器名>:<标识名> <镜像名>
运行中的容器名 必须是运行中的容器
标识名 是在该容器中调用的名称,他类型于localhost
自我介绍一下,小编13年上海交大毕业,曾经在小公司待过,也去过华为、oppo等大厂,18年进入阿里一直到现在。
深知大多数前端工程师,想要提升技能,往往是自己摸索成长或者是报班学习,但对于培训机构动则几千的学费,着实压力不小。自己不成体系的自学效果低效又漫长,而且极易碰到天花板技术停滞不前!
因此收集整理了一份《2024年web前端开发全套学习资料》,初衷也很简单,就是希望能够帮助到想自学提升又不知道该从何学起的朋友,同时减轻大家的负担。
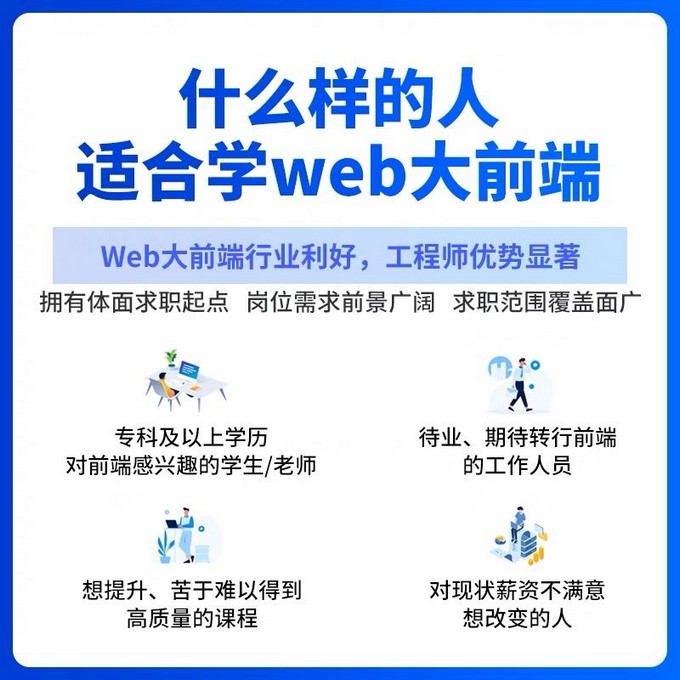

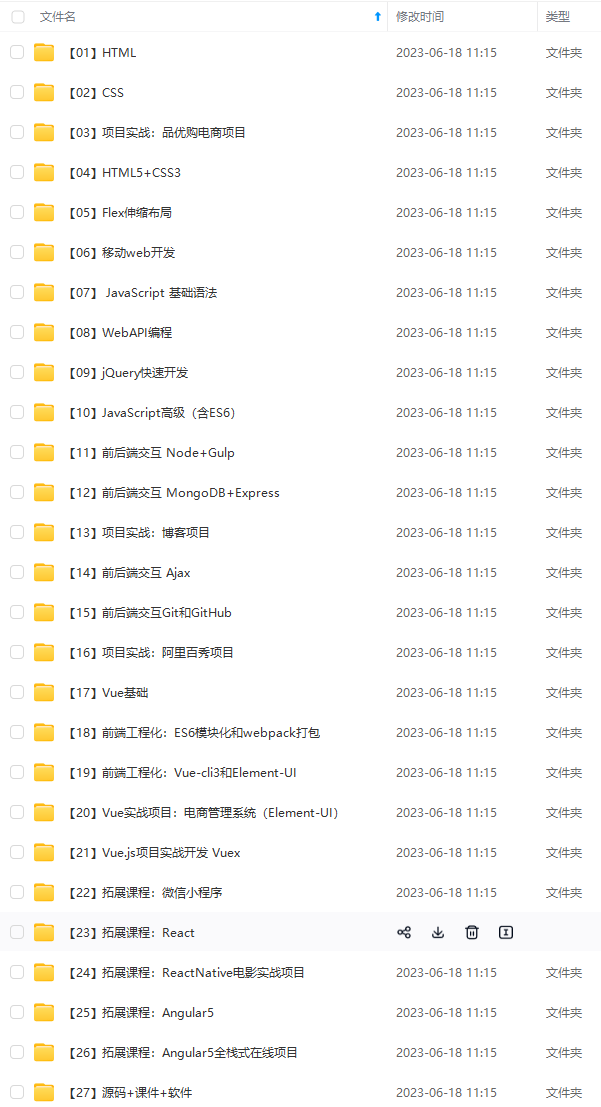
既有适合小白学习的零基础资料,也有适合3年以上经验的小伙伴深入学习提升的进阶课程,基本涵盖了95%以上前端开发知识点,真正体系化!
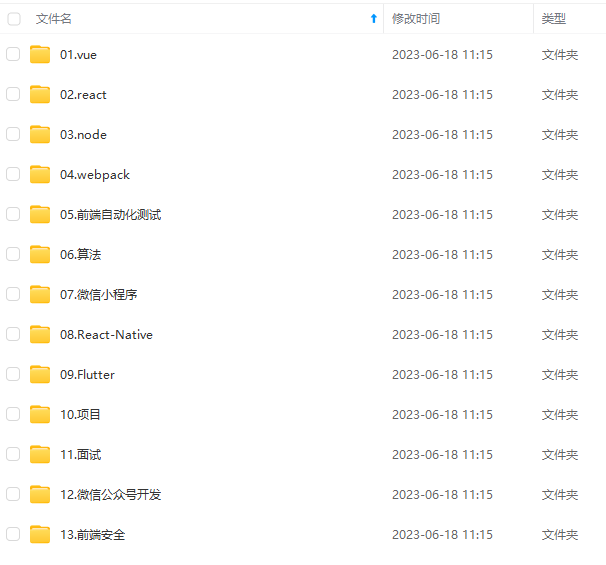
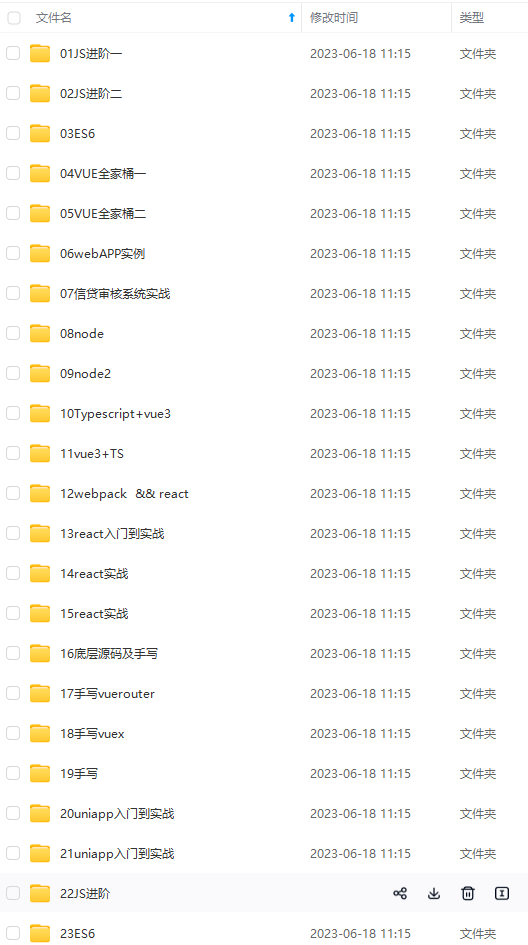
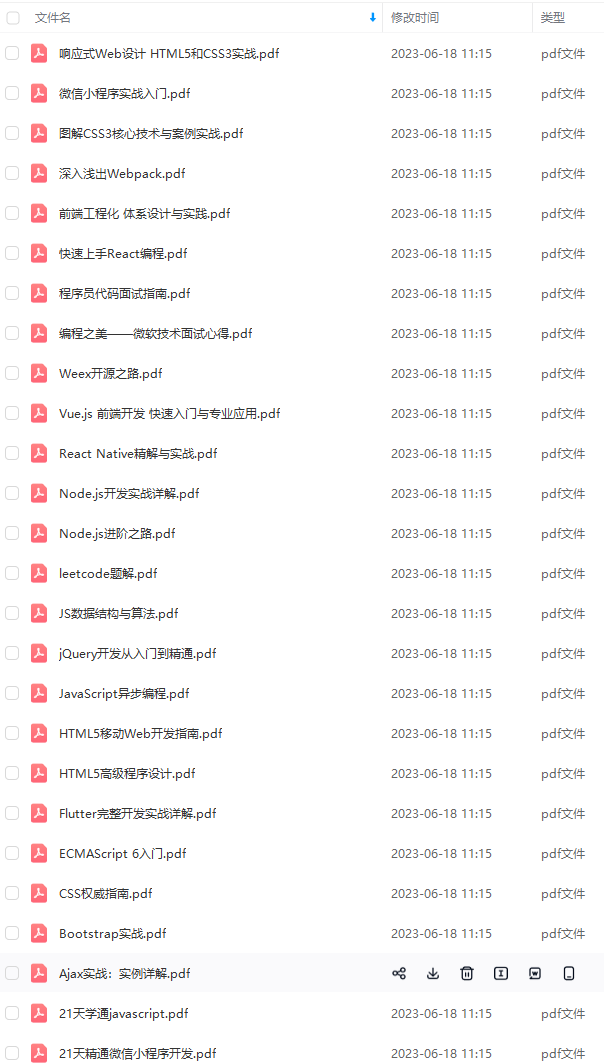
由于文件比较大,这里只是将部分目录大纲截图出来,每个节点里面都包含大厂面经、学习笔记、源码讲义、实战项目、讲解视频,并且后续会持续更新
如果你觉得这些内容对你有帮助,可以添加v获取:vip1024c (备注前端)

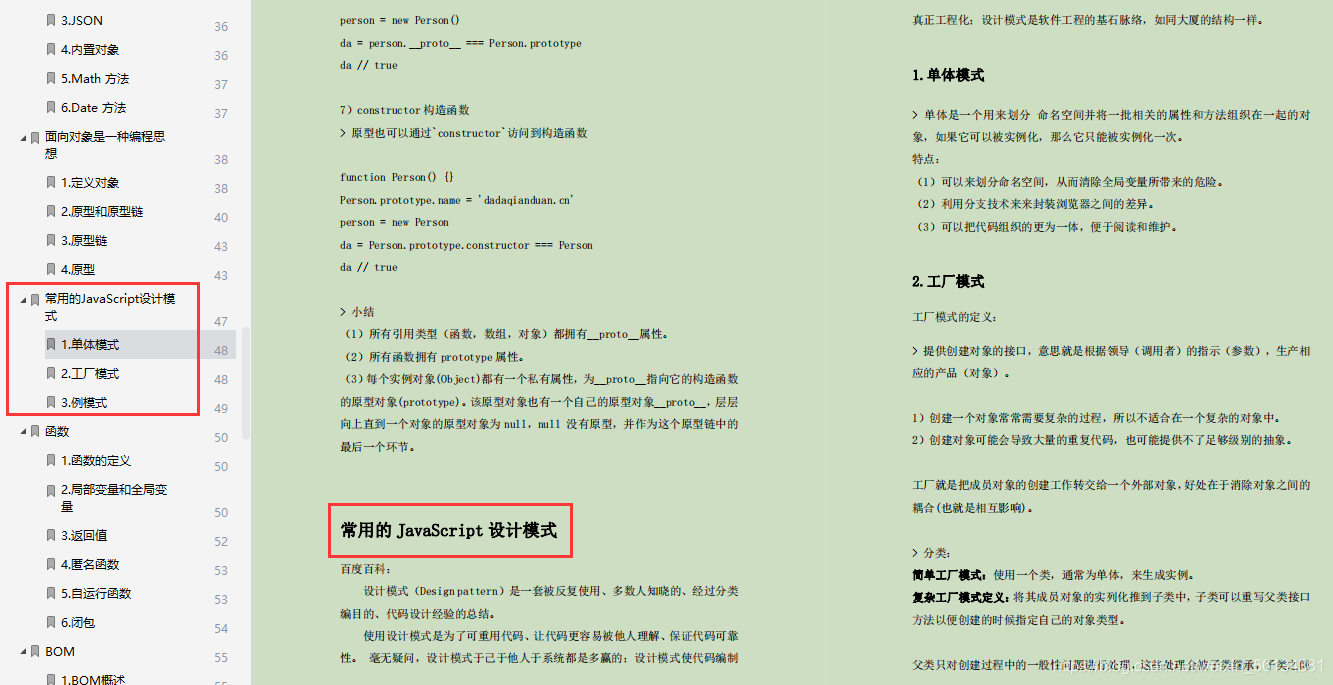
常用的javascript设计模式
-
单体模式
-
工厂模式
-
例模式
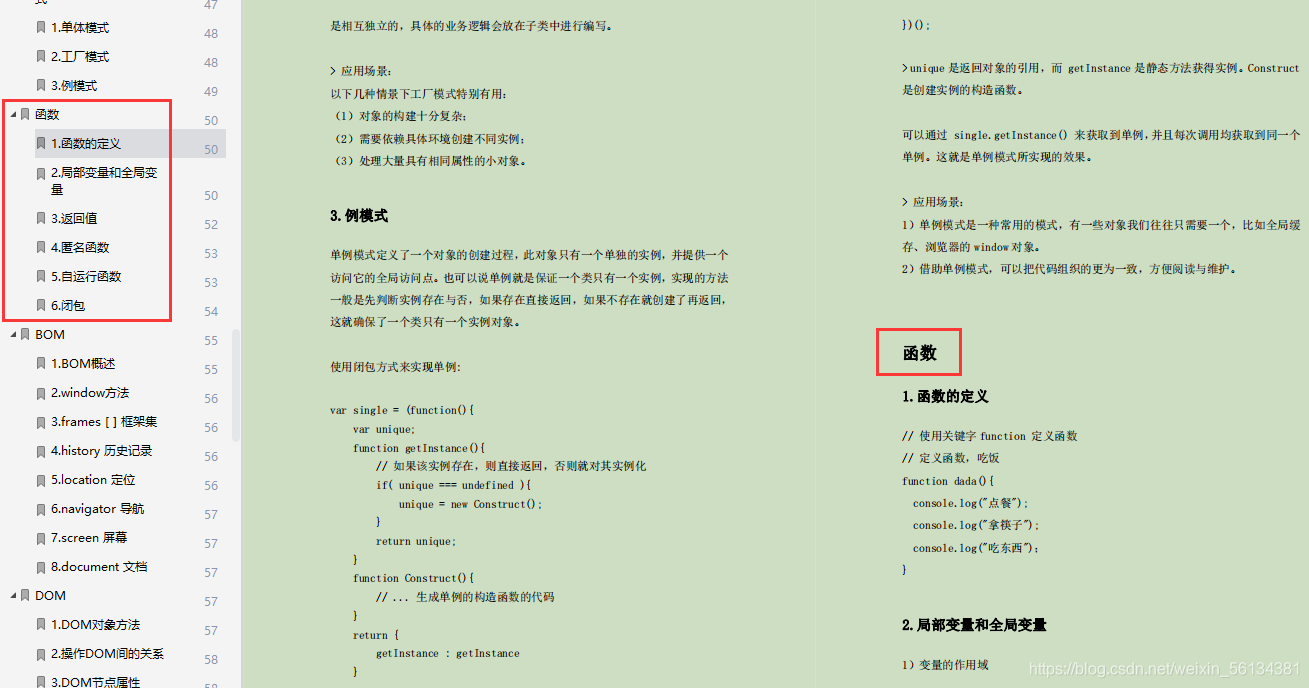
函数
-
函数的定义
-
局部变量和全局变量
-
返回值
-
匿名函数
-
自运行函数
-
闭包
codechina开源项目:【大厂前端面试题解析+核心总结学习笔记+真实项目实战+最新讲解视频】
18年进入阿里一直到现在。**
深知大多数前端工程师,想要提升技能,往往是自己摸索成长或者是报班学习,但对于培训机构动则几千的学费,着实压力不小。自己不成体系的自学效果低效又漫长,而且极易碰到天花板技术停滞不前!
因此收集整理了一份《2024年web前端开发全套学习资料》,初衷也很简单,就是希望能够帮助到想自学提升又不知道该从何学起的朋友,同时减轻大家的负担。
[外链图片转存中…(img-a4iaj4v0-1711725659329)]
[外链图片转存中…(img-mztsrunl-1711725659330)]
[外链图片转存中…(img-gogqy3tn-1711725659330)]
[外链图片转存中…(img-i6etz66t-1711725659331)]
[外链图片转存中…(img-idyvnvin-1711725659331)]
[外链图片转存中…(img-kxak4lt8-1711725659332)]
既有适合小白学习的零基础资料,也有适合3年以上经验的小伙伴深入学习提升的进阶课程,基本涵盖了95%以上前端开发知识点,真正体系化!
由于文件比较大,这里只是将部分目录大纲截图出来,每个节点里面都包含大厂面经、学习笔记、源码讲义、实战项目、讲解视频,并且后续会持续更新
如果你觉得这些内容对你有帮助,可以添加v获取:vip1024c (备注前端)
[外链图片转存中…(img-axtm38om-1711725659332)]
常用的javascript设计模式
-
单体模式
-
工厂模式
-
例模式
函数
-
函数的定义
-
局部变量和全局变量
-
返回值
-
匿名函数
-
自运行函数
-
闭包
codechina开源项目:【大厂前端面试题解析+核心总结学习笔记+真实项目实战+最新讲解视频】


发表评论