step01: python脚本开发
文件路径:d://wl//testproject//fone-grpc//project1//test_client.py
python 脚本作用:
1.通过 grpc 调用底层 c++ 的接口,做数据库的数据插入与查询操作,然后将返回的结果进行拼接与输出。
2.代码里面将每一次调用后返回的内容进行拼接后,并做了成功信息的统计,输出成功的次数为3,输出后会转给 jmeter 里面的脚本获取。
from __future__ import print_function
import logging
import sys
import grpc
import storage_pb2      # storage_pb2.py which contains our generated request and response classes
import storageservice_pb2_grpc # storageservice_pb2_grpc.py which contains our generated client and server classes.

host="10.10.1.117:50066"

def run():
    result=""
    with grpc.insecure_channel(host) as channel:
        resp0=storageservice_pb2_grpc.fonestoragestub(channel).insertkvs(storage_pb2.pupsertkvs(
            dbname="mergelog",tablename="mergelog",keyvalues=[{"key":b'',"key":b''}],upsert=true,transaction=true
        ))
        result+=str(resp0)

    with grpc.insecure_channel(host) as channel:
        stud1=storageservice_pb2_grpc.fonestoragestub(channel)
        resp1=stud1.insertv(storage_pb2.pinsertv(dbname="mergelog", tablename="mergelog", value=b"1"))
        result += str(resp1)

    with grpc.insecure_channel(host) as channel:
        stud2=storageservice_pb2_grpc.fonestoragestub(channel)
        resp2=stud2.findone(storage_pb2.pfindk(dbname="mergelog", tablename="mergelog", key="1"))
        result += str(resp2)

    result=result.replace("\n", " ")
    result=result.count("successful return: 0")
    print(result)


if __name__ == '__main__':
    logging.basicconfig()
    run()
ps:在本地调试好脚本,确保符合预期。
step02: jmeter 创建 beanshell 取样器
脚本内容如下:
import java.io.bufferedreader;
import java.io.inputstreamreader;

log.info("----------------------------start to exe");
string command = "cmd /c python d://wl//testproject//fone-grpc//project1//test_client.py"; //定义要执行的python文件路径
string var;
runtime rt = runtime.getruntime();
process pr = rt.exec(command);  //执行上面的python脚本
pr.waitfor()
bufferedreader b = new bufferedreader(new inputstreamreader(pr.getinputstream())); // 转换执行脚本后的返回响应
string line = "";
stringbuilder response = new stringbuilder();
while ((line = b.readline()) != null) {
     response.append(line);
}
string response_data = response.tostring();
log.info(response_data);
if(response_data.equals("3")){ // 判断响应的内容是否有3次,如果不是3次就表示执行失败了
 log.info("---------------------------success end exe");
}else{
 log.error("--------------------------failed end exe"); //这里的输出一次会记录一次失败次数
}
b.close();
step03: 执行效果
通过 jmeter 工具进行并发操作,对后端底层接口进行压力测试,效果不错,效果图如下所示。
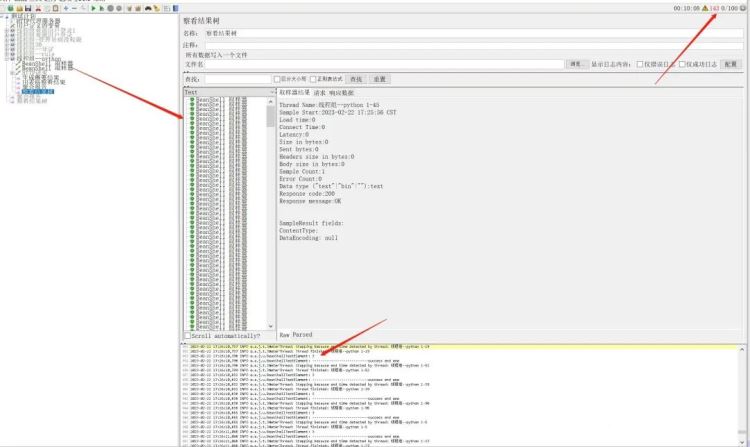
step04: jmeter日志输出
2023-02-22 17:26:08,539 info o.a.j.t.jmeterthread: stopping because end time detected by thread: 线程组--python 1-33
2023-02-22 17:26:08,539 info o.a.j.t.jmeterthread: thread finished: 线程组--python 1-33
2023-02-22 17:26:08,597 info o.a.j.u.beanshelltestelement: 3
2023-02-22 17:26:08,597 info o.a.j.u.beanshelltestelement: ---------------------------success end exe
2023-02-22 17:26:08,598 info o.a.j.t.jmeterthread: stopping because end time detected by thread: 线程组--python 1-82
2023-02-22 17:26:08,598 info o.a.j.t.jmeterthread: thread finished: 线程组--python 1-82
2023-02-22 17:26:08,608 info o.a.j.u.beanshelltestelement: 2
2023-02-22 17:26:08,608 error o.a.j.u.beanshelltestelement: --------------------------failed end exe
到此这篇关于python+jmeter实现自动化性能压测的流程步骤的文章就介绍到这了,更多相关python+jmeter性能压测内容请搜索代码网以前的文章或继续浏览下面的相关文章希望大家以后多多支持代码网!


发表评论