项目创建与配置
新建 nest 项目:
nest new nest-multer-upload -p npm
安装下 multer 的 ts 类型的包:
npm install @types/multer -d
让 nest 服务支持跨域:

单文件上传
添加一个 handler:
@post('aaa')
@useinterceptors(
  fileinterceptor('aaa', {
    dest: 'uploads',
  }),
)
uploadfile(@uploadedfile() file: express.multer.file, @body() body) {
  console.log('body', body);
  console.log('file', file);
}
这里使用 fileinterceptor 提取请求中的 aaa 字段,并通过 uploadedfile 装饰器将其作为参数传递。
当我们运行 nest start --watch 的时候,uploads 文件夹就会创建。
前端代码:
<!doctype html>
<html lang="en">
	<head>
		<script src="https://unpkg.com/axios@0.24.0/dist/axios.min.js"></script>
	</head>
	<body>
		<input id="fileinput" type="file" multiple />
		<script>
			const fileinput = document.queryselector('#fileinput')

			async function formdata() {
				const data = new formdata()
				data.set('name', 'yun')
				data.set('age', 20)
				data.set('aaa', fileinput.files[0])

				const res = await axios.post('http://localhost:3000/aaa', data)
				console.log(res)
			}

			fileinput.onchange = formdata
		</script>
	</body>
</html>
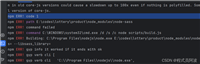
服务端就打印了 file 对象和 body 字段,并且文件也保存到了 uploads 目录:


多文件上传
@post('bbb')
@useinterceptors(
  filesinterceptor('bbb', 3, {
    dest: 'uploads',
  }),
)
uploadfiles(
  @uploadedfiles() files: array<express.multer.file>,
  @body() body,
) {
  console.log('body', body);
  console.log('files', files);
}
把 fileinterceptor 换成 filesinterceptor,把 uploadedfile 换成 uploadedfiles,都是多加一个 s。
前端代码:
async function formdata2() {
  const data = new formdata()
  data.set('name', 'yun')
  data.set('age', 20)
  ;[...fileinput.files].foreach(item => {
    data.append('bbb', item)
  })

  const res = await axios.post('http://localhost:3000/bbb', data, {
    headers: { 'content-type': 'multipart/form-data' },
  })
  console.log(res)
}
这样就可以上传多文件了:

如果有多个文件的字段,和 multer 里类似,使用这种方式来指定:
@post('ccc')
@useinterceptors(filefieldsinterceptor([
    { name: 'aaa', maxcount: 2 },
    { name: 'bbb', maxcount: 3 },
], {
    dest: 'uploads'
}))
uploadfilefields(@uploadedfiles() files: { aaa?: express.multer.file[], bbb?: express.multer.file[] }, @body() body) {
    console.log('body', body);
    console.log('files', files);
}
前端代码:
async function formdata3() {
  const data = new formdata()
  data.set('name', 'yun')
  data.set('age', 20)
  data.append('aaa', fileinput.files[0])
  data.append('aaa', fileinput.files[1])
  data.append('bbb', fileinput.files[2])
  data.append('bbb', fileinput.files[3])

  const res = await axios.post('http://localhost:3000/ccc', data)
  console.log(res)
}
后端收到了上传的 aaa、bbb 的文件:

如果不知道前端上传字段,哪些是用于文件上传的字段,可以使用 anyfilesinterceptor:
@post('ddd')
@useinterceptors(anyfilesinterceptor({
    dest: 'uploads'
}))
uploadanyfiles(@uploadedfiles() files: array<express.multer.file>, @body() body) {
    console.log('body', body);
    console.log('files', files);
}
前端代码:
async function formdata4() {
  const data = new formdata()
  data.set('name', 'yun')
  data.set('age', 20)
  data.set('aaa', fileinput.files[0])
  data.set('bbb', fileinput.files[1])
  data.set('ccc', fileinput.files[2])
  data.set('ddd', fileinput.files[3])

  const res = await axios.post('http://localhost:3000/ddd', data)
  console.log(res)
}
同样识别出了所有 file 字段:

这就是 nest 上传文件的方式。
自定义存储
import * as multer from 'multer';
import * as fs from 'fs';
import * as path from 'path';

const storage = multer.diskstorage({
  // 自定义目录
  destination: function (req, file, cb) {
    try {
      fs.mkdirsync(path.join(process.cwd(), 'my-uploads'));
    } catch (e) {}

    cb(null, path.join(process.cwd(), 'my-uploads'));
  },
  // 自定义文件
  filename: function (req, file, cb) {
    const uniquesuffix =
      date.now() +
      '-' +
      math.round(math.random() * 1e9) +
      '-' +
      file.originalname;
    cb(null, file.fieldname + '-' + uniquesuffix);
  },
});

export { storage };
然后在 controller 使用这个 storage:


其实 nest 上传文件的方式就是对 multer 做了一层简单的封装。
文件校验
此外我们还可能对上传文件的大小,类型做限制。这部分可以放在 pipe 做。
我们生成一个 pipe:
nest g pipe file-size-validation-pipe --no-spec --flat
添加检查文件大小的逻辑,大于 10k 就抛出异常,返回 400 的响应:
import {
  pipetransform,
  injectable,
  argumentmetadata,
  httpexception,
  httpstatus,
} from '@nestjs/common';

@injectable()
export class filesizevalidationpipe implements pipetransform {
  transform(value: express.multer.file, metadata: argumentmetadata) {
    if (value.size > 10 * 1024) {
      throw new httpexception('文件大于 10k', httpstatus.bad_request);
    }
    return value;
  }
}
加到 uploadedfile 的参数里:

当上传一个图片大于 10k 的时候:

但像文件大小、类型的校验这种常见的逻辑,nest 内置了:
@post('fff')
@useinterceptors(fileinterceptor('aaa', {
    dest: 'uploads'
}))
uploadfile3(@uploadedfile(new parsefilepipe({
    validators: [
      new maxfilesizevalidator({ maxsize: 1000 }),
      new filetypevalidator({ filetype: 'image/jpeg' }),
    ],
})) file: express.multer.file, @body() body) {
    console.log('body', body);
    console.log('file', file);
}
maxfilesizevalidator 是校验文件大小、filetypevalidator 是校验文件类型。

返回的也是 400 响应,并且 message 说明了具体的错误信息。
而且这个错误信息 message 可以通过 exceptionfactory 工厂函数自定义。
我们也可以自己实现这样的 validator,只要继承 filevalidator 就可以:
import { filevalidator } from '@nestjs/common';

export class myfilevalidator extends filevalidator {
  constructor(options) {
    super(options);
  }

  isvalid(file: express.multer.file): boolean | promise<boolean> {
    if (file.size > 10000) {
      return false;
    }
    return true;
  }
  builderrormessage(file: express.multer.file): string {
    return `文件 ${file.originalname} 大小超出 10k`;
  }
}
然后在 controller 用一下:

浏览器上传文件:

可以看到我们自定义的 filevalidator 生效了。
最后注意限制文件大小,大小超过之后文件最终还是会上传到服务器,因为文件写入才能拿到相关信息,我们可以根据路径来删除不合规的文件。
以上就是nest.js使用multer实现文件上传功能的详细内容,更多关于nest.js multer文件上传的资料请关注代码网其它相关文章!


发表评论