简介
在现代的 web 应用中,图片预览是一个常见的需求。本文将介绍如何使用 vue3 和 typescript 开发一个图片预览组件,支持展示单张或多张图片,并提供了丰富的配置选项。
组件功能
- 支持单张或多张图片: 可以同时预览单张或多张图片,支持左右切换。
- 自定义配置选项: 提供了丰富的配置选项,如图片缩放方式、懒加载、组件尺寸等。
- 多张图片:无限循环预览,默认点击为首张,布局左右自适应父元素宽度,上下间距可通过参数(rowgap)控制。
组件实现
<script setup lang="ts" name="imagepreview">
import { computed } from "vue";

interface imageprops {
	imageurl: string | string[]; // 图片地址 ==> 必传
	imagefit?: "fill" | "contain" | "cover" | "none" | "scale-down"; // 图片缩放方式 ==> 非必传(默认为 cover)
	imagelazy?: boolean; // 是否懒加载 ==> 非必传(默认为 true)
	height?: string; // 组件高度 ==> 非必传(默认为 150px)
	width?: string; // 组件宽度 ==> 非必传(默认为 150px)
	borderradius?: string; // 组件边框圆角 ==> 非必传(默认为 8px)
	rowgap?: string; // 组件行间距 ==> 非必传(默认为 10px)
}
// 接收父组件参数并设置默认值
const props = withdefaults(defineprops<imageprops>(), {
	imageurl: "",
	imagefit: "cover",
	imagelazy: true,
	height: "150px",
	width: "150px",
	borderradius: "8px",
	rowgap: "10px"
});

// 图片列表
const imagelist = computed<string[]>(() => {
	if (array.isarray(props.imageurl)) {
		return props.imageurl;
	}
	return [props.imageurl];
});
</script>

<template>
	<div class="image-list">
		<div v-for="(item, index) in imagelist" :key="index">
			<el-image
				class="image-style"
				:src="item"
				hide-on-click-modal
				:initial-index="index"
				:preview-src-list="imagelist"
				:lazy="imagelazy"
				:fit="imagefit"
				:z-index="99999"
				preview-teleported
			/>
		</div>
	</div>
</template>

<style lang="scss" scoped>
.image-list {
	display: grid;
	grid-row-gap: v-bind(rowgap);
	grid-template-columns: repeat(auto-fill, v-bind(width));
	justify-content: space-between;
	.image-style {
		width: v-bind(width);
		height: v-bind(height);
		border-radius: v-bind(borderradius);
	}
}
</style>
知识拓展
vue2使用v-viewer实现图片预览
v-viewer
用于图片浏览的vue组件,支持旋转、缩放、翻转等操作,基于viewer.js。
在vue.js 2中使用v-viewer插件实现图片预览功能相对简单。v-viewer是一个vue.js的图片预览插件,可以轻松实现图片的放大、缩小和滑动预览等功能。以下是实现步骤:
安装 v-viewer 插件:
在项目目录下使用 npm 或 yarn 安装 v-viewer 插件。
npm install v-viewer --save
npm i -s viewerjs
# 或
yarn add v-viewer
yarn add  viewerjs
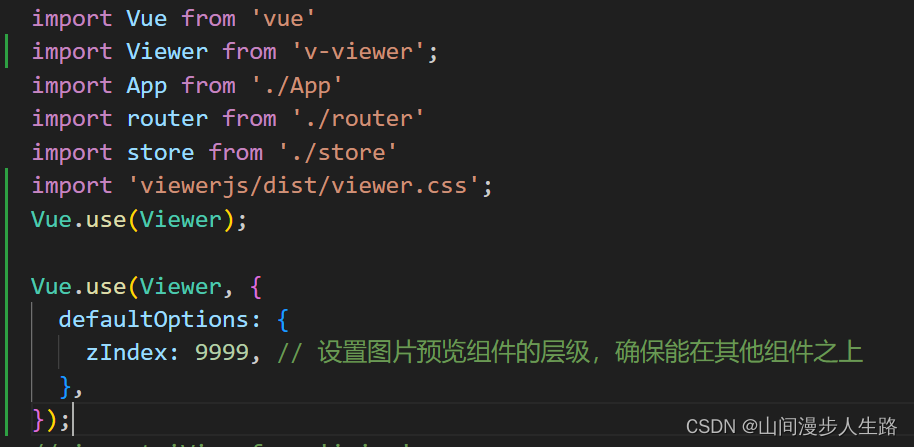
在 main.js 文件中引入和配置 v-viewer 插件:
这行放在:import app from './app.vue'; 之前
import viewer from 'v-viewer';

import 'viewerjs/dist/viewer.css';

vue.use(viewer);
或者
vue.use(viewer, {
  defaultoptions: {
    zindex: 9999, // 设置图片预览组件的层级,确保能在其他组件之上
  },
});
在需要预览图片的组件中使用 v-viewer 指令:
<template>
  <div>
    <!-- 点击图片触发预览 -->
    <img v-for="(image, index) in imagelist" :key="index" :src="image" v-viewer />
  </div>
</template>

<script>
export default {
  data() {
    return {
      imagelist: [
        'https://example.com/image1.jpg',
        'https://example.com/image2.jpg',
        // 添加更多图片链接
      ],
    };
  },
};
</script
也可以使用以下方法
<template>
  <div>
    <button type="button" class="button" @click="previewurl">url array</button>
  </div>
</template>
<script>
  export default {
    data() {
      sourceimageurls: [
        'https://picsum.photos/200/200?random=1',
        'https://picsum.photos/200/200?random=2',
      ],
    },
    methods: {
      previewurl () {
        // 如果使用`app.use`进行全局安装, 你就可以像这样直接调用`this.$viewerapi`
        const $viewer = this.$viewerapi({
          images: this.sourceimageurls
        });
      },
    },
  };
</script>
在上面的代码中,我们将 v-viewer 指令应用在 img 标签上,这样点击图片时会触发预览效果。
总结
通过使用 vue3 和 typescript,我们可以轻松地开发出高度可定制的图片预览组件。这个组件可以帮助我们展示图片,提供了丰富的配置选项,以满足不同项目的需求。
希望本文能帮助你更好地理解如何开发图片预览组件!如果你有任何问题或建议,请随时提出。
以上就是基于vue3+typescript实现图片预览组件的详细内容,更多关于vue3 typescript图片预览的资料请关注代码网其它相关文章!


发表评论