elasticsearch环境搭建
接下来我们在虚拟机centos中搭建skywalking的可观测性分析平台oap环境。skywalking默认使用h2内存进行数据的存储,我们可以替换存储源为elasticsearch保证其查询的高效及可用性。
1、创建目录
[root@izuf66wqqqhhqzkhd61vnoz ~]# mkdir /usr/local/skywalking
[root@izuf66wqqqhhqzkhd61vnoz ~]# cd /usr/local/skywalking/
2、将资源目录中的elasticsearch和skywalking安装包上传到虚拟机/usr/local/skywalking目录下。
elasticsearch-6.4.0.tar.gz — elasticsearch-6.4的安装包,skywalking对es版本号有一定要求,最好使用6.3.2以上版本,如果是7.x版本需要额外进行配置。
apache-skywalking-apm-6.5.0.tar.gz — skywalking的安装包
3、首先安装elasticsearch,将压缩包解压。
[root@izuf66wqqqhhqzkhd61vnoz skywalking]# tar -zxvf ./elasticsearch-6.4.0.tar.gz
修改linux系统的限制配置,将文件创建数修改为65535个。
(1) 修改系统中允许应用最多创建多少文件等的限制权限。linux默认来说,一般限制应用最多创建的文件是65535个。但是es至少需要65536的文件创建数的权限。
(2) 修改系统中允许用户启动的进程开启多个个线程。默认的linux限制root用户开启的进程可以开启任意数量的线程,其他用户开启的进程可以开启1024个线程。必须修改限制数为4096+。因为es至少需要4096的线程池预备。
[root@izuf66wqqqhhqzkhd61vnoz skywalking]# vi /etc/security/limits.conf
# 新增如下内容在limits.conf文件中
es soft nofile 65536
es hard nofile 65536
es soft nproc 4096
es hard nproc 4096
修改系统控制权限,elasticsearch需要开辟一个65536字节以上空间的虚拟内存。linux默认不允许任何用户和应用程序直接开辟这么大的虚拟内存。
[root@izuf66wqqqhhqzkhd61vnoz skywalking]# vi /etc/sysctl.conf
# 新增如下内容在sysctl.conf文件中,当前用户拥有的内存权限大小
vm.max_map_count=262144
# 让系统控制权限配置生效
[root@izuf66wqqqhhqzkhd61vnoz skywalking]# sysctl -p
建一个用户,用于elasticsearch启动。
es在5.x版本之后,强制要求在linux中不能使用root用户启动es进程。所以必须使用其他用户启动es进程才可以。
# 创建用户
useradd es
# 修改上述用户的密码
passwd es
# 修改elasticsearch目录的拥有者
chown -r es elasticsearch-6.4.0
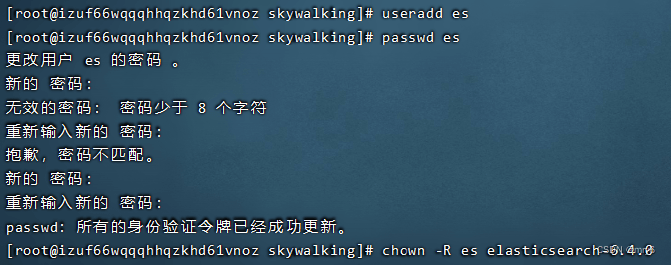
使用es用户启动elasticsearch
[root@izuf66wqqqhhqzkhd61vnoz ~]# java -version
java version "1.8.0_301"
java(tm) se runtime environment (build 1.8.0_301-b09)
java hotspot(tm) 64-bit server vm (build 25.301-b09, mixed mode)
# 切换用户
su es
# 到elasticsearch的bin目录下
cd elasticsearch-6.4.0
cd bin/
# 后台启动
./elasticsearch -d
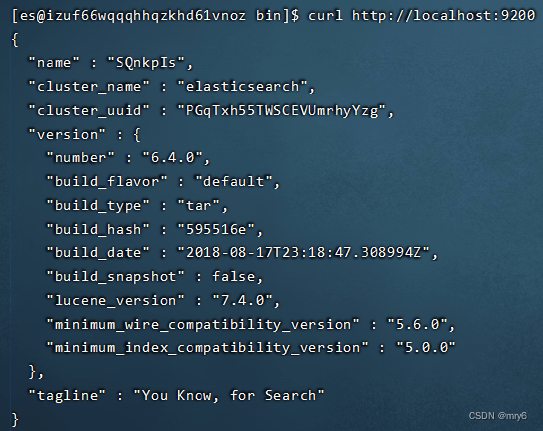
默认elasticsearch是不支持跨域访问的,所以在不修改配置文件的情况下我们只能从虚拟机内部进行访问测试elasticsearch是否安装成功,使用curl命令访问9200端口:
curl http://localhost:9200
如果显示出如下信息,就证明elasticsearch安装成功:
{
  "name" : "sqnkpis",
  "cluster_name" : "elasticsearch",
  "cluster_uuid" : "pgqtxh55twscevumrhyyzg",
  "version" : {
    "number" : "6.4.0",
    "build_flavor" : "default",
    "build_type" : "tar",
    "build_hash" : "595516e",
    "build_date" : "2018-08-17t23:18:47.308994z",
    "build_snapshot" : false,
    "lucene_version" : "7.4.0",
    "minimum_wire_compatibility_version" : "5.6.0",
    "minimum_index_compatibility_version" : "5.0.0"
  },
  "tagline" : "you know, for search"
}
skywalking环境搭建
安装skywalking,分为两个步骤:
(1) 安装backend后端服务
(2) 安装ui
1、首先切回到root用户,切换到目录下,解压skywalking压缩包。
# 切换到rootyongh
su root
# 切换到skywalking目录
cd /usr/local/skywalking
# 解压压缩包
tar -zxvf apache-skywalking-apm-6.5.0.tar.gz
2、修改skywalking存储的数据源配置:
[root@izuf66wqqqhhqzkhd61vnoz skywalking]# cd apache-skywalking-apm-bin/
[root@izuf66wqqqhhqzkhd61vnoz apache-skywalking-apm-bin]# vi config/application.yml
3、我们可以看到默认配置中,使用了h2作为数据源。我们将其全部注释。
#  h2:
#    driver: ${sw_storage_h2_driver:org.h2.jdbcx.jdbcdatasource}
#    url: ${sw_storage_h2_url:jdbc:h2:mem:skywalking-oap-db}
#    user: ${sw_storage_h2_user:sa}
#    metadataquerymaxsize: ${sw_storage_h2_query_max_size:5000}
4、将elasticsearch对应的配置取消注释:
storage:
  elasticsearch:
    namespace: ${sw_namespace:""}
    clusternodes: ${sw_storage_es_cluster_nodes:localhost:9200}
    protocol: ${sw_storage_es_http_protocol:"http"}
    truststorepath: ${sw_sw_storage_es_ssl_jks_path:"../es_keystore.jks"}
    truststorepass: ${sw_sw_storage_es_ssl_jks_pass:""}
    user: ${sw_es_user:""}
    password: ${sw_es_password:""}
    indexshardsnumber: ${sw_storage_es_index_shards_number:2}
    indexreplicasnumber: ${sw_storage_es_index_replicas_number:0}
#    # those data ttl settings will override the same settings in core module.
    recorddatattl: ${sw_storage_es_record_data_ttl:7} # unit is day
    othermetricsdatattl: ${sw_storage_es_other_metric_data_ttl:45} # unit is day
    monthmetricsdatattl: ${sw_storage_es_month_metric_data_ttl:18} # unit is month
#    # batch process setting, refer to https://www.elastic.co/guide/en/elasticsearch/client/java-api/5.5/java-docs-bulk-processor.html
    bulkactions: ${sw_storage_es_bulk_actions:1000} # execute the bulk every 1000 requests
    flushinterval: ${sw_storage_es_flush_interval:10} # flush the bulk every 10 seconds whatever the number of requests
    concurrentrequests: ${sw_storage_es_concurrent_requests:2} # the number of concurrent requests
    resultwindowmaxsize: ${sw_storage_es_query_max_window_size:10000}
    metadataquerymaxsize: ${sw_storage_es_query_max_size:5000}
    segmentquerymaxsize: ${sw_storage_es_query_segment_size:200}
5、默认使用了localhost下的es,所以我们可以不做任何处理,直接进行使用。
启动oap程序:
bin/oapservice.sh
6、这样安装backend后端服务就已经完毕了,接下来我们安装ui。
先来看一下ui的配置文件:
[root@izuf66wqqqhhqzkhd61vnoz apache-skywalking-apm-bin]# vi webapp/webapp.yml
[root@izuf66wqqqhhqzkhd61vnoz apache-skywalking-apm-bin]# cat webapp/webapp.yml
server:
  port: 9080
collector:
  path: /graphql
  ribbon:
    readtimeout: 10000
    # point to all backend's resthost:restport, split by ,
    listofservers: 127.0.0.1:12800
#默认启动端口
server:
  port: 8080
  ribbon:
    readtimeout: 10000
    #oap服务,如果有多个用逗号隔开
    listofservers: 127.0.0.1:12800
7、启动ui程序:
/bin/webappservice.sh
8、同时启动oap程序和ui程序
[root@izuf66wqqqhhqzkhd61vnoz apache-skywalking-apm-bin]# ./bin/startup.sh
skywalking oap started successfully!
skywalking web application started successfully!
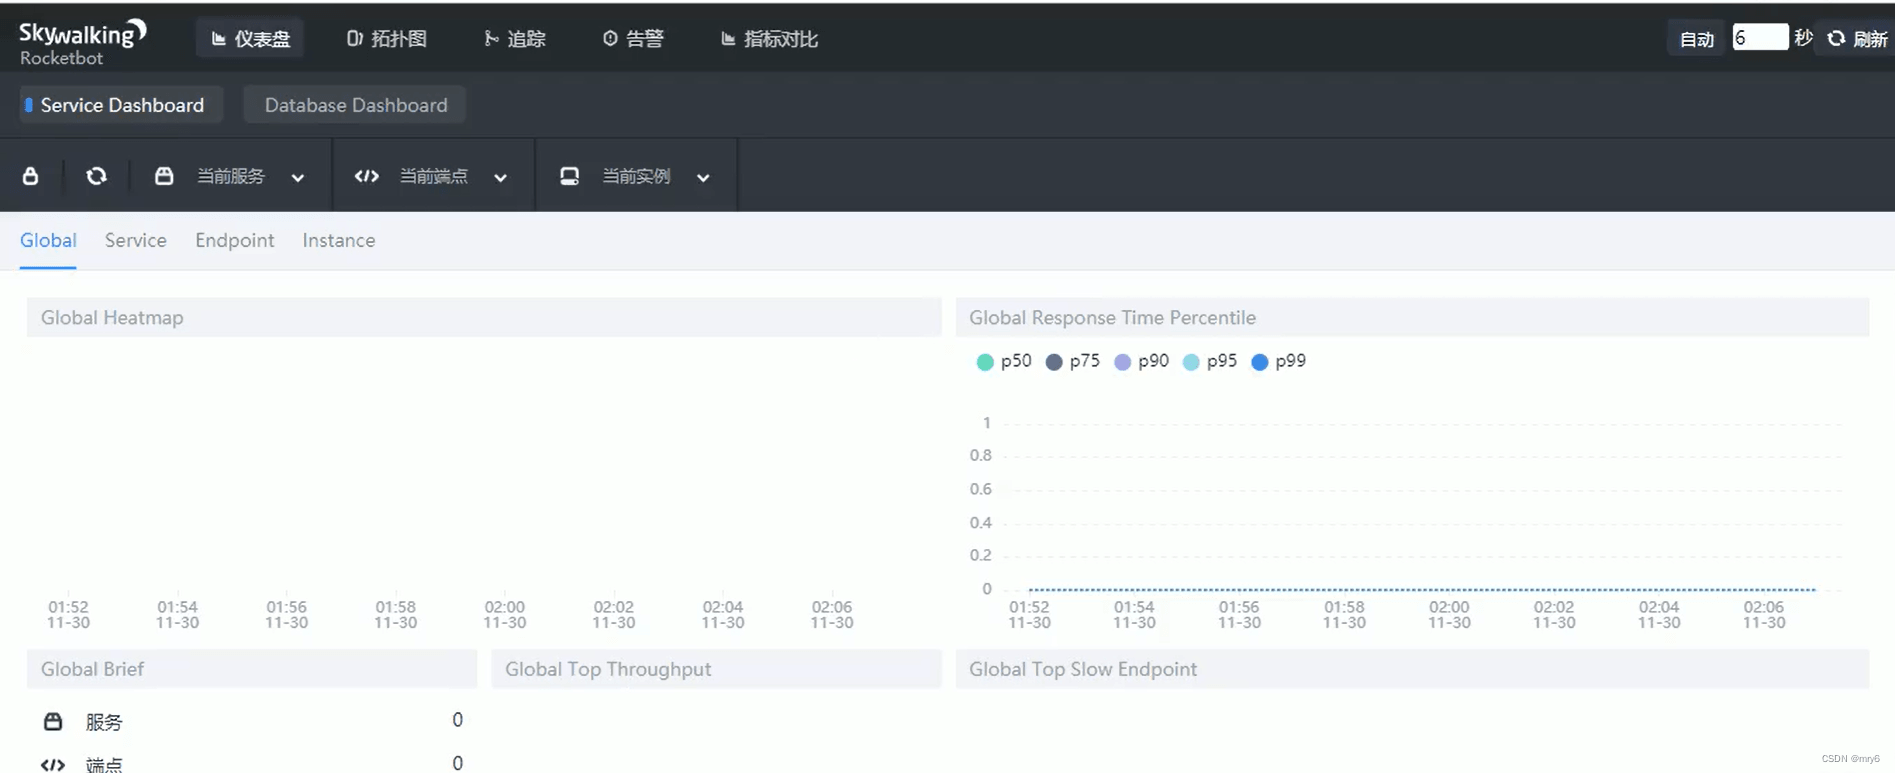
9、然后我们就可以通过浏览器访问skywalking的可视化页面了,访问地址:http://虚拟机ip地址:9080,如果出现下面的图,就代表安装成功了。
到此这篇关于skywalking环境搭建的文章就介绍到这了,更多相关skywalking环境搭建内容请搜索代码网以前的文章或继续浏览下面的相关文章希望大家以后多多支持代码网!


发表评论