
 我要评论
我要评论# centos 7 搭建 sendmail + dovecot 邮件服务器:smtp、pop3、imap 与 tls
1. 服务介绍
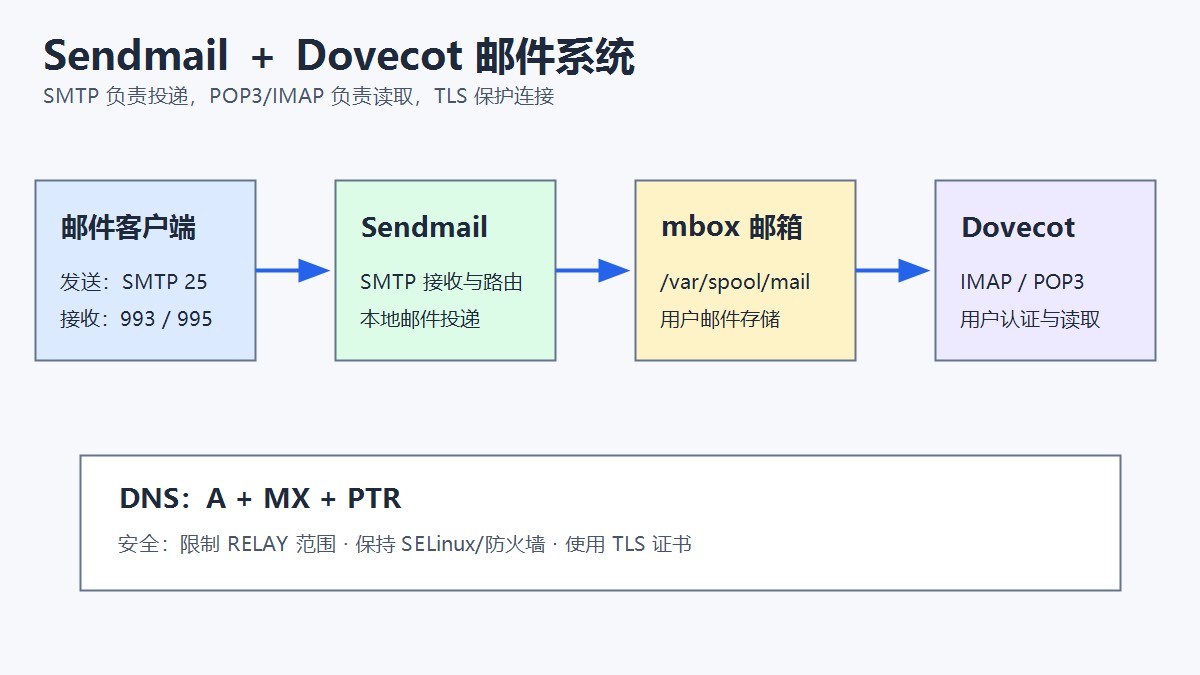
sendmail 是经典邮件传输代理 mta,负责通过 smtp 接收、路由和投递邮件。dovecot 提供 pop3、imap 和用户认证,使客户端能够读取服务器邮箱。
本实验在 centos 7 搭建适合教学和内网测试的邮件系统:sendmail 负责 smtp 与本地投递,dovecot 负责 pop3/imap,tls 保护客户端与服务器之间的连接。
2. 准备运行环境
• 服务端:centos 7.x,主机名 mail.example.com,地址 10.1.100.101。
• 客户端:linux 或 windows,地址 10.1.100.102。
• 邮件域:example.com。
• 操作权限:root 或具备 sudo 权限的管理员账号。
• 网络要求:软件源可用,服务端和客户端互通。
• dns 要求:实验环境至少配置 mail.example.com 的 a 记录和 example.com 的 mx 记录。
hostnamectl set-hostname mail.example.com
echo '10.1.100.101 mail.example.com mail' >> /etc/hosts
hostname -f
ip addr
ip route
yum repolist
示例 dns 记录:
mail.example.com.    in a     10.1.100.101
example.com.         in mx 10 mail.example.com.
3. 相关知识
• sendmail 是 mta,负责 smtp 收发和路由;dovecot 是邮件访问服务,负责 pop3、imap 和认证。
• smtp 常用 tcp 25;客户端提交常用 587;smtps 常用 465。imap 使用 143/993,pop3 使用 110/995。
• sendmail 默认可能只监听回环地址。允许远程连接前必须检查 daemon_options。
• centos 7 常默认安装 postfix。sendmail 与 postfix 不能同时占用 tcp 25,切换前应停止并禁用 postfix。
• /etc/mail/sendmail.mc 是主要模板;修改后用 make -c /etc/mail 生成 sendmail.cf,不要直接长期维护生成文件。
• /etc/mail/access 控制允许、拒绝和中继来源。错误配置 relay 会形成开放中继,被滥用发送垃圾邮件。
• 本实验只允许回环和 10.1.100.0/24 内网中继,不向任意互联网地址开放转发。
• mx 记录决定域的收信服务器;a 记录解析邮件主机;ptr 反向解析、spf、dkim、dmarc 影响公网投递信誉。
• sendmail 本地投递默认使用 mbox 邮箱。本文让 dovecot 读取 /var/spool/mail/用户名。
• tls 只加密传输,不替代账号权限、中继限制和反垃圾策略。
4. 实验步骤
4.1 安装软件并处理 mta 冲突
yum -y install sendmail sendmail-cf dovecot mailx openssl
systemctl disable --now postfix 2>/dev/null || true
ss -lntp | grep ':25 '
alternatives --set mta /usr/sbin/sendmail.sendmail
alternatives --display mta
确认 sendmail 组件:
rpm -q sendmail sendmail-cf dovecot mailx
sendmail -d0.1 -bv root
4.2 创建邮件用户和邮箱
useradd alice
useradd bob
passwd alice
passwd bob
touch /var/spool/mail/alice /var/spool/mail/bob
chown alice:mail /var/spool/mail/alice
chown bob:mail /var/spool/mail/bob
chmod 660 /var/spool/mail/alice /var/spool/mail/bob
检查账号和邮箱:
id alice
id bob
ls -l /var/spool/mail/alice /var/spool/mail/bob
4.3 配置 sendmail 基本参数
备份配置:
cp -a /etc/mail/sendmail.mc /etc/mail/sendmail.mc.bak.$(date +%f-%h%m%s)
cp -a /etc/mail/access /etc/mail/access.bak.$(date +%f-%h%m%s)
编辑 /etc/mail/sendmail.mc。找到仅监听 127.0.0.1 的行:
daemon_options(`port=smtp,addr=127.0.0.1, name=mta')dnl
在行首加 dnl 注释,使 sendmail 按系统网络配置监听 smtp:
dnl daemon_options(`port=smtp,addr=127.0.0.1, name=mta')dnl
在 mailer 定义之前加入本地域和主机名:
define(`confdomain_name', `mail.example.com')dnl
local_domain(`example.com')dnl
masquerade_as(`example.com')dnl
feature(`masquerade_envelope')dnl
把本地域写入 /etc/mail/local-host-names:
example.com
mail.example.com
4.4 配置中继范围
编辑 /etc/mail/access:
connect:127.0.0.1        relay
connect:10.1.100          relay
生成 access 数据库:
makemap hash /etc/mail/access.db < /etc/mail/access
connect:10.1.100 只适用于本实验网段。生产环境应缩小到实际客户端网段,或使用经过认证的 587 提交服务,禁止配置 connect:0 relay。
4.5 生成 tls 证书
实验环境生成自签名证书:
mkdir -p /etc/pki/mail/private
openssl req -new -x509 -nodes -days 3650 -newkey rsa:2048 \
  -keyout /etc/pki/mail/private/mail.key \
  -out /etc/pki/mail/mail.crt \
  -subj '/c=cn/st=lab/l=lab/o=example/ou=it/cn=mail.example.com'
chmod 600 /etc/pki/mail/private/mail.key
chmod 644 /etc/pki/mail/mail.crt
在 sendmail.mc 的 mailer 定义前加入:
define(`confcacert_path', `/etc/pki/tls/certs')dnl
define(`confcacert', `/etc/pki/tls/certs/ca-bundle.crt')dnl
define(`confserver_cert', `/etc/pki/mail/mail.crt')dnl
define(`confserver_key', `/etc/pki/mail/private/mail.key')dnl
生成配置并检查:
make -c /etc/mail
sendmail -c /etc/mail/sendmail.cf -bt -d0.4 </dev/null
4.6 配置 dovecot
备份配置目录:
cp -a /etc/dovecot /etc/dovecot.bak.$(date +%f-%h%m%s)
编辑 /etc/dovecot/dovecot.conf:
protocols = imap pop3
listen = *
编辑 /etc/dovecot/conf.d/10-mail.conf:
mail_location = mbox:~/mail:inbox=/var/spool/mail/%u
编辑 /etc/dovecot/conf.d/10-auth.conf:
disable_plaintext_auth = yes
auth_mechanisms = plain login
编辑 /etc/dovecot/conf.d/10-ssl.conf:
ssl = required
ssl_cert = </etc/pki/mail/mail.crt
ssl_key = </etc/pki/mail/private/mail.key
检查 dovecot 最终配置:
doveconf -n
doveconf -n | egrep 'protocols|listen|mail_location|ssl|auth_mechanisms'
4.7 配置防火墙并启动服务
firewall-cmd --permanent --add-service=smtp
firewall-cmd --permanent --add-service=imap
firewall-cmd --permanent --add-service=imaps
firewall-cmd --permanent --add-service=pop3
firewall-cmd --permanent --add-service=pop3s
firewall-cmd --reload
systemctl enable --now sendmail dovecot
systemctl restart sendmail dovecot
不要关闭 selinux。sendmail 和 dovecot 使用系统默认路径时,发行版策略通常已包含所需权限。出现拒绝时先检查 avc 日志。
4.8 本机发送测试邮件
echo 'sendmail local delivery test' | mail -s 'local test' alice
sleep 2
mail -u alice
也可以直接调用 sendmail:
想亲手搭建一个功能完整的邮件服务器吗?本教程手把手教你使用centos7部署sendmail+dovecot,轻松实现smtp收发、pop3/imap收信,并配置tls加密,点击获取详细的部署步骤和配置技巧,快速打造专属于你的邮件系统
5. 验证结果
5.1 验证服务和端口
systemctl --no-pager --full status sendmail dovecot
ss -lntp | egrep ':25|:110|:143|:993|:995'
firewall-cmd --list-services
预期 sendmail 监听 tcp 25,dovecot 监听 110、143、993、995;若配置 ssl = required,明文端口会要求升级到 tls。
5.2 验证 dns
dig +short a mail.example.com
dig +short mx example.com
dig +short -x 10.1.100.101
内网实验没有反向 dns 时,ptr 可能为空;公网邮件服务器应由地址提供商配置正确 ptr。
5.3 验证 sendmail 路由、队列和日志
sendmail -bv alice@example.com
mailq
mailstats
grep -e 'sendmail|dovecot' /var/log/maillog | tail -n 100
journalctl -u sendmail -u dovecot -n 100 --no-pager
查看邮箱是否收到邮件:
ls -lh /var/spool/mail/alice
tail -n 40 /var/spool/mail/alice
5.4 验证 smtp 与 tls
openssl s_client -starttls smtp -connect mail.example.com:25 -servername mail.example.com
连接后应看到 sendmail smtp 欢迎信息和证书信息。输入 ehlo client.example.com 可查看服务能力。
5.5 验证 dovecot 认证和收信协议
doveadm auth test alice
openssl s_client -connect mail.example.com:993 -servername mail.example.com
openssl s_client -connect mail.example.com:995 -servername mail.example.com
windows 或其他邮件客户端参数:
• 收件服务器:mail.example.com,imaps 端口 993,或 pop3s 端口 995。
• 发件服务器:mail.example.com,smtp 端口 25,仅限实验网段。
• 用户名:alice;密码:linux 用户密码。
• 自签名证书会触发信任提示,生产环境应更换受信任证书。
服务状态正常、端口监听正确、本地邮件进入 /var/spool/mail/alice、dovecot 认证成功、tls 握手正常,说明 sendmail 与 dovecot 邮件系统配置生效。
到此这篇关于centos 7 搭建 sendmail + dovecot 邮件服务器:smtp、pop3、imap 与 tls的文章就介绍到这了,更多相关centos 7 搭建邮件服务器内容请搜索代码网以前的文章或继续浏览下面的相关文章希望大家以后多多支持代码网!



发表评论