
 我要评论
我要评论nginx 是一个高性能的 http 和反向代理服务器,同时也是一个 imap/pop3 代理服务器。它的核心是其事件驱动的架构,这使得 nginx 能够处理大量的并发连接。nginx 的事件模块是实现这一高性能的关键部分。
1. 引言
nginx 作为高性能 web 服务器,其核心在于非阻塞、异步的事件驱动模型。而这一切都建立在 ngx_event_module 这套精巧的内部基础设施之上。很多开发者熟悉 nginx 的配置,却对底层事件处理机制一知半解,导致自己编写的模块性能不佳或行为诡异。
本教程将带你直接从源代码出发,剖析 nginx event 模块的工作原理,并配合实际代码示例,详细讲解 i/o 读写事件、定时器与超时的注册、触发和管理。读完后,你将有能力编写稳定高效的 nginx 事件驱动模块。
2. nginx 事件驱动架构一览
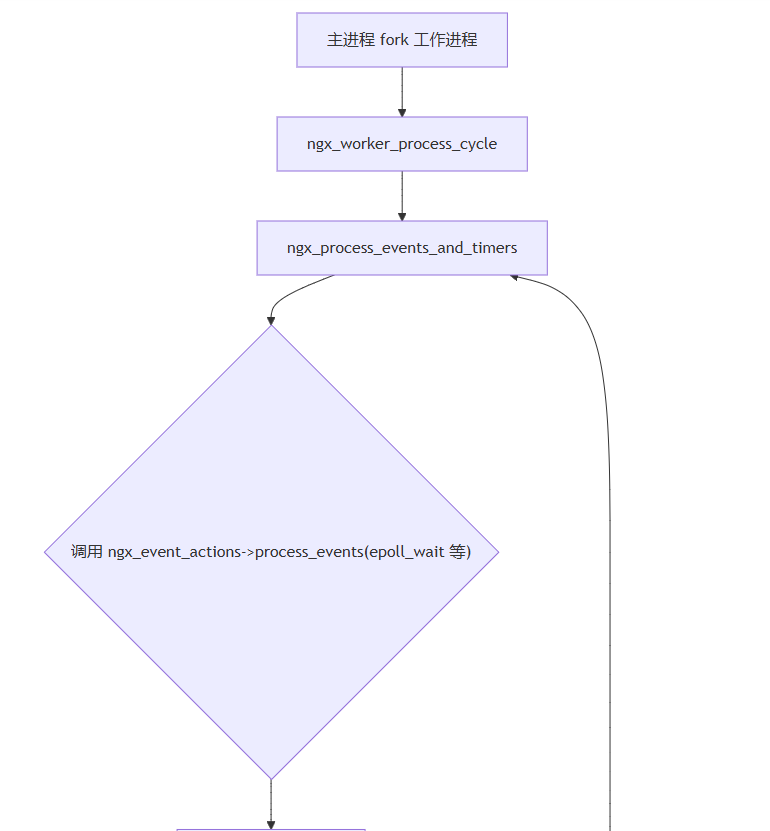
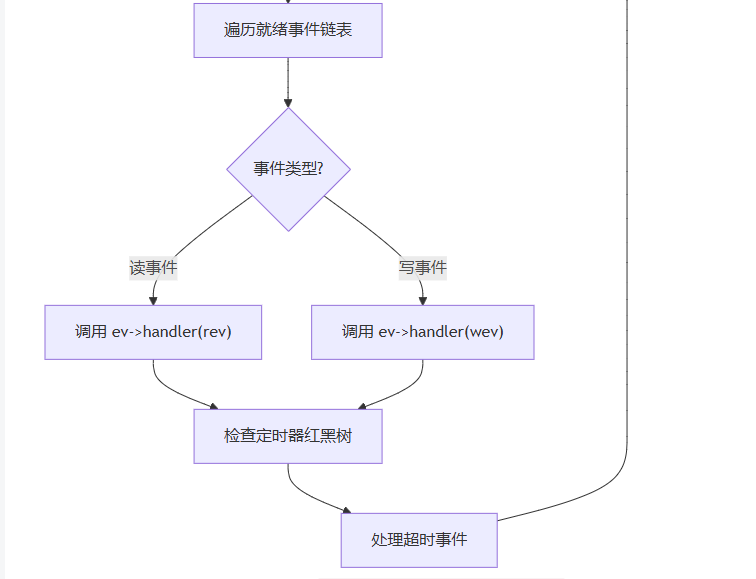
在开始源码之旅前,我们先通过一张流程图建立整体认知:
nginx 工作进程的核心循环就是反复调用 ngx_process_events_and_timers(),该函数内部完成:
- 调用平台相关的事件收集器(
epoll_wait/kqueue等) - 遍历就绪事件并执行对应的回调
handler - 处理定时器红黑树,执行超时事件
下一节我们将聚焦事件模块的核心数据结构,理解这一切是如何串联起来的。
3. 事件模块核心数据结构(源码剖析)
3.1 事件基类:ngx_event_t
在 src/event/ngx_event.h 中定义了整个事件系统的灵魂:
struct ngx_event_s {
    void            *data;          // 通常指向 ngx_connection_t
    unsigned         write:1;       // 1 = 写事件,0 = 读事件
    unsigned         accept:1;      // 标记为 accept 事件
    unsigned         instance:1;    // 用于检测过期事件
    unsigned         active:1;      // 是否已加入事件收集器
    unsigned         disabled:1;
    unsigned         ready:1;       // 事件就绪标记
    unsigned         oneshot:1;
    unsigned         complete:1;
    unsigned         eof:1;
    unsigned         error:1;
    unsigned         timedout:1;    // 超时标记
    unsigned         timer_set:1;   // 是否已加入定时器红黑树
    unsigned         delayed:1;
    unsigned         deferred_accept:1;
    unsigned         pending_eof:1;
    unsigned         posted:1;
    ngx_int_t        index;         // 模块索引上下文
    ngx_log_t       *log;
    ngx_rbtree_node_t   timer;      // 定时器红黑树节点
    ngx_queue_t      queue;         // 用于 post 链表
    ngx_event_handler_pt  handler;  // 回调函数指针
};
逐字段解释:
data:关联的ngx_connection_t,这样在回调中就能极快地拿到连接上下文active:该事件是否已被添加到 epoll 中。防止重复添加ready:当 epoll_wait 返回后设为 1,表示该事件已就绪timedout:当超时发生时(例如读取客户端请求太慢),框架将该标志置 1,回调里检测到此标志后可终止或清理timer_set:该事件是否已挂载到红黑树中handler:这才是我们要关注的重点——事件就绪时执行的函数指针
3.2 连接封装:ngx_connection_t
每个 tcp 连接都对应一个 ngx_connection_t,其中内嵌了两个事件:
struct ngx_connection_s {
    void               *data;
    ngx_event_t        *read;    // 读事件
    ngx_event_t        *write;   // 写事件
    ngx_socket_t        fd;
    ngx_recv_pt         recv;
    ngx_send_pt         send;
    // ...
};关键点:read->handler 和 write->handler 即我们模块中需要设置的读写回调函数。nginx 在就绪时会自动调用。
4. 事件处理主循环:ngx_process_events_and_timers
该函数位于 src/event/ngx_event.c,是整个事件引擎的调度中心。简化后的流程如下:
void ngx_process_events_and_timers(ngx_cycle_t *cycle) {
    ngx_uint_t  flags;
    ngx_msec_t  timer;
    // 1. 从红黑树获得最近超时时间
    timer = ngx_event_find_timer();
    // 2. 调用平台实现,等待 io 事件
    (void) ngx_process_events(cycle, timer, flags);
    // 3. 执行延迟的事件链表(posted events)
    ngx_event_process_posted(cycle, &ngx_posted_accept_events);
    ngx_event_process_posted(cycle, &ngx_posted_events);
    // 4. 处理超时事件
    ngx_event_expire_timers();
}
这里的 ngx_process_events 实际上是一个宏,最终调用的是平台相关的 ngx_event_actions.process_events,在 linux 下即 ngx_epoll_process_events。整个过程清晰诠释了事件驱动的精髓:等待 i/o → 处理 i/o → 处理超时 → 循环。
5. i/o 读写事件详解
5.1 读事件:从 fd 读取数据
读事件主要用于接收客户端数据或 upstream 响应。通常的注册流程为:
// 假设 c 是已经建立好的 ngx_connection_t *c
c->read->handler = ngx_http_my_read_handler;  // 自定义回调
// 将事件添加到 epoll
if (ngx_handle_read_event(c->read, 0) != ngx_ok) {
    ngx_close_connection(c);
    return;
}
在回调 ngx_http_my_read_handler 中,我们需要自己处理具体的 recv 以及连接管理:
static void ngx_http_my_read_handler(ngx_event_t *rev) {
    ssize_t  n;
    ngx_connection_t  *c = rev->data;
    u_char  buf[1024];
    if (rev->timedout) {          // 检查超时标志
        ngx_log_error(ngx_log_info, c->log, 0, "read timeout");
        ngx_close_connection(c);
        return;
    }
    n = c->recv(c, buf, sizeof(buf));
    if (n == ngx_again) {
        return;                   // 暂无数据,等待下次通知
    }
    if (n == ngx_error || n == 0) {
        ngx_close_connection(c);
        return;
    }
    // 处理接收到的 buf ...
    // 然后重新添加读事件(如果还想继续读)
    if (ngx_handle_read_event(rev, 0) != ngx_ok) {
        ngx_close_connection(c);
    }
}注意:rev->timedout 标志由事件框架在 ngx_event_expire_timers() 中设置,这是检测 i/o 超时的标准方法。如果你的模块没有任何读活跃,框架会自动触发该事件的 handler 并置 timedout=1。
5.2 写事件:将数据发送出去
写事件的触发时机是在数据无法一次写完(socket 缓冲区满)时,由 epoll 通知我们可以继续写。以发送一段缓冲区为例:
static void ngx_http_my_write_handler(ngx_event_t *wev) {
    ssize_t  n, size;
    ngx_connection_t  *c = wev->data;
    if (wev->timedout) {
        ngx_log_error(ngx_log_info, c->log, 0, "write timeout");
        ngx_close_connection(c);
        return;
    }
    // 假设 my_buf 是需要发送的 ngx_buf_t
    size = ngx_buf_size(my_buf);
    n = c->send(c, my_buf->pos, size);
    if (n == ngx_again) {
        return;
    }
    if (n == ngx_error) {
        ngx_close_connection(c);
        return;
    }
    my_buf->pos += n;
    if (n == size) {
        ngx_log_debug0(ngx_log_debug_http, c->log, 0, "write finished");
        // 删除写事件:写完了就不再需要监听可写
        if (ngx_handle_write_event(wev, 0) != ngx_ok) {
            ngx_close_connection(c);
            return;
        }
        // ... 后续处理,例如关闭连接或等待下一个请求
    }
}初读这里可能会困惑:为什么要删除写事件? 因为 epoll 默认是水平触发(lt),只要缓冲区不满就会反复通知可写,造成 cpu 空转。所以 nginx 推荐:只在需要写入数据时才临时添加写事件,写完后立刻删除。
6. 定时器与超时机制
6.1 设置超时
每个 ngx_event_t 都内嵌了一个红黑树节点 timer,只需设置超时毫秒数并调用添加接口即可:
// 为读事件设置 30 秒超时
ngx_add_timer(c->read, 30000);
或者使用更通用的宏 ngx_event_add_timer(ev, timer),作用相同。当时间到达后,框架会在主循环中自动调用 handler 并将 ev->timedout 设为 1。我们只需在回调里检查该标志。
6.2 取消超时
在事件正常完成或主动关闭连接前,务必取消定时器,否则可能导致悬挂指针:
if (c->read->timer_set) {
    ngx_del_timer(c->read);
}
6.3 两种超时场景
- 连接空闲超时:长时间无数据交互。可通过
ngx_add_timer设置,在 read handler 中检测timedout后关闭连接。 - 写超时:发送数据对端迟迟不收包。同样在 write handler 中检查
timedout,防止资源泄漏。
7. 实战示例:一个最简单的事件驱动模块
下面我们编写一个 nginx 模块,它会在接收到 http 请求后,先睡眠模拟耗时操作,然后返回响应。通过这个例子,你将完整看到读事件、定时器、写事件的组合用法。
7.1 模块配置与上下文
typedef struct {
    ngx_msec_t  delay;      // 模拟延迟时间(毫秒)
} ngx_http_delay_loc_conf_t;
在配置解析时获取 delay 指令。模块指令定义略。
7.2 请求处理入口
static ngx_int_t
ngx_http_delay_handler(ngx_http_request_t *r)
{
    ngx_http_delay_loc_conf_t  *dlcf;
    // 非 get 请求不处理
    if (r->method != ngx_http_get) {
        return ngx_declined;
    }
    dlcf = ngx_http_get_module_loc_conf(r, ngx_http_delay_module);
    // 创建一个定时事件,延迟后写响应
    ngx_event_t  *ev = ngx_pcalloc(r->pool, sizeof(ngx_event_t));
    if (ev == null) {
        return ngx_http_internal_server_error;
    }
    ev->data = r;
    ev->handler = ngx_http_delay_timeout_handler;
    ev->log = r->connection->log;
    ngx_add_timer(ev, dlcf->delay);
    // 注意:这里返回 ngx_done 告诉 nginx 不要完成请求,后续由我们手动调用 ngx_http_finalize_request
    return ngx_done;
}
7.3 定时器回调(生成响应并发送)
static void
ngx_http_delay_timeout_handler(ngx_event_t *ev)
{
    ngx_http_request_t  *r = ev->data;
    ngx_buf_t    *b;
    ngx_chain_t   out;
    // 构造响应体
    b = ngx_create_temp_buf(r->pool, 1024);
    if (b == null) {
        ngx_http_finalize_request(r, ngx_http_internal_server_error);
        return;
    }
    b->last = ngx_sprintf(b->last, "delay response after %m ms\n",
                          (ngx_msec_t) ev->timer.key);  // 简化 demo 使用 key 演示
    // 设置响应头
    r->headers_out.status = ngx_http_ok;
    r->headers_out.content_length_n = b->last - b->pos;
    ngx_http_send_header(r);
    out.buf = b;
    out.next = null;
    // 发送响应,并设置写事件处理(如有必要)
    ngx_int_t  rc = ngx_http_output_filter(r, &out);
    if (rc == ngx_again || rc == ngx_error) {
        ngx_http_finalize_request(r, rc);
        return;
    }
    // 主动完成请求
    ngx_http_finalize_request(r, ngx_ok);
}
7.4 结合读超时的健壮版写法
上面的例子仅为演示定时器。在实际网络通信中,我们往往需要在读写事件上叠加超时。以读取客户端额外数据为例:
// 某读事件回调
static void
my_read_handler(ngx_event_t *rev)
{
    ngx_connection_t  *c = rev->data;
    if (rev->timedout) {
        ngx_log_error(ngx_log_err, c->log, 0, "client read timeout");
        ngx_close_connection(c);
        return;
    }
    // 读取并处理...
    if (ngx_handle_read_event(rev, 0) != ngx_ok) {
        ngx_close_connection(c);
        return;
    }
    // 续订超时(重置30秒计时)
    ngx_del_timer(rev);
    ngx_add_timer(rev, 30000);
}
这样客户端若在 30 秒内无新数据,timedout 就会被置位,连接得以安全关闭。
9. 总结编译与配置
前面我们实现了延迟响应模块的核心逻辑,本节将补全模块的编译与集成细节,让你能够真正跑起来。
8.1 config 文件
nginx 的第三方模块通过一个 config 文件告知构建系统模块名称、源文件集合。在项目根目录下创建 ngx_http_delay_module/ 文件夹,并新建 config 文件:
ngx_addon_name=ngx_http_delay_module
http_modules="$http_modules ngx_http_delay_module"
ngx_addon_srcs="$ngx_addon_srcs $ngx_addon_dir/ngx_http_delay_module.c"
ngx_addon_name:模块名称,通常与目录名一致。http_modules:将该模块追加到 http 模块链表中,nginx 才能在启动时加载它。ngx_addon_srcs:需要编译的源文件,路径中的$ngx_addon_dir会被自动展开为当前模块目录。
如果需要支持动态模块,可在 config 中额外添加:
if [ -n "$auto_configure" ]; then
    have=ngx_http_delay . auto/have
fi
本文以静态编译为主,动态编译部分可参考 nginx 官方文档。
8.2 模块结构定义与指令解析
将以下完整代码追加到 ngx_http_delay_module.c 中,即可完成模块注册与指令解析(前文的 handler 等函数保留在原文件中):
/* 模块指令定义 */
static ngx_command_t ngx_http_delay_commands[] = {
    { ngx_string("delay"),
      ngx_http_loc_conf|ngx_conf_take1,
      ngx_http_delay,
      ngx_http_loc_conf_offset,
      0,
      null },
    ngx_null_command
};
/* 模块上下文 */
static ngx_http_module_t ngx_http_delay_module_ctx = {
    null,                                /* preconfiguration */
    null,                                /* postconfiguration */
    null,                                /* create main configuration */
    null,                                /* init main configuration */
    null,                                /* create server configuration */
    null,                                /* merge server configuration */
    ngx_http_delay_create_loc_conf,      /* create location configuration */
    ngx_http_delay_merge_loc_conf        /* merge location configuration */
};
/* 模块定义 */
ngx_module_t ngx_http_delay_module = {
    ngx_module_v1,
    &ngx_http_delay_module_ctx,          /* module context */
    ngx_http_delay_commands,             /* module directives */
    ngx_http_module,                     /* module type */
    null,                                /* init master */
    null,                                /* init module */
    null,                                /* init process */
    null,                                /* init thread */
    null,                                /* exit thread */
    null,                                /* exit process */
    null,                                /* exit master */
    ngx_module_v1_padding
};
紧接着实现指令解析函数与 location 配置的创建/合并函数:
/* delay 指令解析函数 */
static ngx_int_t
ngx_http_delay(ngx_conf_t *cf, ngx_command_t *cmd, void *conf)
{
    ngx_http_delay_loc_conf_t  *dlcf = conf;
    ngx_str_t  *value;
    ngx_int_t   ms;
    value = cf->args->elts;
    ms = ngx_parse_time(&value[1], 0);
    if (ms == ngx_error) {
        ngx_conf_log_error(ngx_log_emerg, cf, 0,
                           "invalid value \"%v\"", &value[1]);
        return ngx_conf_error;
    }
    dlcf->delay = (ngx_msec_t) ms;
    return ngx_conf_ok;
}
/* 创建 location 配置 */
static void *
ngx_http_delay_create_loc_conf(ngx_conf_t *cf)
{
    ngx_http_delay_loc_conf_t  *conf;
    conf = ngx_pcalloc(cf->pool, sizeof(ngx_http_delay_loc_conf_t));
    if (conf == null) {
        return null;
    }
    conf->delay = ngx_conf_unset_msec;
    return conf;
}
/* 合并 location 配置 */
static char *
ngx_http_delay_merge_loc_conf(ngx_conf_t *cf, void *parent, void *child)
{
    ngx_http_delay_loc_conf_t  *prev = parent;
    ngx_http_delay_loc_conf_t  *conf = child;
    ngx_conf_merge_msec_value(conf->delay, prev->delay, 1000);
    return ngx_conf_ok;
}
要点说明:
delay指令仅允许在location块内出现(ngx_http_loc_conf),接收一个时间参数。ngx_parse_time()可以解析5000、5s、5000ms等形式,统一转为毫秒存入delay。- 合并配置时默认延迟为 1000 毫秒(1 秒),若用户未指定
delay则使用该默认值。
8.3 nginx.conf 配置示例
动态编译:先通过 --add-dynamic-module 将模块编译为 .so,再在 nginx.conf 中用 load_module 加载:
load_module modules/ngx_http_delay_module.so;
events {
    worker_connections  1024;
}
http {
    server {
        listen       80;
        server_name  localhost;
        location /delay {
            delay 5000;   # 延迟 5 秒后返回响应
        }
    }
}静态编译:在 nginx 源码目录执行 ./configure --add-module=/path/to/ngx_http_delay_module,然后 make && make install。此时 nginx.conf 中无需 load_module,直接使用 delay 指令即可。
编译完成后,启动 nginx,访问 http://localhost/delay,大约 5 秒后即可看到 “delay response after …” 的响应内容,证明你的事件驱动模块已经可以正常工作了。
8. 总结
通过本文的源码剖析和实战示例,你应该已经掌握:
- nginx 事件模块的三大核心数据结构:
ngx_event_t、ngx_connection_t及定时红黑树。 - i/o 读写事件的注册、回调处理与水平触发下的**“写即删”**策略。
- 利用
ngx_add_timer/ngx_del_timer精确控制超时,并在回调中通过timedout标志做出响应。 - 如何将这些知识点组合成一个完整的 nginx 事件驱动模块。
事件模型是 nginx 高性能的根基,理解并善用它将让你的 c 模块开发水平迈上一个新台阶。建议你在实际开发中多翻阅 src/event/ 和 src/http/ 下的源码,结合本文的脉络,很快就能写出生产级别的事件处理代码。
到此这篇关于nginx 事件模块从源码到实战的 event 用法示例详解的文章就介绍到这了,更多相关nginx 事件模块 event 用法内容请搜索代码网以前的文章或继续浏览下面的相关文章希望大家以后多多支持代码网!



发表评论