前言
在传统 qt 多线程开发中,我们常通过继承 qthread 或使用 movetothread 来实现后台任务。但这种方式需要手动管理线程生命周期、信号槽连接、对象所有权等,样板代码多、易出错。
而 qt concurrent 提供了一种更高层次的抽象:你只关心“做什么”,不关心“在哪做”。它基于线程池自动调度任务,极大简化了并发编程。
qtconcurrent是qt特有的一个用于实现并发任务的模块,提供了一组基于任务(task-based)而非线程(thread-based)的并发api。它底层使用 qthreadpool + qrunnable 实现,自动管理线程池,你无需手动创建/销毁线程。如果有一个或多个短期简单任务会造成主线程的阻塞,又觉得为了他单独设计一个任务类再移动到子线程太过繁琐,我们可以使用qtconcurrent。
一、qtconcurrent::run()
qtconcurrent::run()是最简单的单任务线程实现。在写具体代码之前,我们需要先在pro文件中添加相应模块:
qt += concurrent
然后添加头文件:
#include <qtconcurrent>
和之前一样,通过点击界面按钮触发测试代码:
int compute(int a, int b) {
    qthread::msleep(500);
    return a + b;
}

void mainwindow::on_btn_thread_start_3_clicked()
{
    static int a = 10, b = 20;
    a++;
    b++;

    // 1️⃣ 启动异步任务
    qfuture<int> future = qtconcurrent::run(compute, a, b);

    // 2️⃣ 创建 watcher 监听完成事件
    qfuturewatcher<int> *watcher = new qfuturewatcher<int>(this);

    // 3️⃣ 连接 finished 信号(在主线程触发!)
    connect(watcher, &qfuturewatcher<int>::finished, this, [watcher]() {
        qdebug() << "result:" << watcher->result();
        watcher->deletelater(); // 自动清理内存
    });

    // 4️⃣ 将 future 绑定到 watcher
    watcher->setfuture(future);
}
启动任务的时候,需要传递任务函数和参数:
qfuture<int> future = qtconcurrent::run(compute, a, b);
返回值是第一个可监听的对象,代表一个未来会得到的的结果。
这一步是同步不阻塞的,随后我们要马上对future对象进行观察。注意qfuture本身是没有信号的,因此无法使用信号槽。所以我们要单独设置一个qfuturewatcher来进行观察,最后绑定future。代码比较简单,就不详细说了。注意watcher要在最终的槽函数中析构哦。
可以看到compute任务函数中,除了简单的加法运算之外,还特意做了线程延时。
最后,我们运行代码:
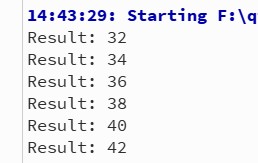
每次点击都会叠加运算,并且界面完全不阻塞。
这种写法特别适合做简单但有可能造成阻塞的任务,相比于特意重载qthread或使用movetothread,简直是清爽多了。(以前工作不太懂,所以也没用过,实在可惜。)
结合我过往的开发经验,说几个可能的应用场景:
(1)批量加载:本地有多个图片文件需要加载读取,甚至还要进行尺寸压缩
(2)多点绘图:qimage中需要绘制多线段,这常常伴随鼠标滑动绘图,为了不阻塞主线程影响流畅度,应当考虑线程。
二、qtconcurrent::mapped()
除此之外,qtconcurrent也提供了其他的方式,比如qtconcurrent::mapped()(并行转换)和 qtconcurrent::filtered()(并行过滤)。
我尝试了mapped的方式,它是一种批量的线程实现,在某些场合下挺实用的。
接下来,尝试一下图片的批量加载,并进行灰度转换,最后弹窗显示出来。
代码如下:
qimage converttograyscale(const qstring& filepath)
{
    // 模拟阻塞
    qthread::msleep(2000);
    qimage img(filepath);
    if (img.isnull()) {
        qwarning() << "failed to load:" << filepath;
        return qimage(); // 返回空图
    }
    // 转为黑白(灰度)
    return img.converttoformat(qimage::format_grayscale8);
}

void mainwindow::on_btn_thread_start_3_1_clicked()
{
    // 1. 选择多个图片文件(最多10个)
    qstringlist filepaths = qfiledialog::getopenfilenames(
        this,
        "选择图片(最多10张)",
        qdir::homepath(),
        "images (*.png *.jpg *.jpeg *.bmp *.gif)"
        );

    if (filepaths.isempty()) {
        return;
    }

    if (filepaths.size() > 10) {
        qmessagebox::warning(this, "警告", "最多只能选择10张图片!");
        filepaths = filepaths.mid(0, 10);
    }

    // 2. 禁用按钮,防止重复点击
    // m_convertbutton->setenabled(false);

    // 3. 启动并发转换
    qfuture<qimage> future = qtconcurrent::mapped(filepaths, converttograyscale);

    // 4. 设置 watcher 监听完成
    if (!m_watcher) {
        m_watcher = new qfuturewatcher<qimage>(this);
        connect(m_watcher, &qfuturewatcher<qimage>::finished,
                this, &mainwindow::onconversionfinished);
    }
    m_watcher->setfuture(future);
}

void mainwindow::onconversionfinished()
{
    // 5. 获取所有结果(顺序与输入 filepaths 一致)
    qlist<qimage> results = m_watcher->future().results();

    // 6. 为每张有效图片弹窗显示
    int validcount = 0;
    for (int i = 0; i < results.size(); ++i) {
        if (!results[i].isnull()) {
            qstring title = qstring("结果 %1").arg(++validcount);
            showimageindialog(results[i], title);
        }
    }

    // 7. 恢复按钮
    // m_convertbutton->setenabled(true);

    if (validcount == 0) {
        qmessagebox::information(this, "提示", "没有成功加载任何图片。");
    }
}

void mainwindow::showimageindialog(const qimage &img, const qstring &title)
{
    qdialog* dialog = new qdialog(this);
    dialog->setattribute(qt::wa_deleteonclose); // 关闭时自动 delete
    dialog->setwindowtitle(title);
    dialog->resize(600, 400);

    qlabel* label = new qlabel(dialog);
    label->setpixmap(qpixmap::fromimage(img).scaled(
        dialog->size(), qt::keepaspectratio, qt::smoothtransformation));
    label->setalignment(qt::aligncenter);

    qvboxlayout* layout = new qvboxlayout(dialog);
    layout->addwidget(label);
    dialog->setlayout(layout);

    dialog->show();
}
我们关注一下这里:
qfuture<qimage> future = qtconcurrent::mapped(filepaths, converttograyscale);
先是参数,后是接口,这一点与run有区别。接口的参数是qstring,但传递的参数却是qstringlist,也就是说qt会自动帮我们适应,处理批量线程。可以看到返回值依旧是qfuture,它的参数是qimage,而不是批量的qlist<qimage>,这一点要注意哦。
同样的任务函数做了一点延时模拟阻塞,顺便转换了下灰度。
最后就是完成的槽函数,这代表所有任务都已经完成。
qlist<qimage> results = m_watcher->future().results();
返回值可以通过results接口获取。之后就是常规的弹窗,就不多解释了。
运行代码,查看结果:
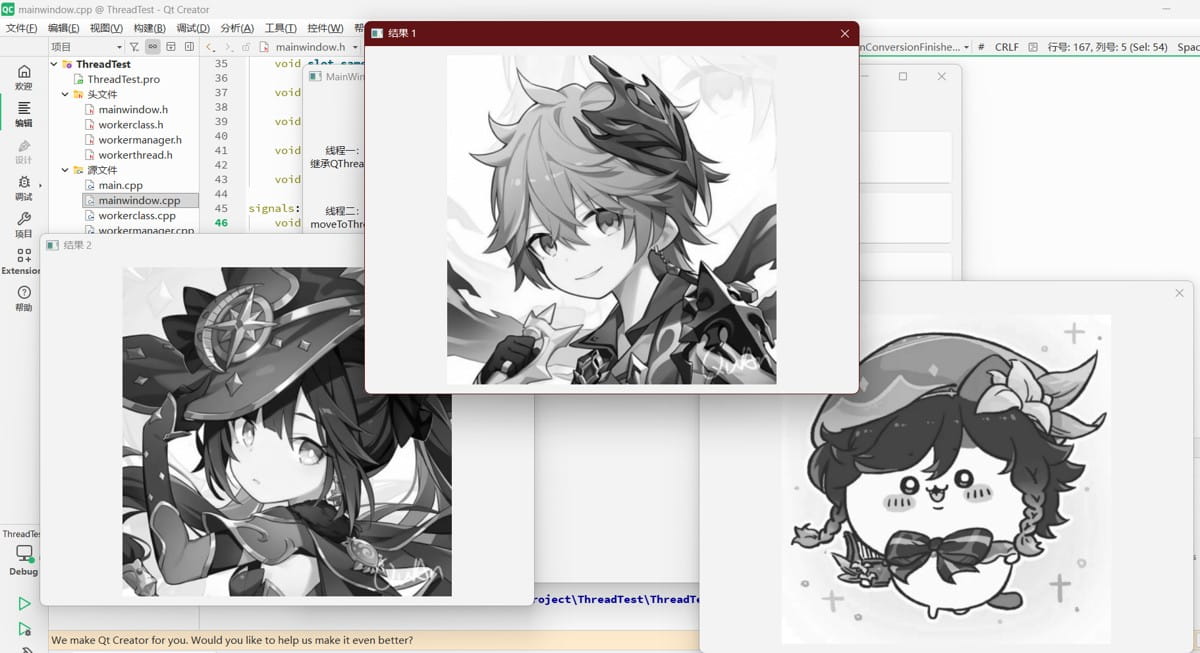
在延时的两秒时间内,界面完全没有被阻塞,随后三个弹窗一起弹出来,效果还是很好的。
三、总结
有关qtconcurrent的其他接口测试就先忽略了。光是run和mapped两种方式,我就已经觉得非常实用了。
以下是qtconcurrent和qthread+worker的对比:
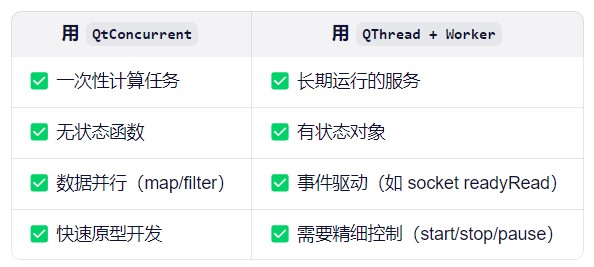
可以看到,qtconcurrent更适合用作一次性的计算任务,特别是简单一次性的并行任务。如果是需要长期运行的任务,如while循环获取,还是采用qthread+worker比较好。
到此这篇关于qt线程qtconcurrent模块的使用的文章就介绍到这了,更多相关qt qtconcurrent模块内容请搜索代码网以前的文章或继续浏览下面的相关文章希望大家以后多多支持代码网!


发表评论