一、rust 智能指针详解
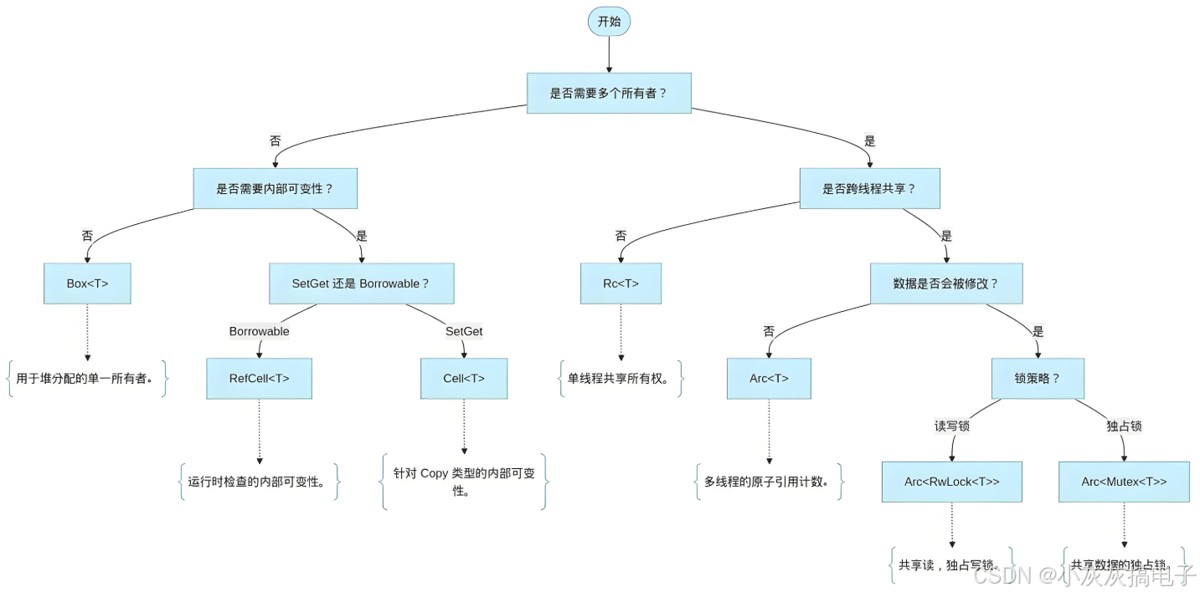
智能指针是rust中管理内存和所有权的核心工具,通过封装指针并添加元数据(如引用计数)来实现安全的内存管理。以下是主要类型及其原理、使用场景和示例:
1、box<t>:堆内存分配
- 原理:在堆上分配内存,栈中存储指向堆的指针。所有权唯一,离开作用域时自动释放内存。
- 使用场景:
- 编译时未知大小的类型(如递归类型)
- 转移大数据所有权避免拷贝
- 特质对象(trait object)的动态分发
- 示例:
fn main() {
    let b = box::new(5); // 在堆上存储整数5
    println!("b = {}", b); // 输出: b = 5
} // 离开作用域,堆内存自动释放
2、rc<t>:引用计数指针
- 原理:通过引用计数跟踪值的所有者数量。当计数归零时自动释放内存。仅适用于单线程。
- 使用场景:多个部分只读共享数据(如图结构、共享配置)。
- 示例:
use std::rc::rc;
fn main() {
    let a = rc::new(10);
    let b = rc::clone(&a); // 引用计数+1
    println!("count: {}", rc::strong_count(&a)); // 输出: count: 2
} // 离开作用域,计数归零,内存释放
3、refcell<t>:内部可变性
- 原理:在运行时检查借用规则(而非编译时),允许通过不可变引用修改内部数据。使用
borrow()和borrow_mut()访问。 - 使用场景:需要修改只读共享数据时(如缓存更新)。
- 示例:
use std::cell::refcell;
fn main() {
    let c = refcell::new(42);
    *c.borrow_mut() += 1; // 运行时借用检查
    println!("c = {}", c.borrow()); // 输出: c = 43
}
4、arc<t>:原子引用计数
- 原理:类似
rc<t>,但使用原子操作保证线程安全。性能略低于rc。 - 使用场景:多线程共享数据(需配合
mutex)。 - 示例:
use std::sync::arc;
use std::thread;
fn main() {
    let val = arc::new(100);
    let handle = thread::spawn(move || {
        println!("thread: {}", val); // 安全共享
    });
    handle.join().unwrap();
}
5、mutex<t>与rwlock<t>:线程同步
mutex<t>:互斥锁,一次仅允许一个线程访问数据。use std::sync::{arc, mutex}; use std::thread; fn main() { let counter = arc::new(mutex::new(0)); let mut handles = vec![]; for _ in 0..10 { let c = arc::clone(&counter); let handle = thread::spawn(move || { let mut num = c.lock().unwrap(); *num += 1; // 修改受保护数据 }); handles.push(handle); } for handle in handles { handle.join().unwrap(); } println!("result: {}", *counter.lock().unwrap()); // 输出: result: 10 }rwlock<t>:读写锁,允许多个读取或单个写入。use std::sync::rwlock; let lock = rwlock::new(5); { let r1 = lock.read().unwrap(); // 多个读取并发 let r2 = lock.read().unwrap(); } { let mut w = lock.write().unwrap(); // 独占写入 *w += 1; }
6、weak<t>:解决循环引用
- 原理:weak 是 rc 的非拥有智能指针,它不增加引用计数。
- 使用场景:用于解决循环引用问题
- 示例:
use std::rc::{rc, weak};
use std::cell::refcell;

// 定义节点结构
struct node {
    value: i32,
    parent: refcell<weak<node>>, // 使用 weak 避免循环引用
    children: refcell<vec<rc<node>>>, // 子节点使用 rc
}

fn main() {
    // 创建叶子节点
    let leaf = rc::new(node {
        value: 3,
        parent: refcell::new(weak::new()),
        children: refcell::new(vec![]),
    });

    // 创建分支节点,并设置 leaf 为其子节点
    let branch = rc::new(node {
        value: 5,
        parent: refcell::new(weak::new()),
        children: refcell::new(vec![rc::clone(&leaf)]),
    });

    // 设置 leaf 的父节点为 branch(使用 downgrade 创建弱引用)
    *leaf.parent.borrow_mut() = rc::downgrade(&branch);

    // 尝试升级 leaf 的父节点
    if let some(parent) = leaf.parent.borrow().upgrade() {
        println!("leaf 的父节点值: {}", parent.value); // 输出: leaf 的父节点值: 5
    } else {
        println!("父节点已被释放");
    }

    // 当 branch 被丢弃时,leaf 的 parent 升级会失败
}
7、组合模式
rc<refcell<t>>:单线程内共享可变数据。let shared_data = rc::new(refcell::new(vec![1, 2])); shared_data.borrow_mut().push(3); // 修改共享数据
arc<mutex<t>>:多线程共享可变数据(最常见组合)。let data = arc::new(mutex::new(0)); // 多线程修改数据(见上文mutex示例)
8、对比总结
| 类型 | 线程安全 | 可变性 | 适用场景 |
|---|---|---|---|
| box<t> | ❌ | 所有权唯一 | 堆分配、递归类型 |
| rc<t> | ❌ | 不可变共享 | 单线程共享只读数据 |
| refcell<t> | ❌ | 内部可变 | 单线程运行时借用检查 |
| arc<t> | ✅ | 不可变共享 | 多线程共享只读数据 |
| mutex<t> | ✅ | 线程安全可变 | 多线程互斥修改数据 |
| rwlock<t> | ✅ | 读写分离 | 读多写少场景 |
二、rust 智能指针示例
以下是一个复杂的 rust 智能指针示例,结合了 rc、refcell 和自定义智能指针,模拟图形渲染场景中的资源管理:
use std::rc::{rc, weak};
use std::cell::refcell;
use std::ops::deref;

// 自定义智能指针:带引用计数的纹理资源
struct texture {
    id: u32,
    data: vec<u8>,
}

impl texture {
    fn new(id: u32, size: usize) -> self {
        texture {
            id,
            data: vec![0; size],
        }
    }
}

// 自定义智能指针:texturehandle
struct texturehandle(rc<texture>);

impl texturehandle {
    fn new(texture: texture) -> self {
        texturehandle(rc::new(texture))
    }

    fn get_id(&self) -> u32 {
        self.0.id
    }
}

impl deref for texturehandle {
    type target = texture;

    fn deref(&self) -> &self::target {
        &self.0
    }
}

// 场景节点:支持父子关系
struct scenenode {
    name: string,
    texture: option<texturehandle>,
    children: refcell<vec<rc<refcell<scenenode>>>>,
    parent: refcell<weak<refcell<scenenode>>>,
}

impl scenenode {
    fn new(name: &str) -> rc<refcell<self>> {
        rc::new(refcell::new(scenenode {
            name: name.to_string(),
            texture: none,
            children: refcell::new(vec::new()),
            parent: refcell::new(weak::new()),
        }))
    }

    fn add_child(parent: &rc<refcell<scenenode>>, child: &rc<refcell<scenenode>>) {
        child.borrow_mut().parent.replace(rc::downgrade(parent));
        parent.borrow_mut().children.borrow_mut().push(rc::clone(child));
    }

    fn set_texture(&mut self, texture: texturehandle) {
        self.texture = some(texture);
    }

    fn print_tree(&self, depth: usize) {
        let indent = "  ".repeat(depth);
        println!("{}{}", indent, self.name);
        if let some(tex) = &self.texture {
            println!("{}texture id: {}", indent, tex.get_id());
        }
        for child in self.children.borrow().iter() {
            child.borrow().print_tree(depth + 1);
        }
    }
}

fn main() {
    // 创建共享纹理资源
    let shared_texture = texturehandle::new(texture::new(101, 1024));

    // 创建场景节点
    let root = scenenode::new("root");
    let camera = scenenode::new("camera");
    let mesh1 = scenenode::new("mesh1");
    let mesh2 = scenenode::new("mesh2");

    // 设置纹理
    {
        let mut root_mut = root.borrow_mut();
        root_mut.set_texture(shared_texture);
    }

    // 构建场景层级
    scenenode::add_child(&root, &camera);
    scenenode::add_child(&root, &mesh1);
    scenenode::add_child(&mesh1, &mesh2);

    // 打印场景树
    root.borrow().print_tree(0);

    // 验证引用计数
    println!("\nreference counts:");
    println!("root strong: {}", rc::strong_count(&root));
    println!("root weak: {}", rc::weak_count(&root));
}
示例解析:
自定义智能指针
texturehandle- 包装
rc<texture>实现资源共享 - 实现
deref获得透明访问 - 提供资源 id 访问方法
- 包装
场景图管理
scenenode- 使用
rc<refcell<scenenode>>实现共享所有权和内部可变性 - 子节点列表:
refcell<vec<rc<...>>>实现运行时可变借用 - 父节点:
refcell<weak<...>>避免循环引用
- 使用
资源共享机制
- 纹理资源通过
texturehandle共享 - 节点树通过
rc共享所有权 - 使用
weak引用打破循环依赖
- 纹理资源通过
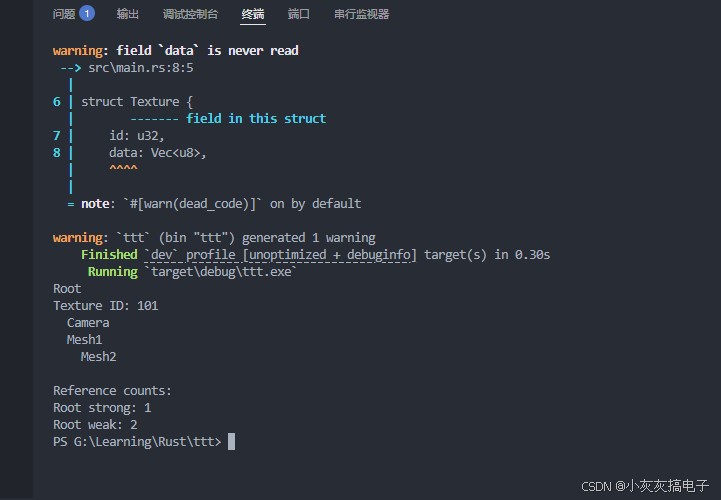
输出示例:
root
texture id: 101
  camera
  mesh1
    mesh2

reference counts:
root strong: 1
root weak: 2
ps g:\learning\rust\ttt>
关键特性:
- 内存安全:自动管理资源释放
- 内部可变性:通过
refcell修改不可变引用 - 循环引用防护:
weak指针避免内存泄漏 - 透明访问:通过
deref实现直接访问 - 运行时借用检查:
refcell在运行时验证借用规则
到此这篇关于rust 智能指针的使用详解的文章就介绍到这了,更多相关rust 智能指针内容请搜索代码网以前的文章或继续浏览下面的相关文章希望大家以后多多支持代码网!


发表评论