如何在node.js项目中使用 swagger 来自动生成 api接口文档,使用生成方式有很多种。本文基于
swagger-jsdoc+swagger-ui-express快速实现
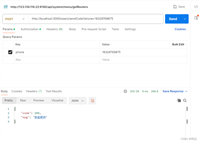
1、直接使用swagger-ui-express
// 方便来浏览和测试api
npm i swagger-ui-express
import { express } from 'express';
import swaggerui from 'swagger-ui-express';
const options = {
  openapi: "3.0.3",
      info: {
      title: '文档相关接口',
      version: '1.0.0',
      description: 'api documentation using swagger',
  },
  tags: [{
    name: "develop",
    description: "开发者站点管理接口",
  }],
  paths: {
    "/develop": {
      "get": {
      "tags": ["develop"],
      "description": "获取文档列表!",
          "responses": {
            "200": {
              "description":"返回字符串数组"
            }
          }
      }
    }
  }
}
const swaggerinstall = (app: express) => {
  app.use(
    '/apidoc',
    swaggerui.serve,
    swaggerui.setup(options)
  );
};
export { swaggerinstall };

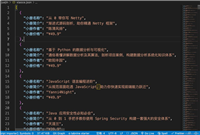
直接使用配置去生成接口文档,更改接口的时候需要同时去更改配置,会相对麻烦点。这时候就可以使用swagger-jsdoc,通过在接口上面注释信息后,就可以自动更新对应的api接口文档,其本质是通过读取该接口对应的注释,然后再转成对应的配置。
2、配合swagger-jsdoc
jsdoc 注释是一种特殊的注释语法,用于为 javascript 代码添加文档化和类型提示信息。它是基于 jsdoc 规范的一部分,旨在提供一种标准的方式来描述代码的结构、功能和类型信息
作用:接口文档注释有更新,对应的api文档会同步更新。确保接口变更,配置会同时去更改
npm i swagger-jsdoc
import { express } from 'express';
import path from 'path';
import swaggerdoc from 'swagger-jsdoc';
import swaggerui from 'swagger-ui-express';

const swaggeroptions = {
  swaggerdefinition: {
    info: {
      title: '文档相关接口',
      version: '1.0.0',
      description: 'api documentation using swagger',
    },
  },
  apis: [path.join(__dirname, './routes/*.ts')], // 指定包含 api 路由的文件或文件夹路径
};
const swaggerinstall = (app: express) => {
  app.use(
    '/apidoc',
    swaggerui.serve,
    swaggerui.setup(swaggerdoc(swaggeroptions))
  );
};
export { swaggerinstall };
//在对应的接口,注释对应的文档
import express from 'express';
import {
  developgetfile,
  developgetfilelist,
} from '../controllers/developcontrollers';
const router = express.router();
/**
 * @openapi
 * /develop:
 *   get:
 *     tags: [develop]
 *     description: 获取文档列表!
 *     responses:
 *       200:
 *         description: 返回字符串数组.
 */
router.get('/', developgetfilelist);
参考
https://github.com/surnet/swagger-jsdoc
https://github.com/scottie1984/swagger-ui-express
以上就是在node.js中使用swagger自动生成api接口文档的详细内容,更多关于node.js swagger生成api文档的资料请关注代码网其它相关文章!


发表评论